
Ok

Ok

What is the question
Cancel
PICTURE FRAMES
 CUSTOM PICTURE FRAMES
Design Your Framing Package Online!
Add Mats, Glass & Acrylic, Mounting Board And More.





Search
☰

My Account
Log In
Favorites
Saved Designs
Shopping Cart

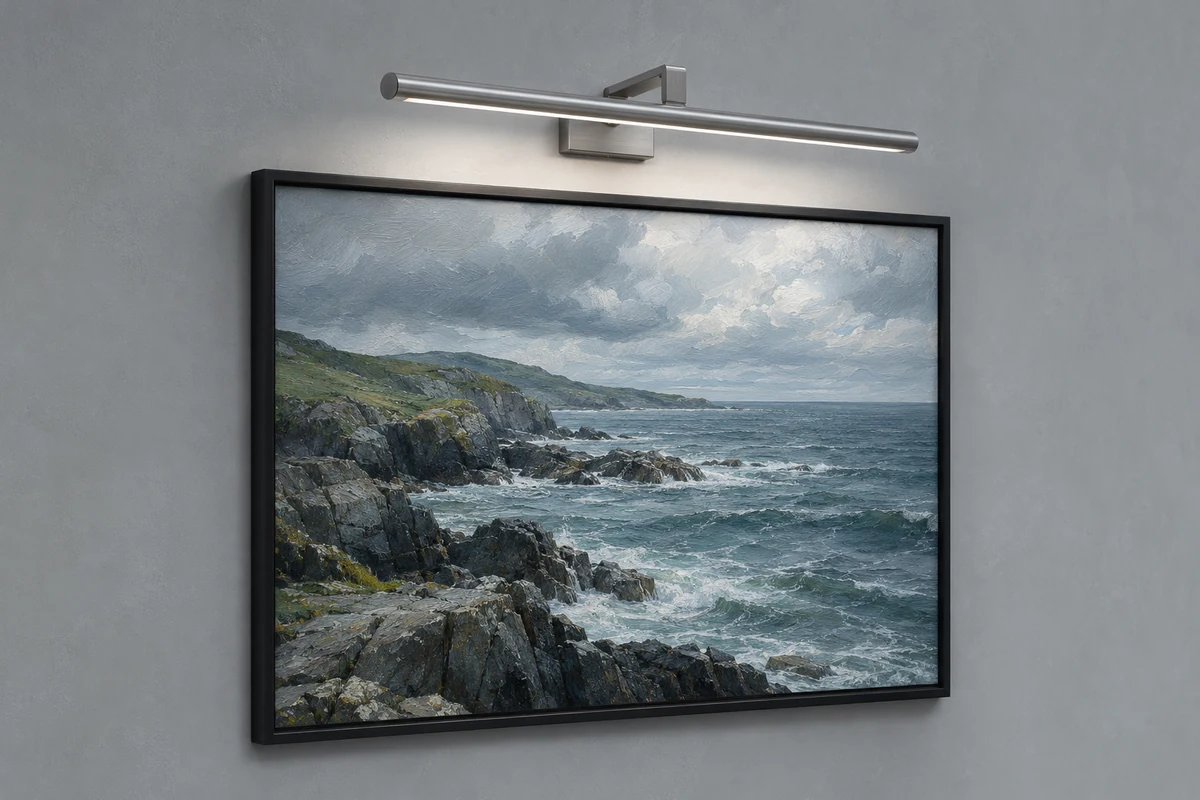
Start at the position allowed by your fixture's mounting instructions. Center the light over the artwork, then check that the top edge and both lower corners are lit. Use the side view to distinguish the height of the light head from the position of the bracket.
By WebPictureFrames.com. Family owned with more than 40 years of custom framing experience. Updated .
How high should the light sit above the picture?
Start at the height or position shown in the instructions for your fixture. Center the light head over the visible artwork and check that it can light the top of the image and reach both lower corners. The right height depends on how far the head extends from the wall, where it aims, and how far the frame projects in front of the image.
For a wall-mounted light, hang the picture or decide exactly where it will hang first. Otherwise a change in artwork height will also change the gap above it. On an adjustable fixture, change one setting at a time. If you raise the arm and tilt the head at the same time, it is harder to see which adjustment helped.
Where to measure the gap above the frame
Use the top outside edge of the frame as your reference. Measure straight up to the underside of the light head. That is the visible gap. The mounting plate sits against the wall and can be higher or lower than the head. Use the manufacturer's bracket or template to transfer the chosen position to the wall.
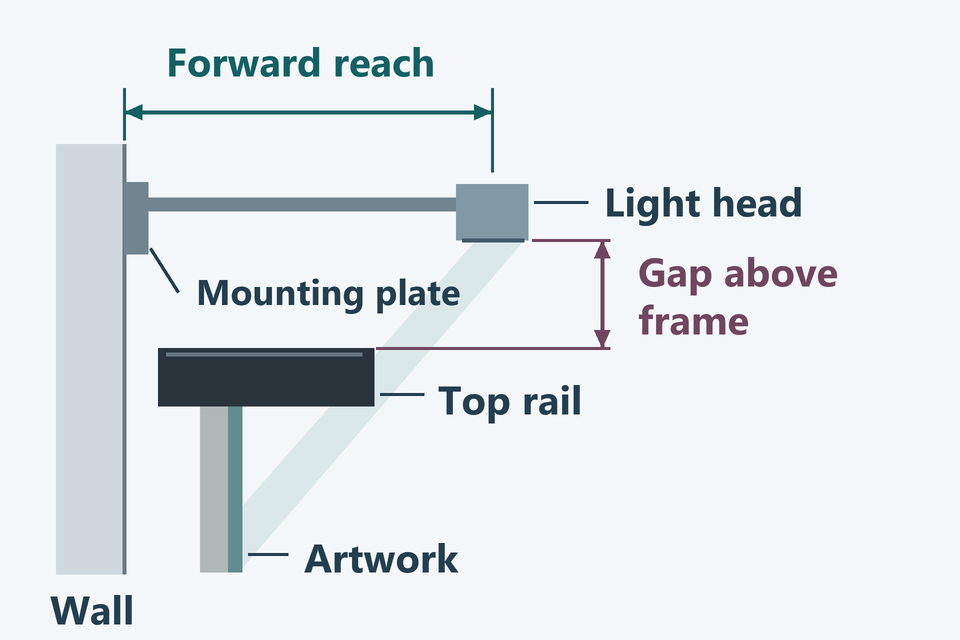
- Height above the frame. Keep this measurement vertical. A diagonal measurement to the projecting head combines the gap and the reach.
- Forward reach. From the side, look at where the light head sits compared with the face of the top rail. A deep rail can shade the top of the artwork when the head sits too far back.
- Distance to the visible image. A wide top mat adds space between the top rail and the start of the artwork. Look for light on the image itself, especially if the mat catches the brightest part.
For example, two frames can have the same gap above the top rail. On the frame with a wide mat and a deep top rail, light may fall across the mat while the print still looks dim. Check the view from the side and adjust the head within the fixture's range before changing the wall position.
Example of the gap and the screw marks
Suppose the top of your frame is 60 inches above the floor and the underside of your chosen light head is 64 inches above the floor. The visible gap is 4 inches. If the fixture's template puts the screw marks at 66 inches, use those marks for the bracket. This example shows how to read the two measurements. Your fixture's bracket shape determines how they relate.
Check the position before marking holes
- Mark the image center. Stand straight in front of the frame. Find the midpoint of the visible image and carry that line up to the proposed fixture position. A mat with uneven side borders can shift this midpoint away from the frame's center.
- Preview the outline. Hold up a paper outline of the head and bracket or use the fixture's paper template. Check the gap and the alignment from the doorway and from the spot you normally view the picture. Set aside enough space above a cordless light to lift it off for charging.
- Check the center and edges. If your fixture has a supported way to test it in position, switch it on and check the top edge, both lower corners, and any dark passages in the art. Otherwise make the outline and clearance checks first, then fine-tune the aim once the fixture is supported by its mount.
- Check for reflections. If the frame has glass or acrylic, look from a seated position and a standing position. Switch the picture light off and on. That helps you tell whether the bright reflection comes from the new fixture or from a window or room lamp.
- Transfer the bracket position. Use the bracket or template to mark the mounting points for the fixture you have. For a plug-in model, check the cord's route to the outlet. Check that any plug, cord or mount behind the frame leaves the picture hanging as intended.
For two pictures side by side, check each piece from its own center and keep the relationship between light and frame consistent where the two installations allow it. A taller portrait can need a different aim than a shorter landscape, even if the top edges of their frames are aligned.
Check the position under the room lighting you normally use. In daylight the wall may be bright enough to hide the effect of the fixture. In the evening, a bright reflection can be easier to see from a sofa or dining chair. If you are judging a newly installed light, compare the same picture with the light off and then on before changing an adjustment.
How to fix uneven light or glare
| What you notice | What to check or adjust |
|---|---|
| Thin shadow across the top of the artwork | Look from the side for a projecting top rail. If the fixture allows it, bring the head farther forward or adjust its aim so the light clears the rail. |
| Top is bright and lower corners are dim | Use the fixture's permitted aim adjustments, then compare the top and bottom again. On a tall picture, check the coverage for the specific model before moving the bracket. |
| One side is brighter | Check whether the head is centered over the image and whether the frame sits square to the wall. Judge both edges from straight in front of the artwork. |
| The light appears in the glass | Check from your usual viewpoint. Try a small change in aim or position within the fixture's adjustment range, and recheck coverage at the edges. |
| The window still appears with the picture light off | Change the shade or viewing position, or consider reflection-control glazing if you are reframing the artwork. |
Start with the lowest usable setting while you compare positions. Brightness can make the center more visible, but a rail can still shade the upper edge. Our glass and acrylic guide covers glazing choices for reducing reflections. If sun reaches the wall, see our guide to protecting framed art from sunlight.
When you make an adjustment, give extra attention to the dark areas in the picture. For a landscape with a naturally bright sky and dark foreground, look for detail in the foreground and the lower corners. You can use the painting's textures and edges to judge how far the fixture's light reaches.
Match the position to the way your light mounts
- Light that rests on the frame. The SITU Rechargeable Micro rests over the top of a suitable frame. Center it over the artwork, check clearance behind the frame for the battery pack, and use the adjustable head to aim the light.
- Removable bar on a mount. The SITU Rechargeable Touch lifts away from its magnetic mount for charging. Check the space around the fixture so you can remove and replace the bar easily.
- Plug-in light with a remote. With a SITU plug-in Classic, plan the cord route and check the view from the spot where you will adjust the light. Assess the top and bottom of the image from that spot.
If you have yet to choose a light, use our picture frame lighting buying guide to compare coverage and controls. Already have a fixture? Keep a note of the gap and arm setting after you finish. If you take the light down to paint or move the artwork, those measurements will help you restore the position.
Frequently asked questions about picture light height
How many inches above a frame should I mount a picture light?
Start at the position specified for your fixture and use its permitted adjustments to light the top and lower corners of the artwork. There is no fixed gap that works for every frame. For a wall mount, record the vertical gap from the top outside edge of the frame to the underside of the light head.
Do I measure to the light head or the mounting plate?
Measure to the underside of the light head to record how high the light sits. Use the fixture's bracket, template, or mounting instructions to locate the screw holes. The head and the plate can sit at different heights.
Should a picture light be centered over the frame or the artwork?
Start by centering the light head over the visible artwork. Check it from the front. The center of the image and the center of the outside frame may differ if the mat borders are uneven.
Can I use the same mount height for a deep frame?
Check the frame from the side. A projecting top rail can block part of the light, even when the fixture sits at the same height as it did over a flatter frame. Use the permitted arm or head adjustments to bring light past the rail.
Does a picture light always need a wall bracket?
Some lights attach to the frame or wall, depending on the model. Others, such as the rechargeable SITU Micro, rest on top of a suitable frame. In that case, you adjust the head and check the fit at the top of the frame.
Made in the USA
Handcrafted by American framing experts
Family Owned
Serving customers for over 40 years
Premium Shipping
Professionally packaged for safe delivery
Ready to Hang
Hardware included with all frames
Framing Specialists
Over 40 years of custom framing experience
