
Ok

Ok

What is the question
Cancel
PICTURE FRAMES
 CUSTOM PICTURE FRAMES
Design Your Framing Package Online!
Add Mats, Glass & Acrylic, Mounting Board And More.





Search
☰

My Account
Log In
Favorites
Saved Designs
Shopping Cart
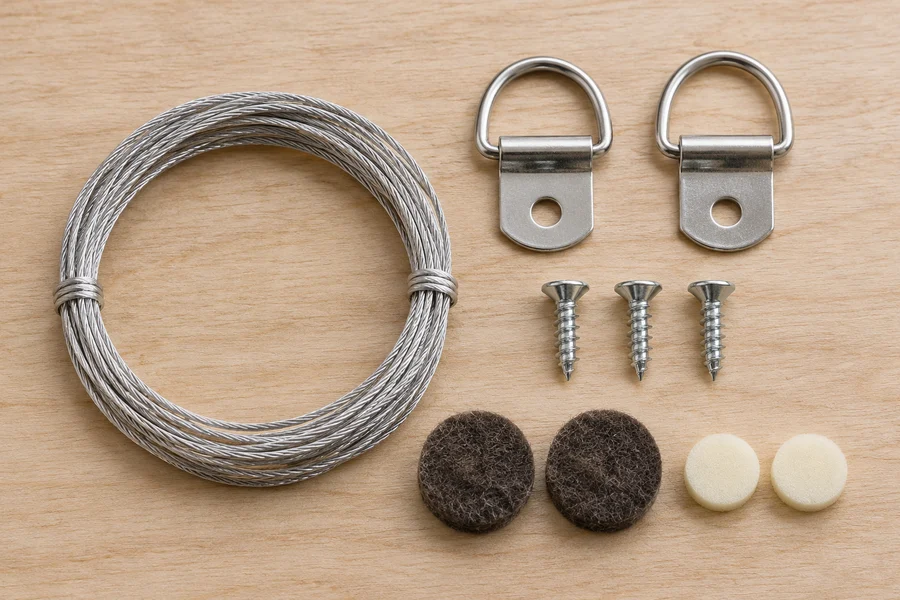
Watch the hanging kit video, then use the installation guide below to position hangers, attach wire, and add bumpers to a wood frame.
Watch: the hanging hardware kit explained
A hanging hardware kit supplies the components for putting wire on the back of a frame. In the video, the demonstrator explains that the hardware size is selected to suit the frame order, whether the frame is large or small.
What comes in the kit?
The kit described in the video contains:
- Picture hanging wire
- A pair of one-hole hangers
- Screws
- Felt or foam bumpers, depending on the frame type
Felt for wood frames, foam for metal frames
The bumper material changes with the frame type:
| Frame type | Bumpers described in the video |
|---|---|
| Wood frame | Felt bumpers |
| Metal frame | Foam bumpers |
Wire length allows for either orientation
The video explains that a frame may be hung horizontally. The supplied wire length takes that possibility into account, so it can accommodate either direction when the hardware is attached to the frame.
How to install the hanging hardware on a wood frame
This additional installation guidance explains placement and attachment for a pair of screw-mounted hangers and picture wire. For a metal frame, use its compatible channel-mounted hardware and installation instructions; the wood-frame screw method below does not apply.
Gather: a tape measure, pencil, screwdriver, wire cutters, and an awl or suitable drill bit for pilot holes, along with the hangers, screws, wire, and bumpers. Confirm that the hardware is appropriate for the completed frame's weight and material.
- Choose the hanging orientation. Place the frame face down on a clean, padded surface. Identify the top for the way the artwork will hang before measuring.
- Mark matching locations on the side rails. Measure approximately one-third of the frame's outside height down from the top on both sides. Put one hanger on the back of each side rail at the same height. For example, on a frame 24 inches tall overall, the starting location is about 8 inches below the top. These are frame attachment points, not wall-hook locations.
- Check the screw path and make pilot holes. Locate each screw in the body of the frame rail, clear of the artwork opening and corner joint. Compare the screw length, allowing for the hanger plate, with the wood available at that exact location so the tip cannot break through the front or enter the artwork package. Make a pilot hole sized for the screw and wood, with its depth limited to the usable material.
- Secure the hangers. Seat each hanger's flat plate against the frame and angle the ring toward the upward pull of the wire. Tighten the screws until the plates are secure, without stripping the holes or splitting the rail. Follow the instructions for your particular hanger if its attachment differs.
- Attach the first wire end. Thread it through the ring, leaving several inches for securing the end. Loop it back around the standing wire and through the ring again, pull the loop snug, then wrap the tail tightly around the standing wire. Follow any different termination instructions supplied with your wire.
- Set the wire length and attach the second end. Run the wire to the opposite hanger. Lift it near the middle to allow some slack before repeating the loop-and-wrap attachment. Leave enough movement to engage the wall hooks; avoid a tightly stretched wire or so much slack that the raised wire or hooks extend above the frame. Trim excess only after checking both ends are secure.
- Add the bumpers. Apply a bumper to the back of each bottom corner where the frame will contact the wall. Use felt for the wood-frame kit described in the video; the metal-frame kit uses foam. The bumpers help protect the wall from scuffs.
Placement and attachment references: Picture Hang Solutions' D-ring installation guidance and Logan's illustrated wire and bumper instructions (PDF). These support the additional written instructions rather than describe what is shown in the kit video.
Check the hardware before hanging
- Both hangers are at the same height, with secure screws and no split wood.
- Both wire ends are secured; the wire has controlled slack and stays below the frame's top when lifted.
- Bumpers sit at the two bottom corners on the back.
Use wall hooks and fasteners appropriate for the wall material and the complete framed weight. With the wire supported at the intended hook positions, measure from the frame's top to the raised wire to determine how far below your desired top edge the hooks should sit. For the full fitting and two-hook hanging sequence, see how to fit and hang a wood picture frame.
Made in the USA
Handcrafted by American framing experts
Family Owned
Serving customers for over 40 years
Premium Shipping
Professionally packaged for safe delivery
Ready to Hang
Hardware included with all frames
Framing Specialists
Over 40 years of custom framing experience
