
Ok

Ok

What is the question
Cancel
PICTURE FRAMES
 CUSTOM PICTURE FRAMES
Design Your Framing Package Online!
Add Mats, Glass & Acrylic, Mounting Board And More.





Search
☰

My Account
Log In
Favorites
Saved Designs
Shopping Cart
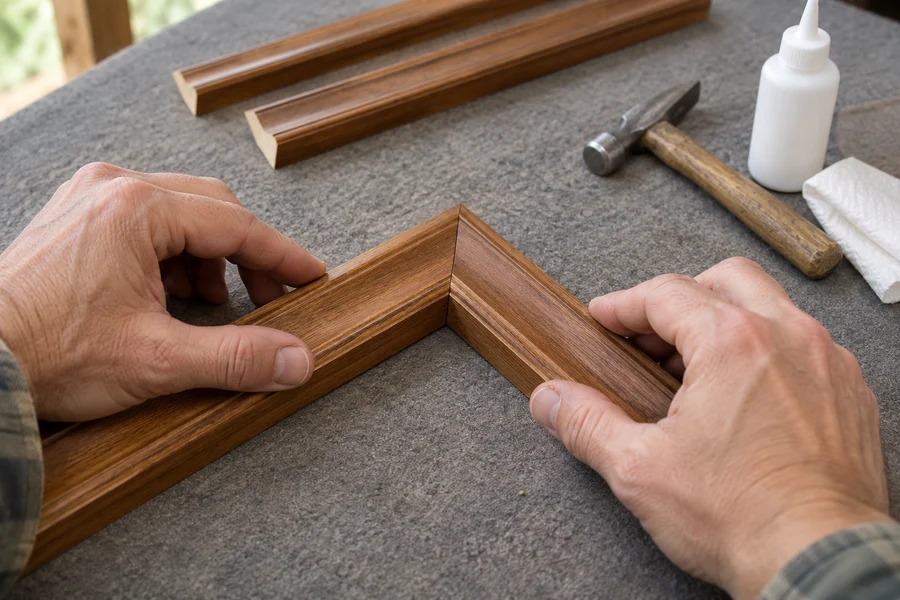
Watch Parts 1 and 2 on one page, then follow the corner-joining sequence from sorting the supplied keys to inspecting the finished frame.
Part 1: Prepare the kit and join the first corner
Start with the rail layout, key sizes, and profile support, then watch the first glued and keyed corner. Continue to Part 2 when you are ready to finish the rectangle.
Use this method for a supplied, pre-cut frame kit with routed dovetail-key slots. It does not cover cutting raw moulding, routing slots, or joining a frame with a different fastening system. Keep the supplied kit instructions beside you.
1. Sort the keys and arrange the rails before gluing
Separate the supplied key sizes and check the four pre-cut rails. Arrange one long and one short rail for each of two L sections, checking their orientation before gluing.
The demonstrator puts the long rails in front and the short rails to the right, then repeats the same corner arrangement. The practical check is that each L contains one long and one short rail and both sections will meet as a rectangle.
- Inspect the miter faces and routed slots for loose debris before bringing them together. Do not recut or enlarge a slot to fix an uncertain fit.
- Separate different key sizes so you do not drive a large key into a smaller slot or bury the wrong key.
- Prepare a small hammer, suitable white or carpenter's wood glue, tissue or cloth for cleanup, and any supplied support spacer and seating piece. Check what your kit includes.
2. Steady the moulding so the routed slots align
Protect the work surface and frame finish with a suitable clean pad. Use the supplied profile-support spacer if the moulding tips or rocks, then align the miter faces and routed slots.
In Part 1, the spacer sits under the frame lip because the shaped profile otherwise tips inward. Another profile may tip outward, while a flat profile may not need the same support. Use the matching support arrangement supplied for the moulding.
Close the corner by hand and inspect both slot pairs. A key should not be used to drag a rocking or visibly misaligned corner into place.
3. Glue the miter, hold it closed, and seat the keys
Apply a controlled amount of suitable wood glue to the mating faces and hold the joint closed with its slots aligned. Start each matching key with gentle taps, then seat it as directed for the kit, using the supplied seating piece if provided.
- Dab glue onto the mating faces without flooding the joint.
- Bring the faces together, hold them closed, and align the routed slots.
- Start the correct key in its matching slot with gentle hammer taps.
- Repeat for the other key while keeping the joint closed.
- Use the supplied metal seating piece, if provided, to finish seating the keys as directed. Stop when seated; do not keep driving with extra force.
- Address excess glue promptly using a cleanup method compatible with the frame finish.
| Detail | What the demonstration shows |
|---|---|
| Smaller key | Fits the smaller slot toward the front of the example profile. |
| Larger key | Fits the larger slot toward the back. Match your own supplied slots rather than assuming every profile has this arrangement. |
| Seating force | Gentle taps; the demonstrator cautions that excessive driving can crack the finish. |
| Fresh joint separates | The demonstrator refreshes the glue before reclosing the joint. Do not treat a separated or partly set glue line as an intact bond. |
Part 1 also shows a delicate rocking adjustment for a slight height difference and explicitly warns that it can damage the frame. Do not force that adjustment. If the faces remain stepped, keep the corner supported and ask for advice.
Part 2: Join the sections and complete the frame
Continue with the second L section, the final two corners, and the checks before fitting. Return to Part 1 for the first-corner technique.
4. Repeat the corner procedure for the second L
Repeat the corner procedure with the other long-and-short pair. Check that the two L sections will form the intended rectangle, and support both rails whenever a section is repositioned.
Use the same support, glue, alignment, and key sequence. Avoid putting sideways or twisting loads into a fresh joint when turning or moving it.
For a frame whose size makes this difficult, use the large-frame assembly and support guide and arrange help with moving the sections.
5. Check both remaining corners before closing them
Bring the two L sections together and check both open corners. Glue, align, and key them without forcing another fresh joint open. If closing the last corner stresses an earlier joint, stop and allow the earlier joints to set as appropriate for the kit and adhesive.
Look at the opposite open corner while closing the corner in front of you. Part 2 explains that forcing the final corner while earlier joints are fresh can leave a gap in another joint. Its waiting example addresses that specific condition; follow your actual glue's instructions rather than treating the video as a universal curing timetable.
Once the fit is ready, complete each corner with the same controlled glue application and gentle key seating. Keep the final rail supported throughout repositioning.
6. Inspect the assembled frame and let the glue cure
Check that the corners meet, the keys are seated as instructed, and glue squeeze-out has been addressed without damaging the finish. Keep the frame supported and follow the actual glue's setting and curing instructions before fitting artwork.
- Each corner closes without creating a gap in another joint.
- The correct key is seated in each matching slot.
- No corner is rocking because its moulding profile lacks support.
- Glue squeeze-out has been addressed without scraping or damaging the finish.
- The adhesive has had its required setting and curing time before the frame is loaded or hung.
The glue and keys perform complementary jobs. The frame holding its shape does not establish that the glue is ready for glazing, artwork, and backing.
Before applying more force, check the cause
| Problem | Check first |
|---|---|
| A key will not start | Its size, the matching slot, and alignment of the two rails. |
| The corner tips while tapping | The pad, profile support, and whether the supplied spacer is in position. |
| The front faces are stepped | Profile support and alignment; do not force a rocking adjustment. |
| The last corner opens another joint | Stop forcing it. Review Part 2's conditional waiting guidance and the glue instructions. |
| A fresh corner opens during movement | Support both rails and get advice on the glue joint and keys before proceeding. |
Common dovetail-joining questions
Are dovetail keys and thumbnails the same thing in these videos?
The demonstrator uses dovetails, thumbnails, and wedges to describe the supplied joining pieces. Use the actual keys supplied for the routed slots in your frame. This guide does not cover cutting or routing raw moulding.
Where do the small and large keys go?
In the demonstrated profile, the smaller key goes toward the front of the frame and the larger one toward the back. That describes the kit shown, not every moulding. Match the supplied key size to the corresponding slot; do not interchange them.
Why do I need glue if the keys pull the corner together?
The series demonstrates glue and keys working together. The glue bonds the mating faces while the keys draw and hold the routed corner together. Do not assume a dry key-only assembly follows this method.
Does every frame kit need a support spacer?
No. The video uses a spacer because its moulding profile tips without support. A flat profile may not need one. Use the support pieces and instructions for the kit you received.
Should I force the last corner shut?
No. Check whether closing it would open another fresh joint. Part 2 discusses waiting for earlier joints to set when the final corner would put stress on them. Keep the rails supported and ask for help if the fit remains uncertain.
Can I fit the artwork as soon as all four keys are in?
Completing the mechanical assembly does not establish that the glue has cured. Follow the actual adhesive and kit instructions before loading the frame with glazing, artwork, or backing.
Continue from joining to fitting
After the frame is ready, follow how to fit art into a wood picture frame. If components are still needed, use the framing-order checklist.
This guide follows both parts of the WebPictureFrames.com dovetail-joining demonstration. Our family-owned business has more than 40 years of practical framing experience. Ask our framing specialists if your kit, slots, or joint fit differ from the example.
Made in the USA
Handcrafted by American framing experts
Family Owned
Serving customers for over 40 years
Premium Shipping
Professionally packaged for safe delivery
Ready to Hang
Hardware included with all frames
Framing Specialists
Over 40 years of custom framing experience
