
Ok

Ok

What is the question
Cancel
PICTURE FRAMES
 CUSTOM PICTURE FRAMES
Design Your Framing Package Online!
Add Mats, Glass & Acrylic, Mounting Board And More.





Search
☰

My Account
Log In
Favorites
Saved Designs
Shopping Cart
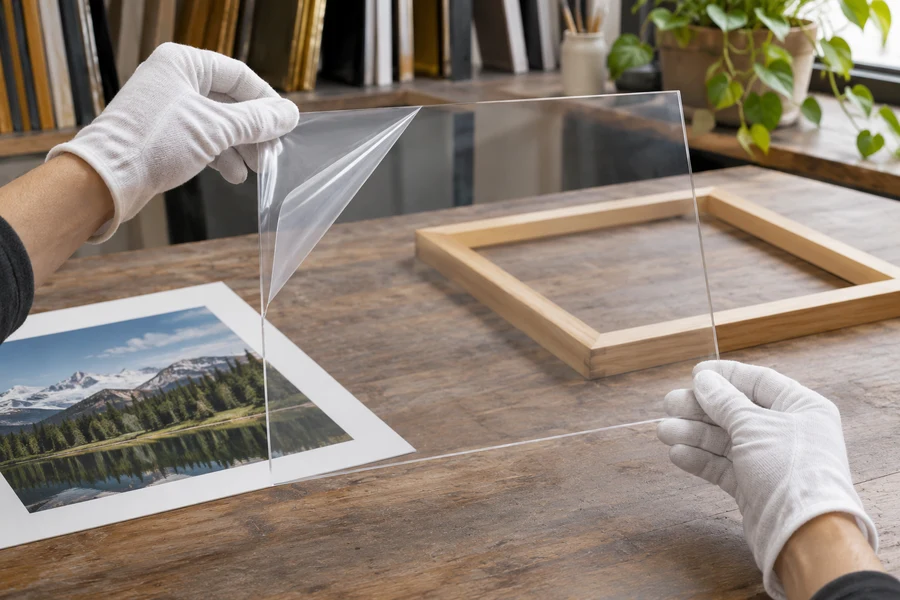
Regular clear acrylic provides a transparent view with room reflections still possible. Check weight, handling, current protection specifications, and the complete framing package before ordering.
Watch: Regular Acrylic for Picture Frames
Clear viewing with visible reflections
Regular clear acrylic and regular glass can look similar in a finished frame. Compare its reflected appearance with non-glare acrylic: regular acrylic keeps a clear surface but can reflect the room like a mirror.
Clear appearance is not the same as anti-reflective treatment or conservation-level UV filtering. Choose those properties separately rather than assuming every clear sheet supplies them.
What regular clear acrylic does and what to compare next
| Requirement | Regular clear acrylic | Next comparison if needed |
|---|---|---|
| Clear viewing | An undiffused view with room reflections still possible. | Non-glare or coated anti-reflective appearance. |
| UV protection | Use the exact current sheet specification. | The separately identified UV-filtering clear product. |
| Lower glazing weight | Compare the handling properties of acrylic with glass. | Assess the whole frame, mounting, and transport plan. |
| Care | Follow the conventional acrylic product instructions. | Do not substitute care instructions for a different coated pane. |
Consider weight, breakage, and scratching
Consider acrylic's lower weight and its resistance to the breakage associated with glass, especially when shipping framed artwork. Those benefits can become more important as the glazing area increases. Acrylic still needs careful handling: ordinary acrylic can scratch, and shatter resistance does not make it indestructible.
- Assess the frame size and how the finished picture will be transported.
- Check the actual sheet thickness and complete package depth.
- Compare the reflected room in clear and non-glare samples if reflections are a concern.
- Choose UV-filtering acrylic separately if the artwork needs that feature.
Use current specifications and suitable care
Consider UV filtering, but a percentage without its wavelength range and exact product is not a complete specification. ACRYLITE's current UV guidance distinguishes standard framing acrylic from OP3 UV-filtering products.
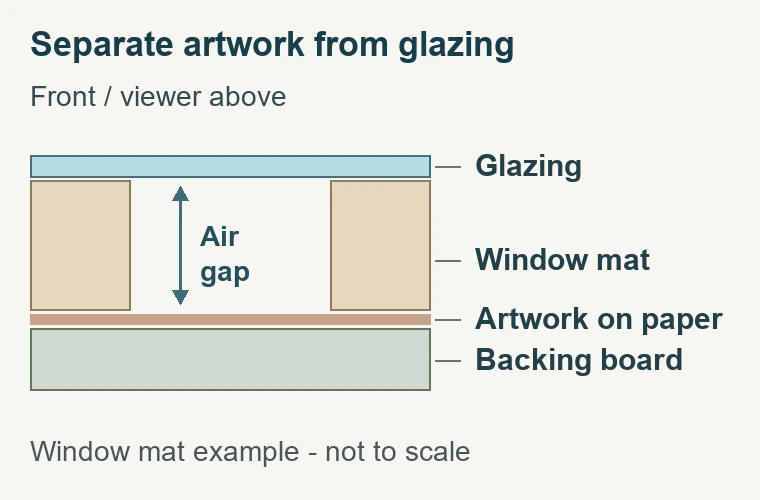
Keep protective film in place while preparing the sheet, remove it from both sides before final fitting, and follow the product's cleaning instructions. Avoid treating conventional acrylic like ordinary window glass. Keep the artwork separated with a suitable mat or spacers.
View clear framing acrylic, compare non-glare acrylic, or use the full acrylic-selection guide.
Decide whether clear conventional acrylic meets the brief
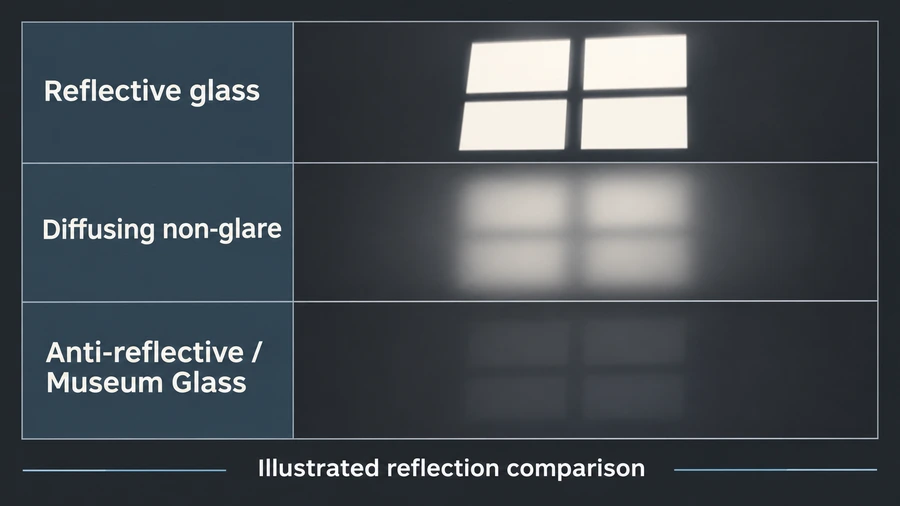
- Regular clear acrylic is the option to assess when the project calls for a transparent, lightweight glazing sheet without a diffusing surface. Its clarity does not remove reflections. Separate the clear view through the sheet from the reflected room on its face. Decide whether that reflected room is acceptable in the intended location before selecting the material solely for its appearance on a workbench.
- Sheets called acrylic do not necessarily have the same thickness, UV performance, static behavior, or care requirements. Use the actual product description and supplier instructions. A material category is a starting point for comparison, while the exact supplied sheet determines the specification and the handling steps you should follow.
- Think about the complete framed object. Lower glazing weight may be useful when the picture is moved or shipped, but it does not eliminate the need for an appropriate frame, retaining arrangement, and hanging hardware. Those parts still support the completed assembly. Choose glazing as one component in that package rather than assuming that a lighter pane automatically makes any frame construction adequate.
Replacing glass with acrylic in an existing frame
Do not assume that a replacement sheet can be selected from the old pane's outside appearance alone. Measure the receiving dimensions, compare thickness, and inspect the existing retaining method. Check whether the mat or spacer arrangement still provides the intended separation after the change. Keep the acrylic's care information with the frame so a person accustomed to cleaning the previous glass does not automatically use the same materials. Finally, inspect the completed weight and hanging arrangement rather than assuming that changing one component resolves every condition of an older frame.
Test the reflections that will actually matter
- Place a sample over an image with similar detail and contrast to the artwork. View it in the intended orientation and from the normal standing or seated position. Reflections can be especially noticeable over dark image areas because the reflected scene competes with less transmitted detail. Inspect the whole picture rather than judging only a bright area where glare is harder to notice.
- Check the likely windows, lamps, and bright objects behind the viewer. Moving the picture or changing a light's position may improve the result without changing the glazing. If the room arrangement is fixed and reflections obscure the work, compare non-glare and coated anti-reflective alternatives. Those approaches do different things to the reflected appearance, so use actual samples rather than assuming that every product described as glare-reducing looks the same.
- Repeat the comparison with the intended mat or spacer depth. The complete package is the relevant viewing arrangement. A sample pressed directly onto a loose print may not represent a framed work with separation, several mat layers, or a deeper recess. Keep the artwork's required separation in the test rather than improving a sample's appearance by removing a gap that the finished package still needs.
Order the receiving size, not the outside frame size
- Establish the dimensions of the glazing that the frame is designed to receive. Those are different from the outside dimensions of the moulding and may be different from the visible artwork window. If a mat surrounds the image, the glazing ordinarily belongs to the larger package size. Follow the ordering system's measurement convention and avoid making an extra allowance unless it is explicitly requested.
- Record sheet thickness together with size. Thickness affects the package depth and the support requirements for the actual panel. Do not infer a maximum suitable size from an unrelated sample or a general statement that acrylic is strong. Confirm the supplied product and application with the framing team when size or construction is uncertain. A small sample does not establish a universal thickness chart for every frame.
- Check the available rabbet with all components included. Glazing, mat layers, artwork support, backing, and spacers each contribute to the arrangement. The retaining hardware must suit the final back position. If the package is too deep, resolve that before fitting rather than removing necessary support or pressing the contents tightly together. Physical fit and the visual proportions of the frame should both be checked.
Prepare the sheet without adding scratches
- Set up a clean protected working area before removing the masking. Keep abrasive debris, loose screws, blades, and dirty cloths away from the pane. A sheet can be damaged by being slid across an unsuitable surface even when the person handling it never touches the viewing area. Support it appropriately for its size and avoid letting an edge drag across the workbench.
- ACRYLITE's handling guidance describes protective masking on both faces and the need to keep dirt from becoming trapped against stored sheets. For the final frame, remove the masking from both sides as required by the supplied product. A remaining transparent film can be mistaken for the glazing surface and can spoil the appearance after the package is closed.
- Handle the prepared sheet by its edges where practical and inspect it before placing it over the artwork. Follow the specific cleaning instructions rather than applying an ordinary household glass treatment. ACRYLITE also notes that static can develop during handling; see its care and cleaning guidance. Do not infer that regular acrylic has the anti-static properties of a separately specified coated product.
Inspect before and after closing the frame
- Check the unmasked sheet against a clean background for visible scratches, film, and dirt.
- Confirm the orientation of any product-specific surface treatment, if present.
- Fit the intended mat or spacers and verify artwork separation.
- Place the supported artwork and backing without dragging them across the glazing.
- Inspect the front while the package can still be reopened easily.
- Install the appropriate retainers and inspect again for shifted components or debris.
If the view looks cloudy, identify the cause before attempting to polish it. Remaining masking, surface dirt, scratches, and a reflection are different problems. An abrasive remedy chosen for the wrong cause can damage an otherwise sound sheet. Likewise, if the picture appears bowed or the pane is under pressure, revisit the package fit rather than treating the distortion as a cosmetic cleaning issue.
Once the frame is displayed, use the care instructions for that glazing when cleaning. Keep liquids from entering the frame edges and use suitable clean materials. If the pane is changed later, record the replacement's exact specification. A new sheet may look similar while having different UV, coating, or handling properties. That record helps preserve the intended package when another person services it.
Know when another acrylic option is needed
- Choose a different specification when the project needs a feature that regular clear acrylic does not establish. If conservation-level UV filtering is required, compare the specifically identified UV-filtering product. If diffuse reflection control is the priority, compare the non-glare sheet with the actual artwork gap. If anti-reflective viewing, anti-static behavior, or abrasion resistance is required, assess products that state those properties rather than assigning them to all clear acrylic.
- For a budget comparison, keep the package scope constant. Compare sheets at the same required dimensions and the specified thickness, then consider the particular features being added. A lower quote for a different size or an incomplete package is not a like-for-like comparison. Ask what the order includes and which mounting, backing, retaining, and hanging components still need to be supplied.
- Regular acrylic can be a deliberate choice when its clear appearance and handling characteristics meet the project's requirements. The useful result is not a generic claim that acrylic is always preferable to glass. It is a documented decision about reflections, current protection properties, size, thickness, artwork separation, and care. Those details make the completed frame easier to order, fit, display, and maintain.
Made in the USA
Handcrafted by American framing experts
Family Owned
Serving customers for over 40 years
Premium Shipping
Professionally packaged for safe delivery
Ready to Hang
Hardware included with all frames
Framing Specialists
Over 40 years of custom framing experience
