
Ok

Ok

What is the question
Cancel
PICTURE FRAMES
 CUSTOM PICTURE FRAMES
Design Your Framing Package Online!
Add Mats, Glass & Acrylic, Mounting Board And More.





Search
☰

My Account
Log In
Favorites
Saved Designs
Shopping Cart
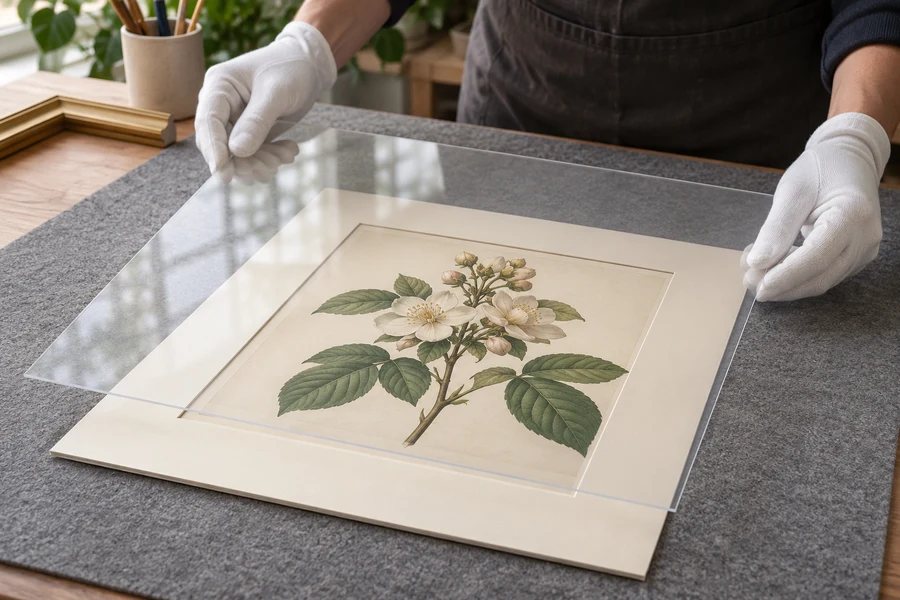
Conservation non-glare acrylic combines UV filtering with a reflection-diffusing surface. Test both the image detail and the room reflection at the intended gap.
Watch: Conservation Non-Glare Acrylic for Picture Frames
UV filtering and a diffused reflection
This option is also called conservation reflection-control acrylic and OP3 P99. Compared with the conservation clear version, the protection choice and the reflected appearance can be considered independently.
The matte-like reflection is different from a coated anti-reflective surface. If you are trying to preserve sharp viewing through a deeper glazing gap, compare both types over the actual package rather than treating their names as interchangeable.
Resolve the combined glazing requirements
| Unresolved requirement | Next step |
|---|---|
| The UV specification is not documented. | Confirm the exact supplied product and current manufacturer information. |
| Fine detail is too soft through the planned gap. | Compare clear or coated anti-reflective viewing while retaining required separation. |
| A room reflection still dominates the picture. | Test another location or lighting angle and compare the actual reflected appearance. |
| The stack exceeds the usable rabbet. | Revise frame or package depth before choosing retainers. |
| The treatment side is uncertain. | Use the product's orientation instructions before closing the frame. |
Assess the finish with the intended package
- Check the current UV specification of the exact product.
- Compare it with conservation clear acrylic under the room's likely reflections.
- Include the planned mat or spacer depth when checking image clarity.
- Follow the sheet's orientation instructions when fitting the treated surface.
ACRYLITE's UV product guidance identifies OP3 P99 as the UV-filtering non-glare version. No glazing treatment makes artwork immune to all damage from light.
Confirm the sheet and fit before ordering
Account for glazing thickness along with the mats, artwork, backing, and any spacers. Remove protective film from both sides before final assembly and follow the cleaning instructions for this conventional acrylic product.
Browse UV-filtering non-glare acrylic. Compare Optium Museum Acrylic for a different reflection-control approach or use the full acrylic guide.
Specify both features instead of relying on the name
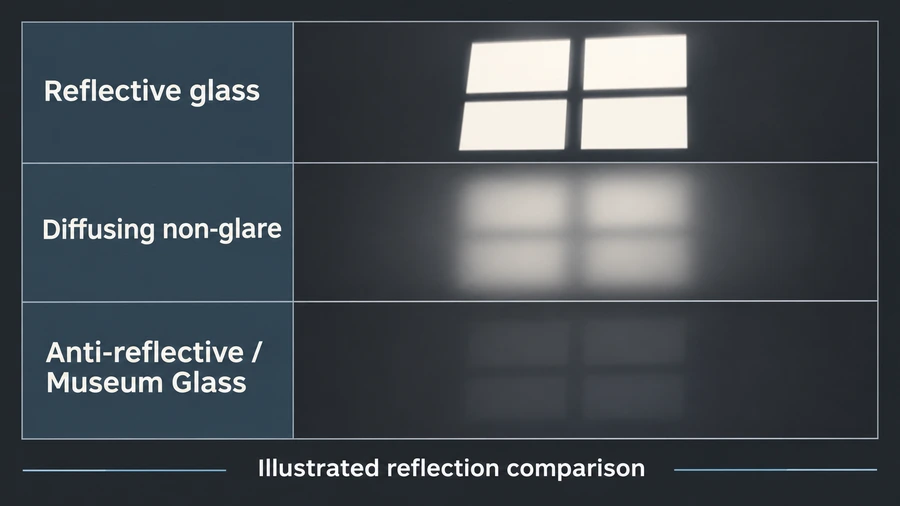
- This option combines the UV-filtering requirement with a non-glare, diffusing face. Compare it with the clear conservation version to separate protection from reflected appearance. The two words in the description do different jobs. Conservation concerns the specified protective property; non-glare concerns the surface's visual effect. Keep both in the order record so neither disappears when a replacement or alternative is considered.
- The planning notes below extend that short comparison. They do not establish that every sheet described as UV non-glare has the same numerical performance, orientation, thickness, or care instructions. Confirm the exact product and its current documentation. Historical terminology can help identify the category, but it is not a substitute for the specification of the pane actually supplied for your frame.
- Also distinguish this textured approach from a coated anti-reflective material. Both may be discussed as ways to reduce distracting reflections, but they do not produce the same view through the package. The right comparison involves the artwork's detail, required separation, room reflections, and other material requirements. A favorable reflection in an isolated sample is not enough to settle all of those decisions.
Record why the sample was accepted
Keep a short note identifying the tested image detail, gap, room, and viewing distance. Those observations explain why the non-glare conservation combination was chosen and help when another picture is added to the display. A later work with smaller text or a deeper mount may produce a different result through the same finish. Treat the earlier choice as a documented comparison for that package, not a rule that all future artwork in the room should use the identical pane. Repeating the useful test is more reliable than repeating only the product name.
Use a three-option comparison when the choice is uncertain
- Compare conservation clear acrylic, conservation non-glare acrylic, and a suitable coated anti-reflective option over the same artwork. Keep the intended protection requirement explicit during that test. Use the same room, viewing position, and image-to-glazing distance. This makes the actual differences easier to see than comparing unrelated photographs or samples laid over different images.
- First examine the reflected room. Notice whether a sharp reflected window becomes a softer patch and whether the change improves the view of the work. Then look through the sheet at fine lines, text, and important image detail. A diffusing surface can change that view as the artwork is positioned farther behind it. The acceptable balance depends on the actual image and intended display, not simply on the surface name.
- Finally step back to the usual viewing distance. A difference that matters while reading small text close up may matter less across a room, while a broad reflection can remain distracting at either distance. If the picture will be viewed from several angles, test those too. Record the reason for the chosen pane so the decision remains understandable after the samples are put away.
Keep the artwork's required gap in the design
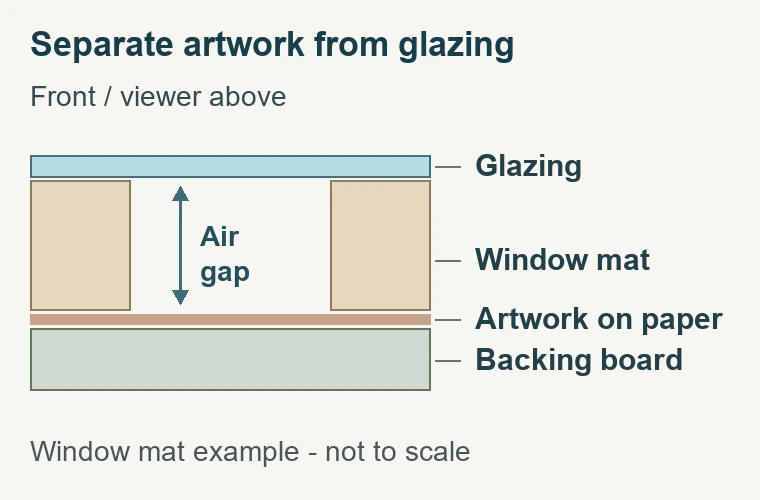
- A mat or spacer should not be removed merely to make a diffusing pane appear sharper in a test. Separation belongs to the fitting and artwork requirements. If the selected surface does not provide an acceptable view through that separation, compare another glazing method. Otherwise the apparent solution to a visual concern can create a different physical problem in the completed frame.
- Measure the complete intended gap rather than estimating it from the number of mat sheets. Board thicknesses and additional mounting components can vary. A multi-layer mat, raised support, or spacer changes the actual distance between the artwork face and glazing. Test that arrangement as a whole. There is no universal maximum gap for every image and every non-glare sheet.
- Check concealed spacer positions if the design is unmatted. The strip needs to remain behind the frame lip while establishing the intended perimeter gap. It does not attach the artwork or retain the backing. Include the spacer in the depth assessment and inspect the front after fitting. The glazing's conservation specification does not resolve an exposed spacer edge or an inadequately supported paper sheet.
Coordinate the pane with mats, backing, and mounting
- Verify the contact materials around the work independently of the glazing. A UV-filtering sheet at the front does not establish that an unidentified mat or backing is archival. Record the selected boards and the attachment arrangement. If the artwork requires a particular reversible mounting approach, choose that explicitly rather than assuming that the glazing's conservation description makes any adhesive method appropriate.
- Plan the frame depth with the entire stack. Glazing thickness, mat layers, artwork and mounting support, backing, and spacers occupy the available rabbet. A visually pleasing combination can be too deep for a shallow moulding. Check where the completed backing sits and choose retaining hardware for that position. Do not compress the package or omit support to preserve a frame selected before the full construction was known.
- Display location remains relevant. A non-glare surface can make a reflection less recognizable without eliminating all light-related change in the artwork. UV filtering does not mean every display condition is suitable. Consider direct sunlight and prolonged bright exposure, and seek conservation advice for valuable or sensitive work. The viewing surface and the display plan should support each other rather than be treated as interchangeable protections.
Identify the treated face before final fitting
- Keep the supplier's product information with the sheet during preparation. Follow its instructions for the non-glare face orientation rather than guessing after the film has been discarded. If the sheet is reversed accidentally, the appearance may differ from the intended setup. Resolve that question while the frame can still be opened easily, before the back is finished and the artwork needs unnecessary handling.
- Remove protective masking from both surfaces before final assembly as directed. Keep the work area clean and avoid sliding the prepared pane over abrasive debris. Use care instructions for this conventional non-glare acrylic, not instructions for a different coated product. Do not polish the texture to make it resemble clear acrylic. Its surface finish is a selected feature, not an imperfection to remove.
- Inspect the unmasked pane, then the assembled front. If haze, marks, or an unexpected reflected pattern appears, distinguish masking residue, dirt, scratches, orientation, and the intended diffuse finish. Those causes need different responses. Stop before applying a chemical or abrasive remedy that may change the sheet. Use the exact product's guidance and describe the problem clearly if advice from the supplier is needed.
Match the unresolved issue to the next decision
- When the design is settled, record the product, size, thickness, orientation, gap, and cleaning method. Keep the protection specification beside those physical details. A future replacement should reproduce the chosen combination, not merely look similar when viewed without artwork. That record is particularly useful when several frames use different acrylic products that would be difficult to distinguish from their edges alone.
- Compare quotations on the same basis. A regular non-glare pane and a conservation non-glare pane are different specifications even if their reflections look similar. A coated anti-reflective pane may add other properties that the project does or does not need. Choose the combination that meets the project brief, then confirm the rest of the framing order rather than treating one glazing selection as the complete package.
- The finished result should have an acceptable view, the verified protection required, and a package that fits without compromising the artwork's support. If any one of those remains unresolved, return to that specific decision. The value of the combined product is that it can address two requirements together; it does not remove the need to test their practical effect in the actual frame.
Made in the USA
Handcrafted by American framing experts
Family Owned
Serving customers for over 40 years
Premium Shipping
Professionally packaged for safe delivery
Ready to Hang
Hardware included with all frames
Framing Specialists
Over 40 years of custom framing experience
