
Ok

Ok

What is the question
Cancel
PICTURE FRAMES
 CUSTOM PICTURE FRAMES
Design Your Framing Package Online!
Add Mats, Glass & Acrylic, Mounting Board And More.





Search
☰

My Account
Log In
Favorites
Saved Designs
Shopping Cart
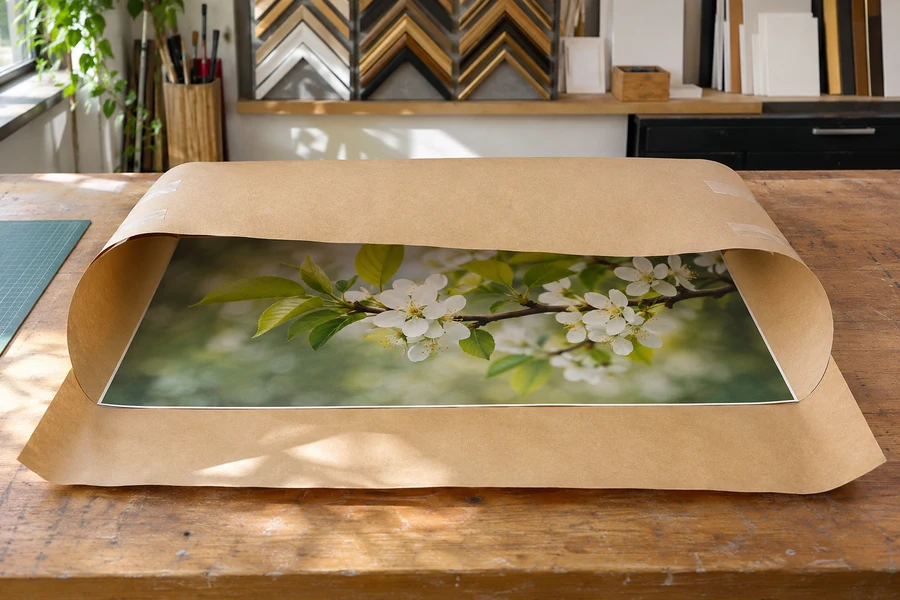
Gentle reverse rolling can reduce ordinary curl in a sound, flexible poster. Use protective paper, align the start, and keep tape on the wrapper rather than the artwork.
Watch: How to Flatten a Rolled Poster
Check that reverse rolling suits the poster
Gently counter-roll a flexible poster with protective paper. Use this method only when the poster is sound enough to bend without cracking, flaking, or creasing. For valuable, brittle, damaged, or unfamiliar artwork, get a conservator's advice before trying to flatten it.
Clear a table large enough to support the sheet and have clean protective paper ready. The wrapper should separate the poster from the outside handling and tape.
Is gentle reverse rolling the right next step?
| Condition or stage | Useful action | Limit |
|---|---|---|
| Ordinary curl in sound flexible paper | Use the clean wrapper and gentle opposite roll. | A perfectly flat result is not guaranteed. |
| Corners start unevenly | Pause and realign before rolling farther. | Do not tape the poster itself to force alignment. |
| Wrinkles or resistance appear | Stop and release enough to assess the cause. | Do not tighten the roll to force a result. |
| Creases, brittleness, damage, or valuable work | Seek an appropriate assessment before treatment. | This method is not a conservation repair treatment. |
| After the wait | Unwrap gently and reassess. | Heat, water, steam, and ironing are not part of this method. |
Roll gently against the existing curl
- Unroll the poster on the protective paper and identify the direction it naturally curls.
- Fold the leading edge of the protective paper as described, and align both poster corners with it. A skewed start can wrinkle the sheet as the roll progresses.
- Begin a loose roll in the opposite direction to the original curl. Guide the poster and wrapper together slowly, without forcing a tight tube.
- Keep checking the edges for wrinkles or a corner catching. For a large poster, use two people so both sides advance evenly.
- Hold the wrapper closed with tape on the wrapper only. Keep adhesive off the poster.
Use controlled, gentle bending. If the sheet resists or starts to crease, stop rather than tightening the roll.
Leave the reverse roll, then reassess
Leave the loosely wrapped reverse roll for a few hours or overnight before reassessing. Unwrap it carefully and check how much curl remains. Paper thickness and its original roll affect the result, so a perfectly flat sheet is not guaranteed.
This method does not use heat, water, or an iron. Once the poster is ready to handle, measure the artwork and plan its support and framing. Keep the sheet supported while transferring it to the frame.
Confirm that the poster can tolerate this method
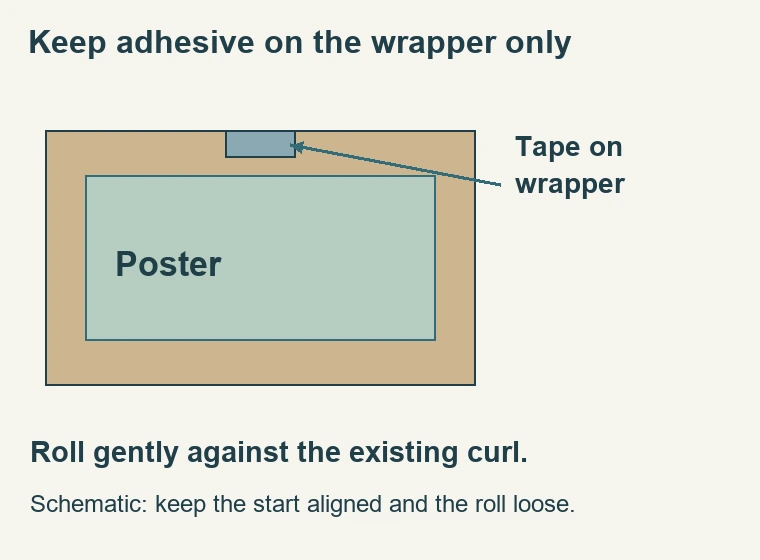
- This technique gently bends a flexible poster against its existing curl while a larger paper wrapper protects and controls it. It is not a repair for a crease, a treatment for brittle paper, or a universal conservation flattening process. These handling steps should not be applied automatically to valuable, fragile, damaged, or unfamiliar artwork whose surface or support may react differently.
- Inspect the poster before rolling. Look for tears, sharp folds, flaking media, weak edges, and areas that resist movement. If the condition is uncertain, stop and obtain suitable advice rather than testing how much force the sheet can withstand. The fact that an item arrived in a tube does not prove that repeated reverse bending is harmless for its present condition.
- Separate ordinary curl from a crease. Curl is a broad tendency to return towards a rolled shape. A crease is a localized fold that reverse rolling does not erase. Tightening the counter-roll in an attempt to remove a crease can introduce another one. Set the realistic aim as reducing the poster's tendency to roll so it can be handled for framing, not guaranteeing a perfectly restored sheet.
Prepare enough support before unrolling
- Clear a table large enough for the poster and the protective wrapper. Keep liquids, tools, tape dispensers, and rough objects out of the image area. The sheet should not hang unsupported from a narrow edge while you search for supplies. Have the wrapper and the means of securing its outside ready before beginning so the poster can be guided without abrupt movements.
- Use clean protective paper larger than the poster so the outside handling and tape remain on the wrapper. Inspect it for dirt, tears, and sharp folds that could press into the poster. Do not assume a sheet is suitable simply because it is brown like the example. If the artwork has particular contact-material requirements, verify the wrapper and seek appropriate advice about whether the technique should be used at all.
- For a large poster, arrange a second person before starting. Two-person handling helps support larger sheets evenly. Both people should understand which direction the roll will travel and how the edges will remain aligned. A helper is useful when coordinated support keeps the sheet even; pulling from opposite sides or advancing at different speeds can create a new handling problem.
Establish the curl direction and align the leading edge
- Unroll the poster gently enough to see its natural tendency. Identify the direction it wants to return towards, then plan the reverse roll in the opposite direction. Avoid repeatedly flipping or flexing the sheet while deciding. Keep it supported on the wrapper and use controlled movement rather than flattening it by pressing down on isolated parts of the image.
- The folded leading edge of the wrapper helps begin this arrangement. Align both poster corners so the sheet starts square. This is a functional step: if one corner leads, the paper can travel unevenly as the roll progresses. Check the edges before rolling far enough that the misalignment becomes trapped inside several turns.
- Do not attach the poster to the wrapper with adhesive as a shortcut. Keep tape on the outer wrapper rather than on the artwork. The wrapper should guide and protect the sheet without turning the operation into a mounting process. If you cannot maintain alignment gently, stop and reset the beginning instead of taping the poster into place.
Keep the counter-roll broad and controlled
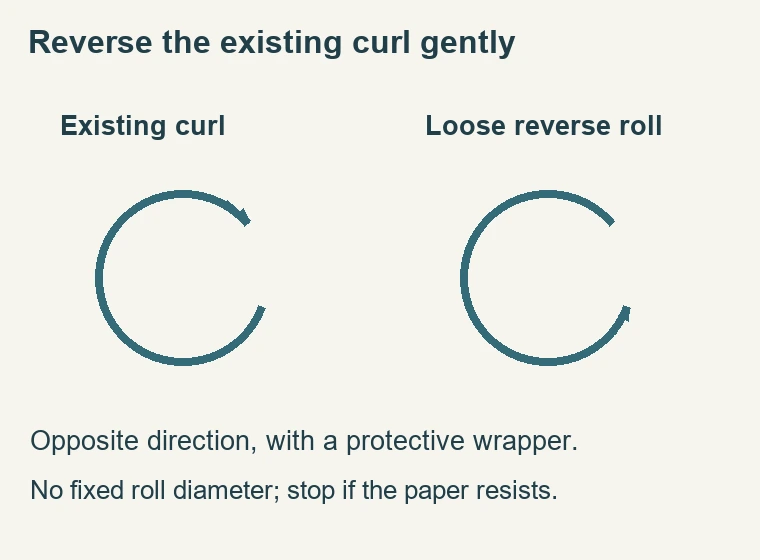
- Guide the poster and wrapper together slowly in the reverse direction. Consider that the roll need not be tight. Watch the sides and the leading fold as the sheets travel. A broad, even movement is more useful than forcing a compact tube. Do not squeeze the image surface or pull one edge hard to correct an uneven roll after it has begun.
- If a corner catches, a wrinkle starts, or the two sides advance differently, pause and release enough of the roll to correct the alignment. Continuing can trap the defect and turn it into a crease. With two people, coordinate each movement so the full width advances together. Keep fingers and loose items from making localized pressure marks inside the roll.
- Stop if the sheet resists, cracks, or shows any sign of damage. The method is not improved by applying more force to a material that does not tolerate bending. Do not add heat, steam, water, or a household iron to this procedure; those are not part of this method and introduce different treatment questions. Use an appropriate professional assessment when the ordinary poster technique is not suitable.
Secure only the wrapper and reassess after the wait
- Once the loose reverse roll is formed, secure the outside wrapper as described. Keep tape away from the poster edges and image. Check that no exposed adhesive can catch the work when the wrapper is removed. The purpose is to hold the protective roll closed, not to create a permanent bond or a tight band around a vulnerable sheet.
- Reassess after a few hours or overnight; this waiting period is not a guarantee of a fixed result for every paper. Thickness, condition, and previous rolling can affect how much curl remains. Do not infer a longer or more forceful treatment simply because the first result is not perfectly flat.
- Open the wrapper on a clear supported surface and remove the outer tape without dragging it over the poster. Release the roll gently and assess the sheet. Some remaining curl can be compatible with careful framing preparation. A new crease, surface change, or unexpected resistance is a reason to stop and seek advice rather than repeat the process automatically.
Move from reduced curl to a planned frame
- Measure the actual poster after it can be handled adequately. Record the paper size and intended visible image area separately, especially if there are printed borders or important text near the edges. Decide whether a window mat is wanted and what it should show. Do not use the original tube label or a rounded nominal size as a substitute for measuring the sheet being framed.
- Plan support and attachment before closing the package. A backing sheet does not automatically provide a suitable mounting method, and pressure between glazing and board should not be the only plan for locating the poster. Choose materials for the work's requirements and any future removal needs. If a mat or spacer is required for separation, include it in the frame-depth calculation.
- Keep the poster supported during transfer. Avoid grabbing one corner and allowing the full sheet to hang while a custom wood frame is prepared. Have the intended mounting and backing arrangement ready so the work is not repeatedly rolled and unrolled between unfinished steps. Reducing curl is a handling stage that helps the next task; it is not a complete framing or preservation system by itself.
A quick checklist before starting
- The item is a sound flexible poster appropriate for gentle reverse bending.
- The table and clean wrapper are large enough to support it.
- The curl direction and opposite rolling direction are clear.
- Both leading corners can be aligned without adhesive on the poster.
- A helper is available where the sheet's size requires coordinated support.
- The roll will remain loose, with tape only on the outside wrapper.
- The sheet will be reassessed gently rather than forced until perfectly flat.
- The next mounting and framing steps are planned before transfer.
Keep the result realistic and observe the sheet as you work. The useful handling details are the wrapper, aligned start, gentle reverse direction, and controlled handling. Those details matter more than making the smallest possible roll or promising that every poster will become flat by a particular hour.
Made in the USA
Handcrafted by American framing experts
Family Owned
Serving customers for over 40 years
Premium Shipping
Professionally packaged for safe delivery
Ready to Hang
Hardware included with all frames
Framing Specialists
Over 40 years of custom framing experience
