
Ok

Ok

What is the question
Cancel
PICTURE FRAMES
 CUSTOM PICTURE FRAMES
Design Your Framing Package Online!
Add Mats, Glass & Acrylic, Mounting Board And More.





Search
☰

My Account
Log In
Favorites
Saved Designs
Shopping Cart
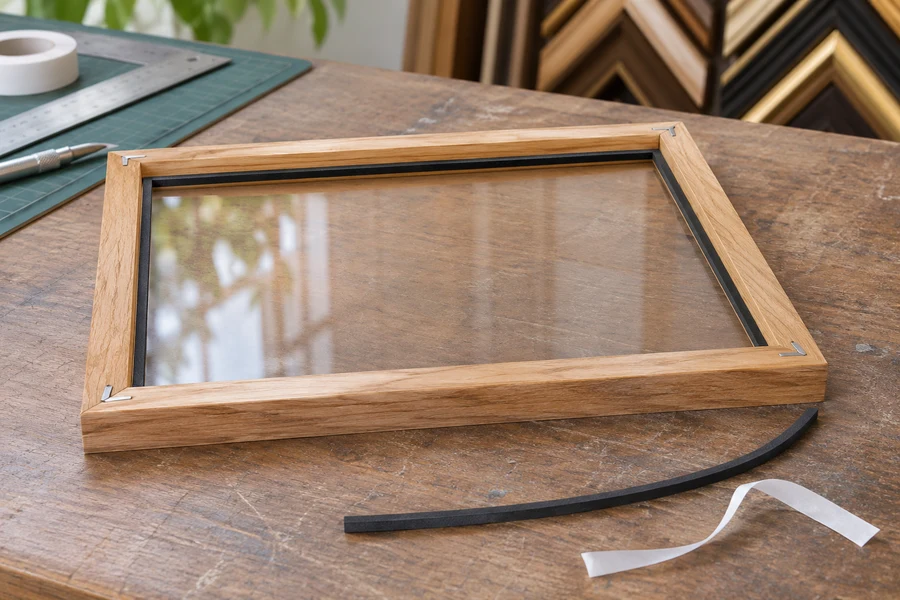
Glass spacers separate artwork from glass or acrylic. Cut and fit adhesive strips around the glazing, then check that the frame lip conceals them from the front.
Watch: How to Install Glass Spacers in a Picture Frame
Choose the spacer and prepare the glazing
Adhesive glass spacers are available in clear and black options and different depths. Choose a color that is inconspicuous with the artwork and a depth suited to the required separation and available frame rabbet. Confirm the current product dimensions for your order instead of treating all spacer profiles as interchangeable.
Have the selected spacer strips, a sharp cutting blade, and a protected cutting surface ready. Seat clean glass or acrylic in the frame. Remove the acrylic's protective film first, and avoid adding fingerprints while fitting the strips.
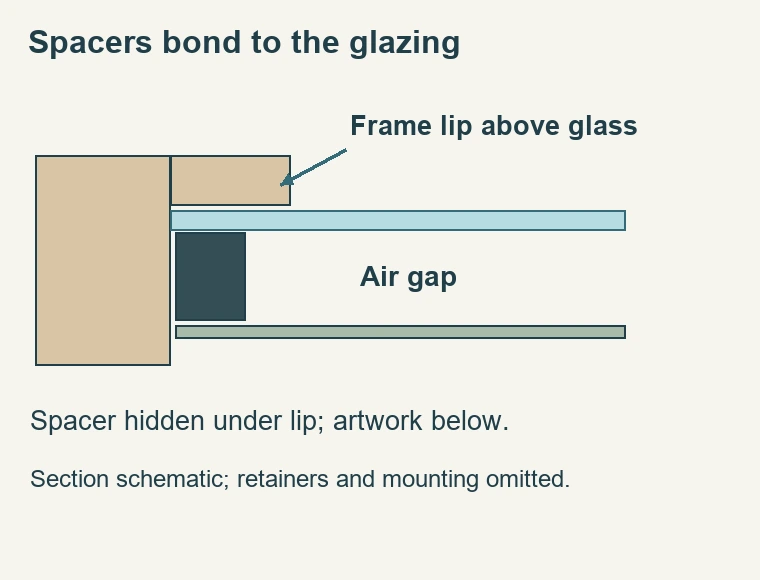
The spacer attaches to the glazing around its perimeter, hidden behind the frame lip. It separates the artwork from the glazing; it does not secure the completed package in the frame.
Spacer installation sequence and checks
| Stage | Action | Check before continuing |
|---|---|---|
| Prepare | Seat clean glazing and settle it towards the intended bottom. | Confirm the strip can remain concealed by the frame lip. |
| First strip | Measure, cut, expose adhesive, and fit the strip. | Inspect its position from the front. |
| Remaining sides | Work around the perimeter, fitting each new piece to the preceding one. | Measure the final gap instead of forcing an overlong strip. |
| Complete package | Add the supported artwork and backing, then retain correctly. | Recheck separation, alignment, and visible spacer edges. |
1. Fit the first strip along the intended bottom
- Identify the frame's intended bottom and settle the glazing towards that edge. Allow for the small amount of movement between glazing and frame.
- Lay a strip along the inside edge and mark its length against the actual opening.
- Cut the strip to fit. Use a separate protected cutting surface to keep the blade away from the finish and glazing.
- Peel off the adhesive release liner, then place the strip on the glazing close to the frame's inside edge.
- Check that the frame lip conceals it from the front before pressing it into its final position.
2. Work around the remaining three sides
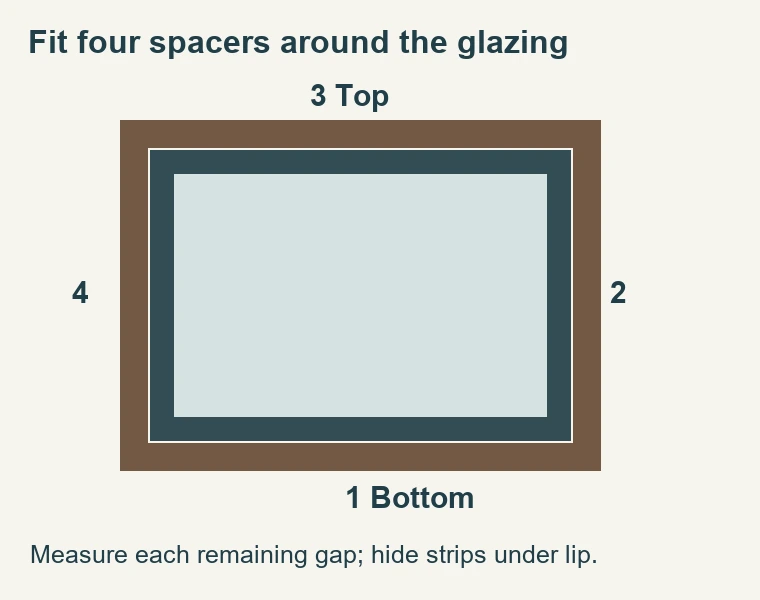
Work around the frame in sequence. Each new strip meets the end of the preceding one. Measure the actual remaining space rather than cutting four equal lengths or assuming the opposing pieces will all fit the same way.
- Butt the second strip against the first, mark where it ends, and cut it to fit.
- Peel its liner and adhere the strip to the glazing, maintaining the hidden position under the lip.
- Repeat for the third side.
- Measure the final gap between the installed strips carefully, cut the fourth piece, and fit it without bowing it into place.
Keep loose liner and trimming debris out of the frame. If a liner tears or leaves adhesive covered, prepare a clean, properly exposed adhesive surface before fitting that strip.
3. Add the artwork and check from the front
Remove any loose debris, then place the artwork package on the spacers. Spacers are often useful in an unmatted presentation; a matted package may also need additional separation. The purpose remains to separate the artwork surface from the glazing.
- Keep the glazing settled towards the intended bottom, as it was during the first-strip placement.
- Support the contents from the back while carefully inspecting the frame from the front.
- Look around the complete opening for any spacer showing past the lip. Check whether normal movement of the glazing or package exposes an edge.
- Correct the alignment before adding the selected retaining hardware. Do not rely on excessive pressure to hold an unsuitable fit.
Finish with the right retaining hardware
Retain the package and check the front again. Use the tabs, points, or clips selected for the frame. Spacers add depth to the package, so they must be included when assessing its physical fit.
Direct artwork contact with glazing is the issue this method addresses. A mat can also provide separation in suitable designs. For the full assembly sequence, see how to fit art into a wood frame. Browse glass spacers and verify the profile and dimensions before cutting.
Plan the air space as part of the complete package
- The spacer creates a physical gap between the glazing and the artwork. Its thickness is part of the depth that the frame must accommodate. There is no single required gap for every artwork. Consider the surface of the work, the mounting arrangement, the glazing, and the usable rabbet before selecting a spacer. A deeper strip is not automatically an improvement if the rest of the package no longer fits.
- Make a complete component list before starting: glazing, spacer, artwork and any mount, backing, and retaining hardware. If a mat is also present, include its actual thickness. Compare the total arrangement with the usable depth of the frame rather than its overall external height. A tall profile can have a shallower working recess than expected. The selected frame must accommodate the complete assembly.
- A spacer is not a mounting method for the artwork. Paper still needs an appropriate attachment or support arrangement behind it. Nor does the adhesive on the spacer secure the backing inside the frame. The adhesive holds the strip to the glazing perimeter; the frame's retaining hardware holds the assembled package. Keep those jobs separate so you do not rely on one narrow plastic strip to compensate for missing mounting or retaining components.
Dry-fit the layout before exposing adhesive
- Check the glazing in the frame before peeling a release liner. Confirm that it seats properly and note the small amount of movement available within the opening. Settle the glazing towards the intended bottom to account for that movement. A strip positioned using one glazing location may become visible when the glazing later shifts. Consider the possible positions while the assembly is still easy to lift and inspect.
- Cut and place the first strip as a dry fit where practical. Look from the front to check concealment under the frame lip. Clear and black spacers can behave differently against a particular image and frame, but neither color guarantees invisibility. A clear edge can catch light; a black edge can show as a dark line. Judge the actual profile and placement in the actual frame rather than choosing color from a loose sample alone.
- Plan the corner sequence. Work around the perimeter, fitting each strip against the preceding piece. That means the later cuts depend on the space remaining after earlier strips are installed. Avoid assuming that four strips cut from an overall frame measurement will create the same fit. Dry positioning also gives you a chance to detect a bowed strip, damaged end, or cutting error before adhesive makes the correction more difficult.
Keep the adhesive and glazing clean
- Prepare the glazing using the care instructions for the actual material and coating. Acrylic and coated glass do not necessarily share a cleaning method. Remove protective film where required and inspect both surfaces before fitting. A fingerprint underneath an installed spacer or a speck trapped inside the completed frame can require reopening the package. Work deliberately rather than cleaning only the center of the pane and overlooking the perimeter where the strip attaches.
- Handle exposed adhesive as little as possible. The backing liner protects it until the strip is ready to be placed; removing every liner in advance makes accidental contact more likely. Keep cut liner pieces and plastic trimmings away from the artwork. If adhesive becomes dirty or damaged, do not assume that pressing harder restores a dependable bond. Follow the spacer supplier's guidance for correcting or replacing the affected piece.
- Press the strip into its intended position without shifting the glazing or dragging the adhesive across the viewing area. Check the end alignment as you work around the frame. The goal is an even perimeter support with the joins fitted as intended. A gap, overlap, or strip forced into a curve should be examined before the artwork is installed. The last side is a fitting step, not an opportunity to force an overlong piece into the remaining space.
Inspect the opening from several useful positions
- After adding the artwork package, support it securely and inspect the front at normal viewing distance. Look around every edge for a visible strip and check the corners as well as the centers of the rails. A strip can be concealed along most of its length but show at one corner where the glazing or artwork is slightly displaced. A careful perimeter check is more useful than looking only at the main image.
- Check whether the intended separation remains present throughout the opening. A perimeter spacer does not by itself establish that every artwork surface stays away from glazing under every condition. The artwork's support and flatness still matter. If a sheet or dimensional surface bows towards the pane, reassess the mounting and gap rather than assuming that a nominal spacer thickness guarantees clearance everywhere.
- Once the retaining hardware is installed, repeat the inspection. Retainers should hold the package in place without forcing it into a distorted arrangement. Watch for a shifted mat, a changed reveal, or a previously hidden spacer becoming visible. Complete the fitting and dust-cover steps only after the front looks correct. That sequence reduces the need to remove a finished back merely to resolve an alignment issue that could have been caught earlier.
Allow for future opening and servicing
- Record the spacer product and depth with the framing details if the assembly may need servicing. A future change in glazing thickness, backing, mat layers, or artwork mounting can change the available space. The original strip should not automatically be reused with a different package merely because it still adheres to the old pane. Recheck the complete depth and compatibility whenever a component changes.
- If a spacer detaches during fitting or later opening, inspect both its adhesive surface and its physical condition. Do not introduce an unrelated glue into the viewing area as an improvised repair. Follow the component's instructions and replace it where required. Keep any replacement strip consistent with the intended gap and corner arrangement. An isolated repair that changes the support height can create an uneven package.
- Finally, distinguish a spacer problem from a frame-size problem. Visible edges may result from poor placement, but they can also reveal insufficient frame-lip coverage or an unsuitable overall layout. Repeatedly trimming the artwork or moving the pane off-center is not a reliable correction for a frame that cannot conceal the required components. Resolve the underlying fit before treating the perimeter as complete.
Made in the USA
Handcrafted by American framing experts
Family Owned
Serving customers for over 40 years
Premium Shipping
Professionally packaged for safe delivery
Ready to Hang
Hardware included with all frames
Framing Specialists
Over 40 years of custom framing experience
