
Ok

Ok

What is the question
Cancel
PICTURE FRAMES
 CUSTOM PICTURE FRAMES
Design Your Framing Package Online!
Add Mats, Glass & Acrylic, Mounting Board And More.





Search
☰

My Account
Log In
Favorites
Saved Designs
Shopping Cart
Keep the details you want to see. Learn how to measure the image, choose a mat opening, and check the finished outside size before ordering.
Measure what you want the mat to reveal
The mat opening is the visible area, not the outside size of the board. To cover image edges, make the opening smaller than the image. To show white paper or a signature outside the image, include that area in the opening. Measure the whole sheet separately so you can confirm that paper remains behind the mat.
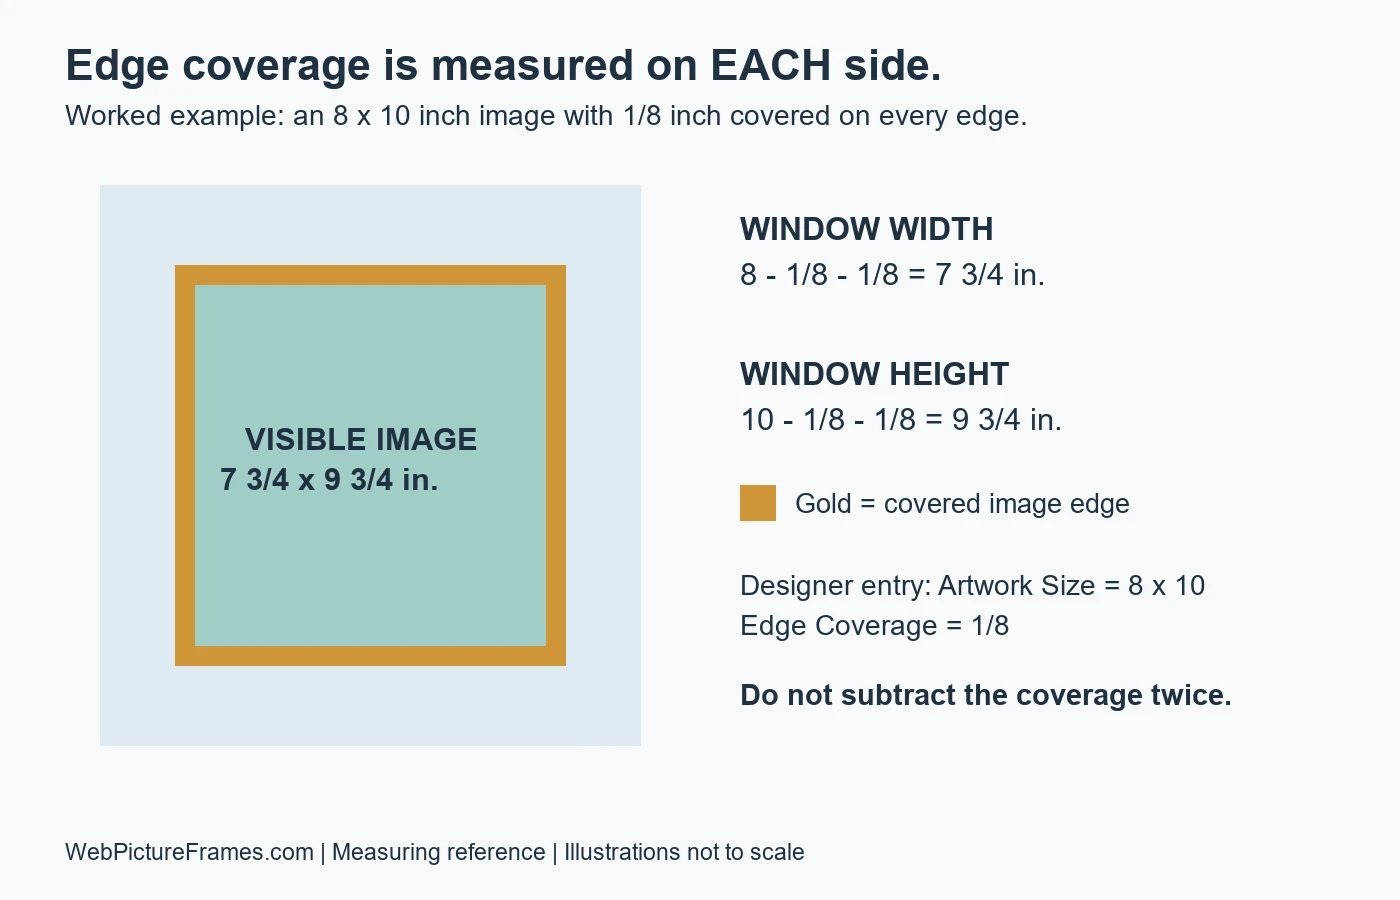
Coverage is per edge. An 8 x 10 inch image with 1/8 inch covered on every edge needs a 7 3/4 x 9 3/4 inch opening. In the designer's Artwork Size fields, enter 8 x 10 and choose 1/8 Edge Coverage; the designer makes the subtraction.
Watch: three ways to measure for a mat
Our framing-shop demonstration covers fine edge details, a visible white border, and a border you want to hide. The written instructions below explain those choices with separate worked examples.
Keep these four measurements separate
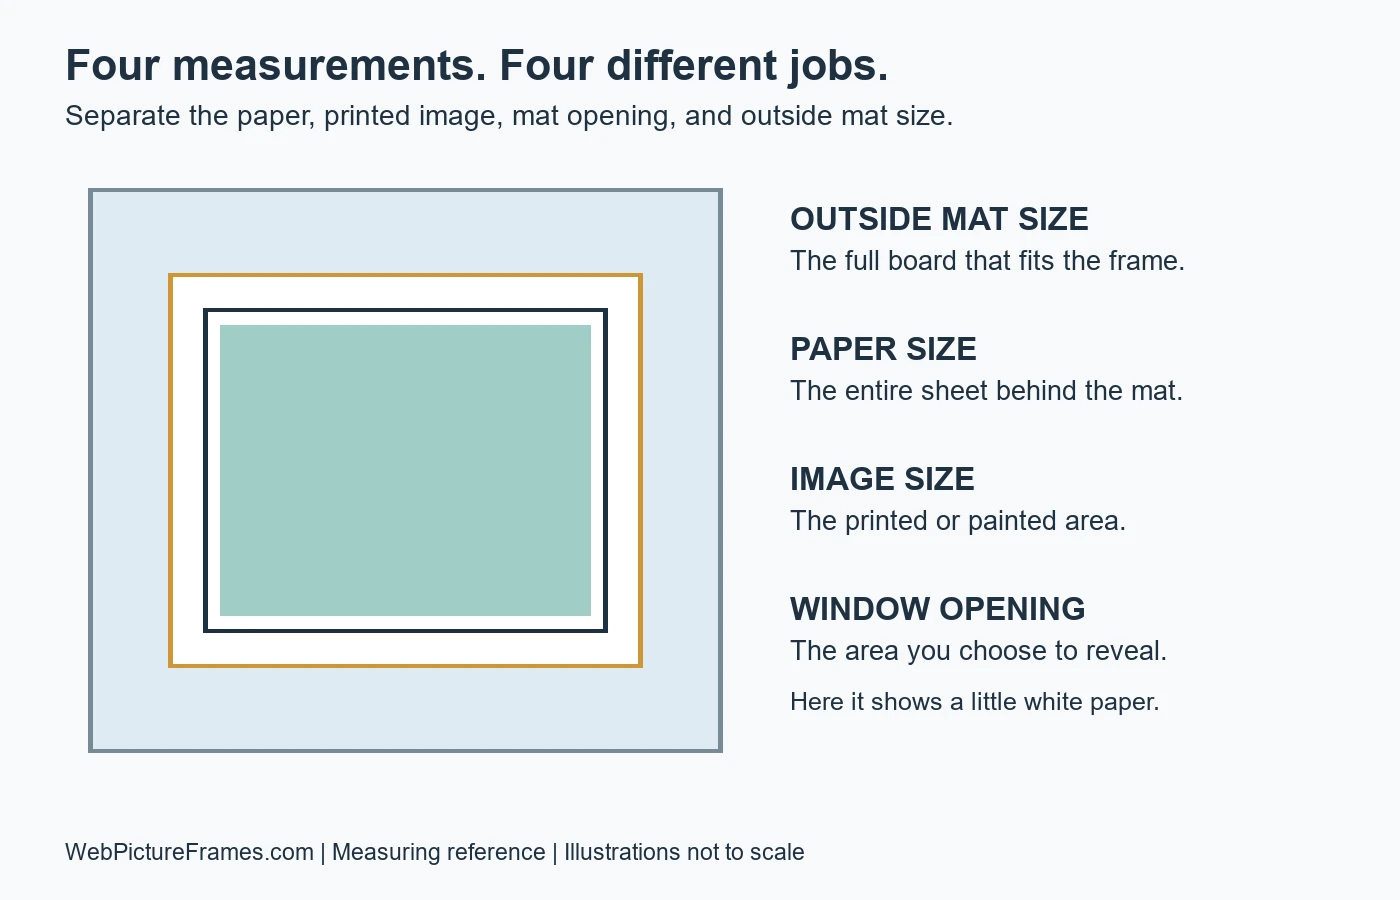
- Paper size: the entire physical sheet, including blank margins.
- Image size: the printed or painted area, excluding blank margins.
- Window opening: the area visible through the mat.
- Outside mat size: the full board that fits into the frame.
A paper border and a mat border are different. A paper border belongs to the artwork sheet and can show inside the opening. A mat border is the board between the opening and the outside edge.
Step 1: Decide what should remain visible
Inspect the entire image, including signatures, edge details, and paper borders. Decide what the mat should cover and what it should reveal before choosing an opening.
Preserve edge detail
Look for brushwork, lettering, or other details near the edge. Preview a small overlap with clean paper strips placed around the image without attaching them. Do not assume the usual coverage will suit it.
Show a paper border
Decide how much paper should show on each side. Include a signature or edition number in the visible area. Check all four margins; they may not be equal.
Hide a paper border
Measure the image rather than the whole sheet. Choose enough coverage to conceal the unwanted border without covering important image content.
This method covers a rectangular window mat over flat artwork. Showing the entire sheet edge, irregular shapes, collage openings, and raised or delicate surfaces need a different layout or mounting plan. A float-mounted sheet is also different from a canvas floater frame.
Step 2: Measure width and height in several places
Use a ruler or tape measure with readable fractions, a clean flat surface, and a place to record measurements. Keep hard tools clear of fragile image surfaces.
Lay the artwork flat on a clean surface. Measure the image width at the top, middle, and bottom, and its height at the left, center, and right. Record the paper dimensions separately. Check any variation before choosing the window.
Record width first, then height, in the intended display orientation. Measure the actual piece rather than relying on a print's nominal size. Do not round away a fraction just to match a standard size.
If the measurements differ, check whether the sheet or image is out of square. A rectangular opening can expose a sliver of unwanted paper on one edge while hiding detail on another. Preview the proposed opening against every edge; ask for help if the layout cannot do both jobs.
Step 3: Choose the opening and edge coverage
For an opening that covers the image edges, subtract the left and right coverage from image width and the top and bottom coverage from image height. To show paper borders, add the desired visible paper on each side to the image dimensions.
Covering edges: opening width = image width - left coverage - right coverage.
Opening height = image height - top coverage - bottom coverage.
Showing paper: opening width = image width + visible paper left + visible paper right; apply the same logic to height.
Opening height = image height - top coverage - bottom coverage.
Showing paper: opening width = image width + visible paper left + visible paper right; apply the same logic to height.
| Goal | Image size | Treatment on each edge | Resulting opening |
|---|---|---|---|
| A small crop | 8 x 10 | Cover 1/16 | 7 7/8 x 9 7/8 |
| Cover the image edges | 8 x 10 | Cover 1/8 | 7 3/4 x 9 3/4 |
| A larger crop | 8 x 10 | Cover 1/4 | 7 1/2 x 9 1/2 |
| Show white paper | 5 x 7 | Reveal 1/8 of paper | 5 1/4 x 7 1/4 |
The designer currently suggests 1/8 inch of coverage, but the image determines whether that works. The video's larger-coverage example illustrates easier positioning when the edge details can be cropped; it is not a rule for every artwork.
When showing paper, confirm there is paper left behind the mat. A 5 x 7 inch image on a larger sheet can have a 5 1/4 x 7 1/4 opening if its margins allow it. A whole sheet measuring only 5 x 7 cannot overlap that larger opening. Even with overlap, plan an appropriate attachment method; a mat is not a substitute for mounting. See how to frame a print without damaging it.
Step 4: Determine the outside mat size
For a single rectangular mat, outside width equals opening width plus left and right mat borders; outside height equals opening height plus top and bottom borders. If fitting an existing frame, establish its required insert size separately.
Example: a 7 3/4 x 9 3/4 inch opening with 2-inch mat borders on all four sides gives an outside mat size of 11 3/4 x 13 3/4 inches.
If the outside mat must be 11 x 14 inches, that same centered opening leaves 1 5/8-inch left and right borders and 2 1/8-inch top and bottom borders. Fitting a frame and choosing visually balanced borders are separate decisions.
Do not use the frame's exterior measurement as the insert size. Use a correctly fitting existing mat or establish the required insert dimensions with the frame measurement guide. The frame lip will hide some of the mat's outside edge. Check that the whole paper sheet, glazing, backing, and mounting also fit the package.
For color, material, thickness, or layered-mat choices, use how to choose a picture mat. A double or triple mat adds reveals; check the complete design rather than treating each reveal as an extra outside border.
Step 5: Match your measurements to the designer
Match your measurements to the designer's field labels. Artwork Size with Edge Coverage calculates an opening; Window Width and Window Height specify the opening directly. Check the resulting window and outside mat dimensions before continuing.
- Artwork Size + Edge Coverage: enter the measured image dimensions when covering its edges. For 8 x 10 with 1/8 coverage, enter 8 x 10, not 7 3/4 x 9 3/4.
- Window Width + Window Height: when the border-showing path asks for exact window dimensions, enter the area you want visible, including the desired paper border.
- Mat Border OR Outside Size: set the border widths or the required full board dimensions after checking the window.
Recheck the displayed opening before continuing. If you have already calculated the opening, do not enter it as the original image size and then apply coverage again. If using zero coverage to specify an exact opening, verify that result and plan the artwork attachment separately.
Keep this measurement worksheet with your artwork
Orientation: portrait / landscape Units: inches
Whole sheet: width __________ height __________
Image widths: top __________ middle __________ bottom __________
Image heights: left __________ center __________ right __________
Keep visible: signature / edition number / edge detail / paper border / other __________
Cover or reveal: left ______ right ______ top ______ bottom ______
Final window: width __________ height __________
Outside mat: width __________ height __________
Artwork attachment method: __________
Final check: preview all four edges, check the paper behind the window, and confirm the designer shows the intended opening.
You can print this page or copy these fields into your project notes.
Check these problems before ordering
| Problem | What to check |
|---|---|
| The opening is smaller than expected | Check whether you subtracted overlap yourself and then applied Edge Coverage again. |
| White paper shows along one edge | Measure the image at several positions. Check squareness, alignment, and whether the coverage conceals the border everywhere. |
| A signature is hidden | Include the signature in the visible-area measurement. Preview the lower edge separately. |
| The paper does not overlap the opening | Compare the whole sheet with the opening, not just the printed image. Reconsider the layout and attachment method. |
| The mat fits but the paper does not | Check the whole sheet against the usable package dimensions. Ask for advice before trimming original or irreplaceable artwork. |
Common mat-measuring questions
Is mat opening size the same as artwork size?
No. Artwork size may refer to the image or the whole sheet, so record both. The mat opening is the area you will see. It is smaller than the image when covering its edges, or larger than the image when revealing a paper border.
How much should a picture mat overlap the artwork?
The current WebPictureFrames designer suggests 1/8 inch of edge coverage. This means 1/8 inch on each edge, reducing the opening by 1/4 inch in both width and height. Choose coverage that suits the actual image, edge details, and mounting plan; it is not appropriate for every piece.
What opening do I need for an 8 x 10 image?
With 1/8 inch of coverage on each edge, an 8 x 10 inch image has a 7 3/4 x 9 3/4 inch opening. With 1/4 inch on each edge, it has a 7 1/2 x 9 1/2 inch opening. These examples assume you want to cover the image edges.
How do I keep a signature or white border visible?
Include the signature and the desired visible paper in the measured opening. For a 5 x 7 inch image with 1/8 inch of paper showing on every side, the opening is 5 1/4 x 7 1/4 inches. Confirm the sheet extends behind the opening on every side and plan suitable artwork attachment.
Can I use zero edge coverage?
Zero coverage leaves the opening equal to the entered dimensions. If you entered the whole sheet size, the mat will not overlap it. Use an appropriate attachment method and backing; the opening size alone does not secure the artwork.
About this guide
Based on the WebPictureFrames.com mat-measuring video and the current Custom Mat Designer. Our family-owned framing business has more than 40 years of practical experience. The examples here explain the measurement arithmetic separately from the video's individual artwork. Learn about our framing shop.
Ready to compare materials? Browse custom picture mats. For an unusual border, fragile surface, or uncertain fit, ask our framing specialists before ordering.
Made in the USA
Handcrafted by American framing experts
Family Owned
Serving customers for over 40 years
Premium Shipping
Professionally packaged for safe delivery
Ready to Hang
Hardware included with all frames
Framing Specialists
Over 40 years of custom framing experience
