
Ok

Ok

What is the question
Cancel
PICTURE FRAMES
 CUSTOM PICTURE FRAMES
Design Your Framing Package Online!
Add Mats, Glass & Acrylic, Mounting Board And More.





Search
☰

My Account
Log In
Favorites
Saved Designs
Shopping Cart

Position paper artwork behind a mat, attach it from the top, and leave the remaining edges free. Follow two methods demonstrated in our frame shop.
Watch: two ways to hinge paper artwork
The demonstration starts with a book-hinged mat and artwork attached to backing with T hinges. It finishes with a quicker direct-to-mat method for smaller pieces.
Choose the attachment before you start
Support the artwork from the top rather than taping all four edges. This leaves the paper room to respond to changes in humidity instead of fixing it rigidly to boards that may move differently.
| Method | What attaches to what | Why choose it |
|---|---|---|
| Book hinge plus T hinges | The mat hinges to the backing; the artwork hinges separately to that backing. | You want to open the mat and recheck the artwork's alignment before closing the package. |
| Direct top-edge attachment to the mat | The artwork hangs from the reverse of the mat. | The video presents it as a faster option for smaller pieces where exact alignment is less critical. |
A book hinge is a board-to-board connection. It does not attach the artwork. Neither method replaces the backing or the hardware that retains the complete package in the frame.
Choose a method suited to the artwork. This video demonstrates adhesive contact with the back of a paper sheet. Before applying tape to a fragile, valuable, irreplaceable, or tape-sensitive original, get advice on the appropriate mounting method. The tape and paper must be compatible; the demonstration is not a universal mounting specification.
Prepare the mat, backing, artwork, and tape
- A window mat and backing board with matching outside dimensions.
- Paper artwork and an opening that shows the intended image, borders, and signature.
- Suitable flexible tape for the board-to-board hinge and artwork-appropriate hinging material for the paper attachment.
- A clean flat work surface, ruler, and a suitable clean protected weight for keeping the artwork aligned.
The demonstrator names P90 for the artwork hinges. That identifies the material shown, rather than establishing that every adhesive tape is suitable for your paper. Do not substitute ordinary office or masking tape for an artwork-appropriate material.
Check the framing tape and mounting supplies for the intended job. The mat designer has a separate option to add hinging tape; check your selection and cart if you need it.
If the opening or dimensions are uncertain, use the mat-measuring guide before attaching anything.
Method 1, step 1: Book-hinge the mat to the backing
Align the matching mat and backing edges like an open book. Join the adjacent edges with suitable flexible tape so the mat can open and close without losing its position. This hinge joins the boards; it does not attach the artwork.
- Place the boards beside one another with the mat opened away from the backing.
- Align their matching edges so the mat will close over the backing in the intended orientation.
- Bridge the joining edge with suitable flexible tape and press it onto the board surfaces.
- Close and reopen the mat to check that the boards line up and the joint moves freely.
Keep this board-joining tape separate from the artwork. It should not touch the image or fasten the sheet around its perimeter.
Step 2: Position the artwork behind the window
Position the artwork face up on the backing. Close the mat and check the visible image, borders, signature, and alignment. Hold the position with a suitable clean protected weight clear of delicate image areas, then open the mat without shifting the artwork.
Check the top, bottom, and both sides rather than assuming the image or its paper border is square. Measure the visible border when alignment matters, and confirm that lettering or a signature remains visible.
Keep tools and weights away from fragile image surfaces. If you cannot hold the position without risking the artwork, stop and choose another handling or mounting approach.
Step 3: Make the top-edge T hinges
Attach a short upright tape tab to the reverse of the artwork's top edge with a small contact area, leaving the rest projecting above the sheet. Anchor the exposed tab to the backing with a second strip across it to form a T. Keep adhesive off the image surface and leave the other artwork edges free.
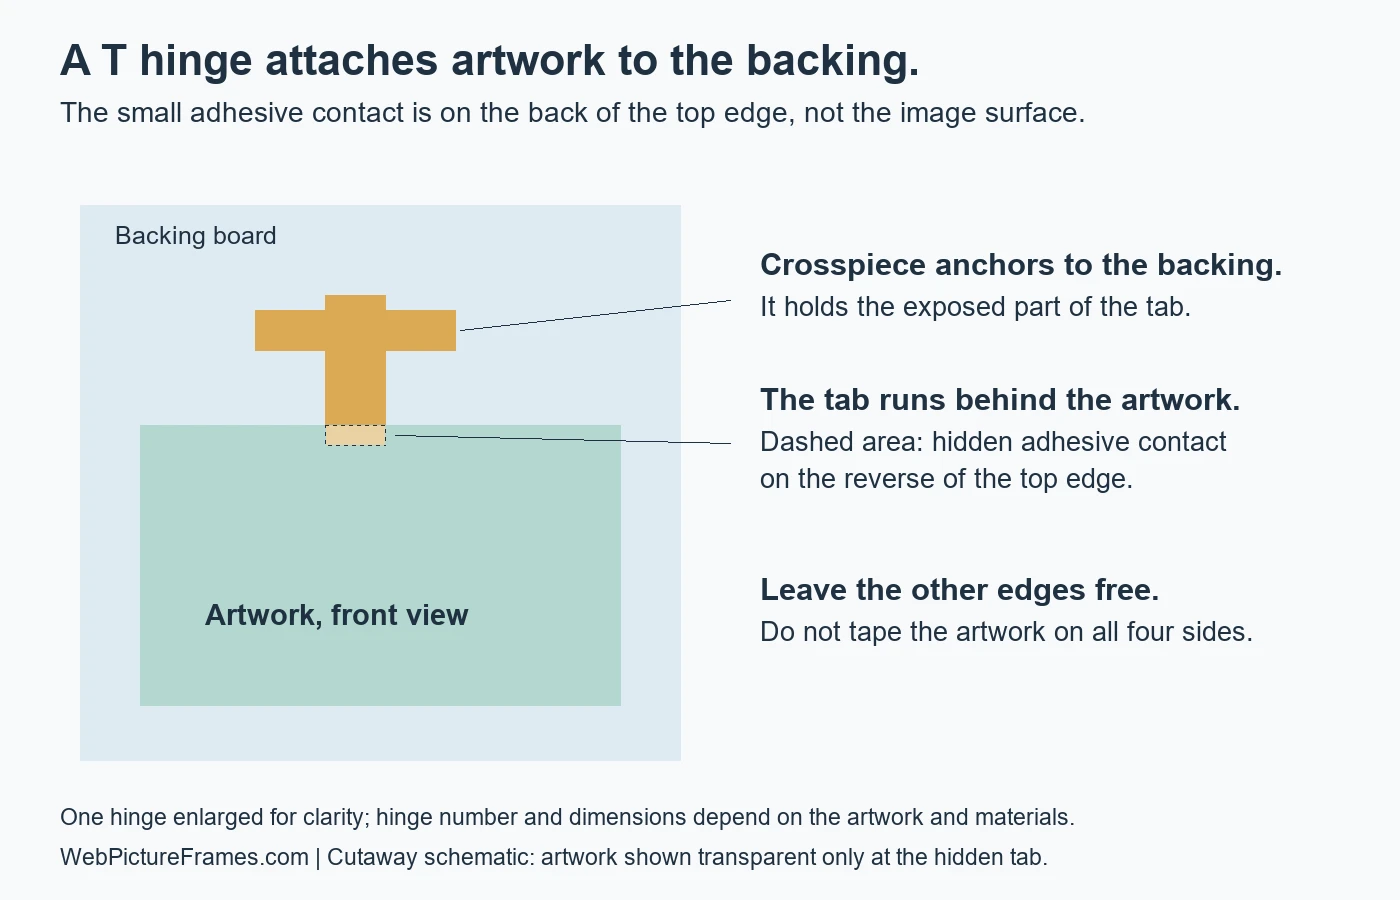
- Lift the top edge only as much as needed to reach the reverse without creasing the paper or losing alignment.
- Apply the small contact portion of the upright tab to the back of the top edge. The remaining tab projects beyond that edge.
- Lay the artwork back into position on the backing.
- Place the crosspiece across the exposed tab above the artwork, anchoring it to the backing to form the T.
- Use a hinge arrangement suited to the sheet. Leave the bottom and side edges unattached.
The video uses about 1/8 inch of adhesive contact on the back of the top edge in its example. That demonstrates limiting adhesive contact; it does not specify a universal contact size or hinge count for all papers and weights.
Step 4: Close the mat and check the result
Close the mat, check the visible crop and alignment again, and confirm the hinges remain behind the mat. Ensure the artwork is supported at the top without its other edges being taped down. Hinging positions the sheet; the completed frame still needs suitable backing, glazing or spacing, and securing hardware.
Recheck the crop with the mat closed. Confirm no exposed adhesive or hinge projects into the window and that the mat closes without pushing the artwork out of position.
Method 2: Attach a smaller piece directly to the mat
The video offers this as a quick alternative where precise alignment is less critical. The artwork attaches to the reverse of the window mat instead of being T-hinged separately to the backing.
- Prepare the top-edge attachment on the reverse of the artwork, keeping adhesive off its front.
- Position the artwork behind the mat and inspect the crop through the window before pressing the attachment into place.
- Adhere the exposed portion of the top-edge tape to the reverse of the mat, following the arrangement shown in the video.
- Check the front alignment and leave the other artwork edges free.
This does not make backing unnecessary, and it does not make every paper suitable for adhesive attachment. Use the separate-backing method when its alignment workflow is more useful, or seek advice when the artwork needs another mounting approach.
Check these problems before closing the frame
| Problem | What to check |
|---|---|
| The mat opens but the artwork moves | A book hinge only joins the boards. Check that the separate artwork attachment is present. |
| The image is crooked or a signature disappears | Recheck the window crop and the artwork's position before committing the adhesive. Do not force a correction by taping down more edges. |
| Tape is visible in the window | Check the attachment position and overlap before framing. The hinges should sit behind the mat. |
| The paper looks restrained or starts to buckle | Check for tape on the sides or bottom and for an unsuitable mounting arrangement. Do not try to flatten the problem by tightening the frame. |
| Existing tape needs to come off | Do not pull it off a fragile original. Ask for help with removal and a suitable replacement mount. |
Common artwork-hinging questions
What is the difference between a book hinge and an artwork hinge?
A book hinge joins the window mat to its backing board so it opens like a cover. An artwork hinge attaches the paper artwork to the backing or mat. The book hinge alone does not hold the artwork in position.
Should I hinge the artwork to the mat or to the backing?
The video demonstrates both. Book-hinging the mat and attaching the artwork to backing with T hinges allows repeated alignment checks. Direct top-edge attachment to the mat is a quicker alternative shown for smaller pieces where exact alignment is less critical. Choose a method and adhesive suited to the actual artwork.
Why should I avoid taping all four sides of the artwork?
Paper, mat board, and backing can expand and contract differently. Fixing every edge restrains that movement and can contribute to buckling. The video supports the artwork from the top while leaving the other edges free.
How much tape should touch the artwork?
The demonstrator uses about 1/8 inch of contact on the back of the top edge in the example. This illustrates a small adhesive contact area, not a universal specification for every paper, adhesive, weight, or size. Do not use it as a blanket rule for fragile or valuable work.
How many T hinges do I need?
There is no universal hinge count for every sheet. The number, strength, and size must suit the artwork, support, and adhesive. The diagram enlarges one hinge to explain its construction; it does not specify the complete mounting arrangement for your artwork.
Is hinging tape included with a custom mat?
The current mat designer offers a separate option to add hinging tape. Check that option and the cart if you need tape; do not assume ordering a mat automatically adds it.
Complete the framing package
For the complete process, use how to frame a paper print without damaging it. For the fitting sequence, follow how to fit art into a wood frame.
Need to choose the support? Compare backing-board options. For an uncertain attachment or delicate artwork, ask our framing specialists before applying tape.
This guide follows the WebPictureFrames.com hinging demonstration. Our family-owned business has more than 40 years of practical framing experience. Learn about our framing shop.
Made in the USA
Handcrafted by American framing experts
Family Owned
Serving customers for over 40 years
Premium Shipping
Professionally packaged for safe delivery
Ready to Hang
Hardware included with all frames
Framing Specialists
Over 40 years of custom framing experience
