
Ok

Ok

What is the question
Cancel
PICTURE FRAMES
 CUSTOM PICTURE FRAMES
Design Your Framing Package Online!
Add Mats, Glass & Acrylic, Mounting Board And More.





Search
☰

My Account
Log In
Favorites
Saved Designs
Shopping Cart
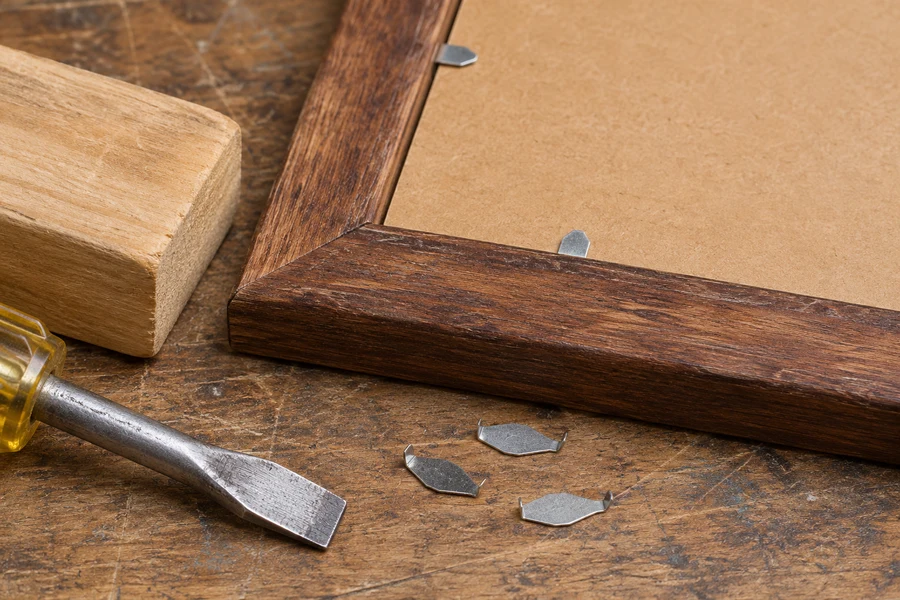
Push-point glaziers retain the framing package from the back. Use the controlled tool position and controlled push into the wood, with a protective block beside the rail.
Watch: How to Install Glazier Points in a Picture Frame
Prepare the frame and tools
This method uses a wood frame with its backing in place, loose push points, a broad flat-blade screwdriver, a protective block or weight, and a hammer. Push points are hand-installed retainers; they are different from strips of points loaded into a point driver.
Seat the complete framing package and check alignment before installing the points. Work face down on a protected surface. The point must overlap the backing while its sharp end enters the frame's inside wood edge, not the artwork or glazing.
Push-point fitting problems and checks
| Problem | Check before continuing |
|---|---|
| The point bends before entering. | Inspect alignment, tool contact, wood suitability, and whether the correct point is being used. |
| The backing dents. | Remove downward pressure from the tool and reassess how the package is supported. |
| The rail slides or twists. | Reposition the clean outside support and stabilize the frame on the bench. |
| The point cannot overlap the package. | Check package depth and whether a different retaining method is required. |
| The package moves after fitting. | Inspect the complete retaining arrangement and frame fit; do not add random points without identifying the cause. |
1. Position the point and protect the outside rail
- Place a point flat on the backing at the inside edge of the wood frame, with the sharp end facing the wood.
- Put the protective block against the outside of the rail being worked on. This method uses it to help protect the frame finish and the hand if the screwdriver slips.
- Keep your fingers clear of the screwdriver's path and seat its broad tip against the point's raised shoulder.
A narrow screwdriver tip is easier to slip off the shoulder. Use a suitable push-point tool or a broad flat blade that engages the point securely.
2. Push the point into the wood
- Support the frame and push the screwdriver towards the wood, keeping the point flat against the backing.
- Advance until the point is securely embedded and its exposed portion retains the backing.
- Move to the next position and repeat, keeping the package seated as you work around the frame.
Point count and spacing depend on frame length, material, and the complete package. Choose an arrangement that retains the whole package using hardware suitable for the frame.
3. Start a resistant point with controlled taps
For the hand-inserted push-point method, gentle hammer taps on the screwdriver can start a resistant point in harder wood before continuing with hand pressure. Maintain the same controlled insertion direction and protective block position.
Do not strike the glazing or force a point that bends, slips, or damages the frame. Stop and reassess the hardware or use a compatible fitting tool if the wood will not accept the hand-installed point cleanly.
4. Check the retained package
Inspect all sides: each point should engage the wood and overlap the backing. The backing should remain flat, with no excessive pressure bowing the package. Check the image and glazing from the front before hanging.
For other retainers, compare tabs, driver-installed points, and offset clips. For the preceding glazing and artwork steps, follow the complete wood-frame fitting guide. Browse art securing hardware for compatible parts.
Identify the point before choosing a tool
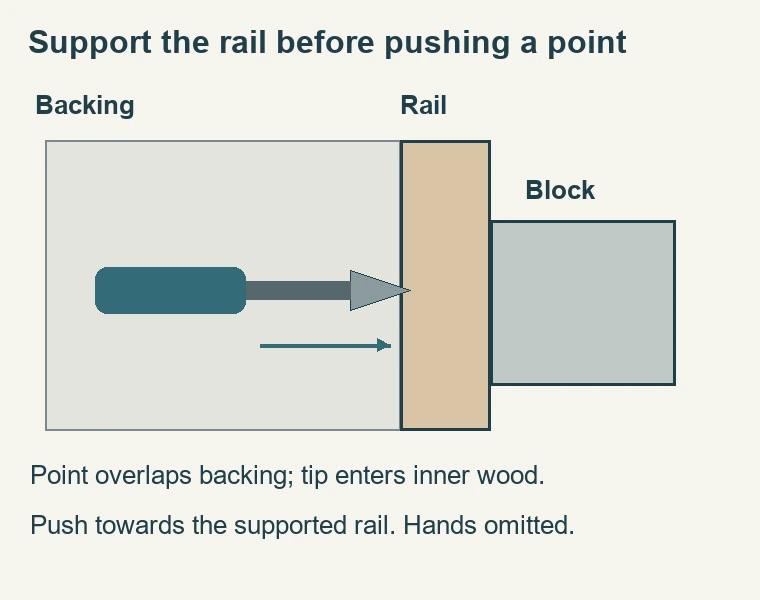
- This method concerns hand-inserted glazier points in a wood frame. These small metal retainers overlap the back of the framing package while their pointed ends enter the inner wall of the frame. They are different from screws, bendable tabs already installed by a frame shop, and the points loaded into a dedicated driver. The similar purpose does not make those parts interchangeable. Identify the actual component in your kit before following an installation method.
- There is no universal number of points, fixed distance between them, or maximum frame size for this fitting arrangement. Those choices depend on the retainer, frame, package, and any manufacturer's instructions. Insert the compatible point under control, and assess retention for the complete assembly rather than assuming a few points suit every large or heavy package.
- Look for the surface against which the hand tool is intended to bear. The driver should push the point into the wood rather than slide across the backing towards the artwork. A broad, appropriate contact surface gives more control than balancing a sharp tool on an unsuitable edge. If the point design does not match the hand-inserted type, check its own instructions. Do not reshape an unfamiliar retainer to force compatibility with this method.
Check the package and the available wood
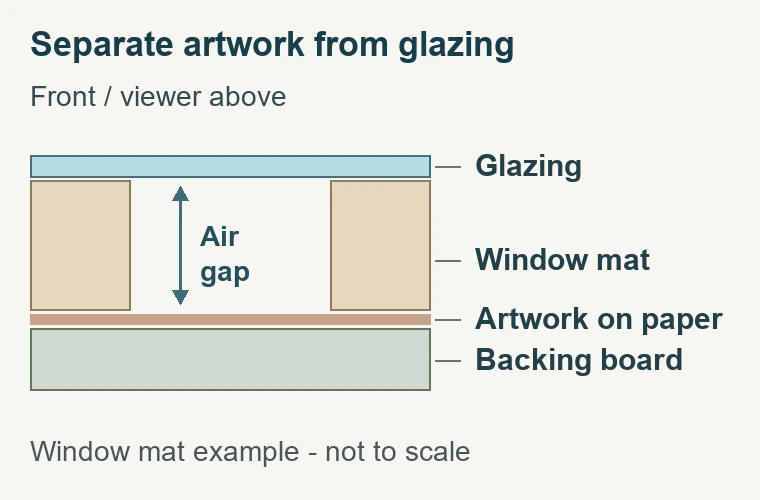
- Before installing a point, confirm that the glazing, mat, artwork, and backing are seated in their intended order. Remove dust and inspect the front before adding retainers. Correcting a visible speck after the package is secured means opening it again, which creates more handling and more opportunities for damage. A clean dry fit also shows whether the backing lies evenly or whether one component is catching the frame's inside edge.
- The point needs a suitable wood wall at the level where it will enter. If the completed backing projects beyond the frame, the geometry differs from a package seated below the back surface. Do not force a point diagonally downwards to compensate for inadequate depth. Reassess the rabbet and the retaining method. An offset clip may be appropriate for a different depth arrangement, but its size and screws must be selected for that actual package.
- Check the proposed insertion path against the moulding profile. A wide-looking frame face does not prove that there is enough wood behind every part of the rabbet. The point must remain within suitable frame material and clear of the artwork package. This is especially important when the inner wall is thin or the profile changes sharply. Stop if you cannot identify a suitable path rather than relying on the front appearance of the rail.
Use controlled pressure rather than force
- A protective block beside the frame helps support the outside of the rail while the point is pushed in from the inside. Its purpose is to let you work against a supported frame rather than allow the whole assembly to skid across the bench. Keep the block and work surface clean. Grit between a finished moulding and its support can mark the finish even when the point itself is installed correctly.
- Set the point in its intended position on the backing and align the tool with the direction of insertion. Make sure the point overlaps the backing enough to perform its retaining job without directing the tip into the package. Maintain a stable hand position and keep fingers out of the path a slipping tool would take. The useful action is a controlled push into the wood, not downward pressure through the backing towards the glazing.
- Increase pressure gradually while watching the point and the rail. If the tool skids, the point buckles, or the frame moves, reset the arrangement. More force is not a correction for poor alignment. Inspect the tool contact and the outside support, and confirm that the retainer is suitable for the wood. A damaged point should be replaced with an appropriate part rather than straightened repeatedly and relied on to hold the assembly.
- Gentle tapping is an alternative when hand pressure does not start this type of push point. Keep the same supported setup and controlled insertion direction. Keep the impact directed through the suitable tool contact and away from the glass. Do not strike the glazing, hammer through the backing, or use the frame's finished edge as an uncontrolled bearing surface. If the wood continues to resist, reassess the hardware and method before continuing.
Check each retainer and the completed frame
- After inserting a point, inspect it before moving to another location. It should remain seated in the wood and overlap the backing in the intended way. Look for a shifted backing edge, crushed board, a raised or distorted point, and damage to the rail. Correct the cause while the problem is local rather than finishing the entire perimeter and discovering that several points have been installed against an uneven package.
- Retain the package without forcing its contents into a compressed stack. Mats, glazing, paper, and backing have different jobs; the point is there to keep them seated. It should not be used as a lever to flatten a warped component or make an over-deep package disappear into a shallow rabbet. If the assembly cannot sit properly before the points are installed, solve that fit problem first.
- When the retaining arrangement is complete, support the frame while inspecting it from the front. Confirm that the image remains aligned, no spacer or backing edge has become visible, and no debris was introduced. Then inspect the back for loose metal or tools before adding any paper cover. A dust cover conceals the work but does not make loose or poorly placed points secure.
Common problems and useful next checks
- When reopening a frame, remember that rigid glazier points are not the same as flexible tabs. Use the removal method appropriate to the installed part, protect the artwork, and do not repeatedly bend rigid points as though they were designed as hinges. If you expect frequent picture changes, consider that requirement when choosing the frame and retaining arrangement. Installation convenience and repeated-opening suitability are separate questions.
- Finish by separating retention from wall hanging. Points hold the artwork package in the frame. They do not carry the frame on the wall and are not attachment points for hanging wire. Complete that separate task with hardware suited to the frame and display. Keeping those functions separate prevents an apparently finished back from hiding an incomplete or unsuitable hanging arrangement.
Made in the USA
Handcrafted by American framing experts
Family Owned
Serving customers for over 40 years
Premium Shipping
Professionally packaged for safe delivery
Ready to Hang
Hardware included with all frames
Framing Specialists
Over 40 years of custom framing experience
