
Ok

Ok

What is the question
Cancel
PICTURE FRAMES
 CUSTOM PICTURE FRAMES
Design Your Framing Package Online!
Add Mats, Glass & Acrylic, Mounting Board And More.





Search
☰

My Account
Log In
Favorites
Saved Designs
Shopping Cart
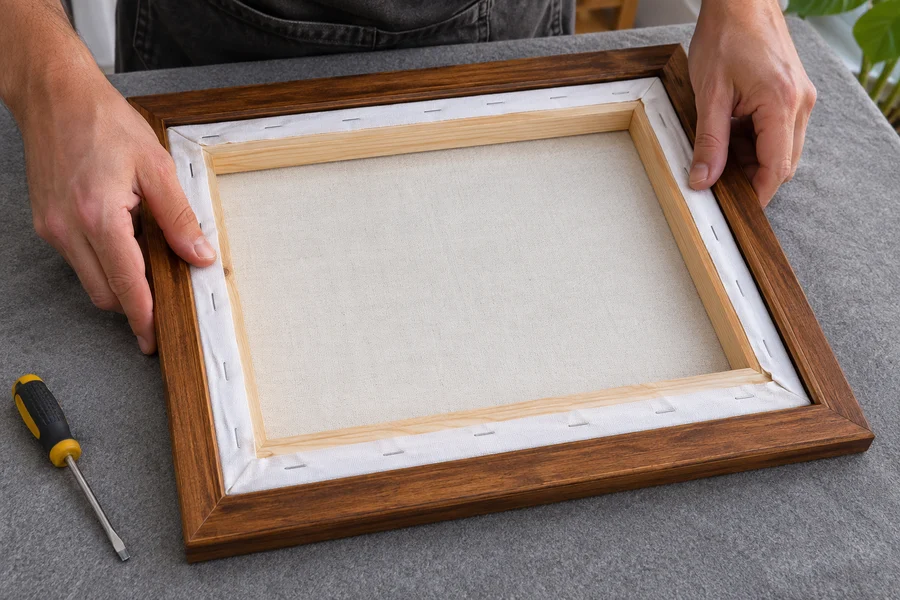
Fit an already-stretched canvas into a standard wood frame using the securing hardware selected for its thickness. See how offset clips work when the canvas projects at the back or sits inside the rabbet.
Watch: secure stretched canvas with offset clips
The video starts with an already-stretched canvas and demonstrates securing it in a traditional wood frame. It does not cover stretching loose canvas.
Standard frame or floater? This method uses a standard frame whose front lip overlaps the canvas edge. A floater has a different mounting arrangement and a visible reveal around the artwork; use the floater installation guide for that frame type.
1. Check the actual canvas size and depth
Measure the actual stretched canvas width, height, and thickness. Confirm that it fits the frame opening and assess its depth against the frame's usable rabbet. Report the thickness of materials you supply through Art Thickness so the securing hardware can be selected for the package.
Canvas thickness, moulding height, and usable rabbet depth are different measurements. The available space behind the frame lip determines where the back of the canvas will sit. A deeper rabbet alone does not establish that a frame is suitable for every canvas.
Use the artwork measurement guide and the rabbet-depth guide if those dimensions are uncertain.
In the current designer, Art Thickness describes materials you supply yourself. Do not add the thickness of materials ordered from us a second time; the designer accounts for those separately when the securing hardware is set up.
2. Place the stretched canvas in the frame
Use a clean protected work surface and place the already-stretched canvas into the back of the standard wood frame. Check the visible image and the seating against the frame lip before attaching any clips.
- Protect the frame finish and painted surface during handling; keep tools clear of the canvas fabric.
- Check that the canvas seats without forcing its sides into the opening.
- Confirm the intended orientation and the visible crop from the front.
- Keep the frame and canvas supported while working at the back.
For the demonstrated method, have the supplied offset clips, suitable frame screws, and a matching screwdriver ready. Verify the actual hardware and screw length before installation; this guide does not specify one screw size for every moulding.
3. Match the clip to the depth relationship
Check whether the canvas back projects beyond the frame or sits below the frame's back edge. Use the supplied offset-clip arrangement for that depth relationship. Confirm that the clip can retain the stretcher edge while its screw attaches to the picture frame.
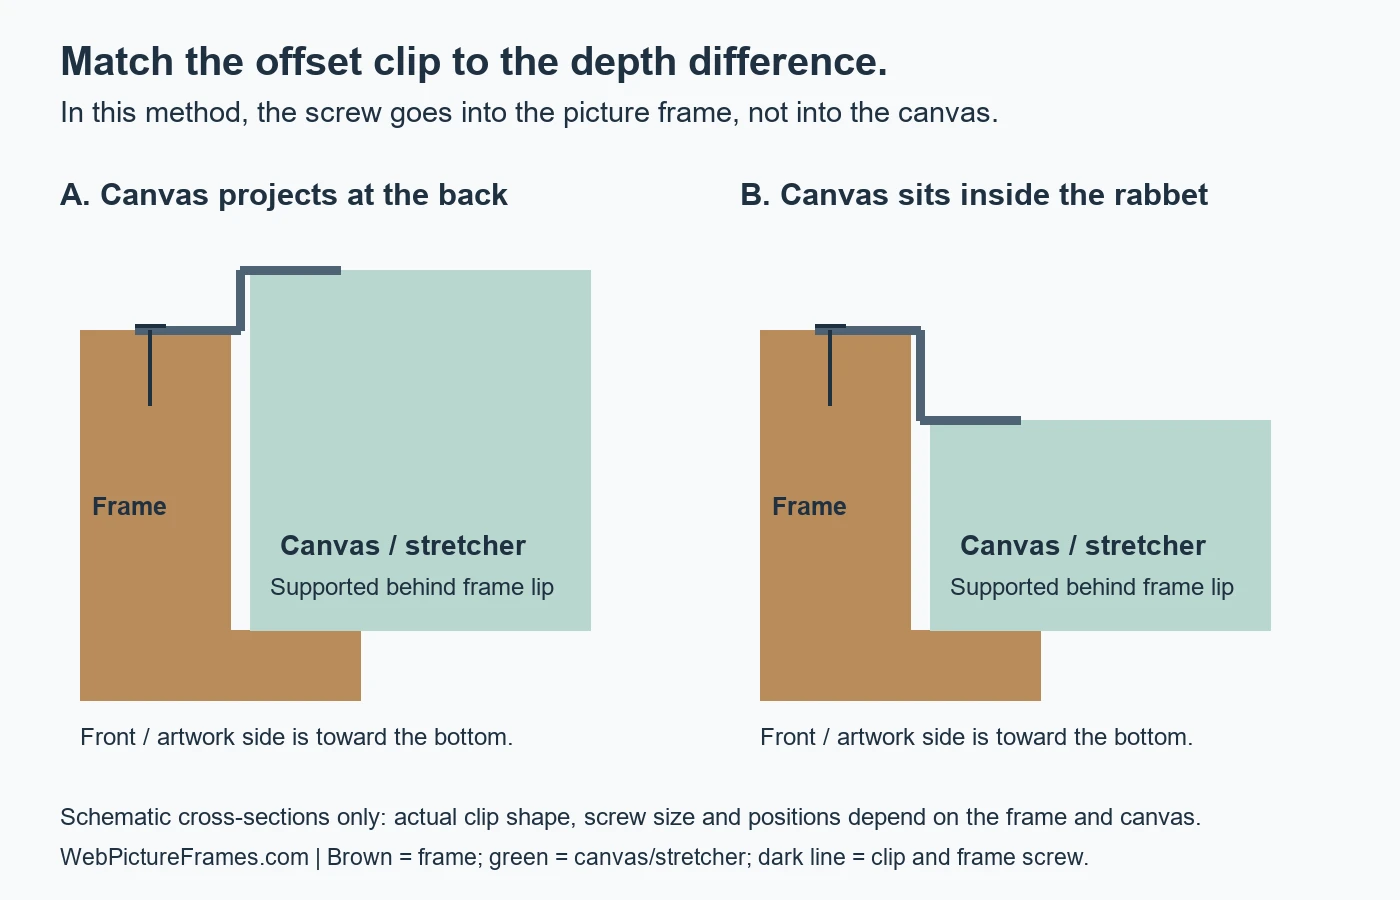
Canvas projects beyond the back of the frame
The video shows this as common. The selected offset clip bridges the difference between the frame's back and the stretcher edge. The rear projection may be visible from the side, so assess its appearance and the hanging arrangement as well as whether the hardware physically fits.
Canvas sits inside a deeper rabbet
The demonstrator reverses the supplied clip arrangement to reach down to the recessed canvas. Confirm the hardware can engage the stretcher edge before tightening. Do not substitute the floater-frame mounting method.
A clip in the video sits at a slight angle before tightening. That example does not mean any clip will work across any depth difference. If it cannot retain the canvas with an appropriate attachment to the frame, stop and confirm the hardware selection.
4. Screw the clips into the picture frame
Position the supplied clips as instructed for the canvas and frame. Check screw suitability for the actual frame before driving them. In the demonstrated method the screws go into the picture frame, not into the canvas or its stretcher bars. Tighten them snugly so the clips retain the canvas without forcing the assembly.
- Position the first supplied clip so it bears on the stretcher edge and its screw hole is over suitable frame material.
- Check the screw length and location against the actual moulding so it cannot emerge through the front or contact the canvas.
- Start the screw in the picture frame and tighten snugly, as shown in the video.
- Install the remaining clips in the arrangement supplied for the frame and canvas, keeping the canvas seated and aligned.
- Check each clip's engagement without adding excessive pressure or distorting the assembly.
Do not turn the demonstration into a clip-count rule. Two clips are used briefly to demonstrate retention; the small recessed example uses four, and the video notes that larger canvases need more. Use the quantity and placement selected for your actual package.
The video also mentions points and push-point glaziers as possible alternative retention hardware. They need a compatible frame and installation method; do not improvise a substitution if your supplied setup is unclear.
5. Check the canvas before hanging the frame
Confirm that the canvas remains seated, the clips engage as intended, and the image is aligned. Check the rear projection and the separate hanging-hardware arrangement before placing the completed frame on the wall.
- The visible image and orientation are correct.
- The canvas is seated against the intended frame support.
- Every clip engages as intended, with suitable screws secured into the picture frame.
- No screw or tool has penetrated the canvas fabric.
- The rear projection is compatible with the intended display and hanging arrangement.
Securing clips are not wall-hanging hardware. Check the selected frame-side hangers or wire and a wall fixing suited to the finished frame. The framing-order checklist separates those jobs.
If the canvas or clips do not fit
| Problem | What to check |
|---|---|
| The canvas projects at the back | Compare canvas thickness and usable rabbet depth. Check the selected offset and hanging clearance rather than assuming the canvas must sit flush. |
| The clip will not reach the canvas | Confirm the depth relationship and supplied clip orientation. Do not force an unsuitable clip into position. |
| The screw location risks the canvas | Stop and recheck the frame attachment point and screw suitability. The screw goes into the picture frame in this method. |
| The canvas shifts after tightening | Recheck seating, clip engagement, and whether all supplied clips are installed as intended. |
| The frame fits but the rear looks too deep | Assess side appearance and wall clearance separately from retention. Ask about a different frame depth if the display result is unsuitable. |
Common stretched-canvas fitting questions
Is it normal for stretched canvas to project beyond a wood frame?
The video shows this as a common situation. A compatible offset-clip arrangement can retain a canvas that projects beyond the frame's back. That does not establish that every canvas and frame combination is suitable; check the actual fit, clip engagement, screw attachment, and hanging arrangement.
Do the screws go into the stretcher bars?
Not in this offset-clip method. The demonstrator screws the clips into the picture frame, and the clips retain the canvas at the stretcher edge. Do not confuse this with the separate screw-through-ledge method used for some canvas floater frames.
What if the canvas sits below the back of the frame?
The video demonstrates reversing the supplied offset-clip arrangement to reach the recessed canvas. Use the arrangement selected for your frame and canvas depth. Do not force an unsuitable clip to bridge a gap it cannot accommodate.
How many offset clips should I use?
Use the quantity and placement specified for your actual canvas and frame. The video briefly demonstrates retention with two clips and shows four on a small recessed example, while noting that larger canvases need more. Those examples are not a universal count or spacing rule.
Do I enter the frame's height as Art Thickness?
No. Report the thickness of the artwork and other materials you are supplying yourself, following the current selector instructions. The designer already accounts for materials ordered from WebPictureFrames. Canvas thickness and usable frame rabbet depth are separate measurements.
Can I use the same instructions for a canvas floater frame?
No. This guide covers a standard wood frame with a front lip overlapping the canvas edge. A floater frame has a different support and mounting arrangement and uses its own installation instructions.
Check the frame and hardware for your canvas
Browse wood picture frames and art securing hardware, checking compatibility with the actual canvas and frame. If the depth, offset, or screw attachment is uncertain, ask our framing specialists before installation.
This guide follows the WebPictureFrames.com stretched-canvas installation video and current Art Thickness instructions. Our family-owned business has more than 40 years of practical framing experience.
Made in the USA
Handcrafted by American framing experts
Family Owned
Serving customers for over 40 years
Premium Shipping
Professionally packaged for safe delivery
Ready to Hang
Hardware included with all frames
Framing Specialists
Over 40 years of custom framing experience
