
Ok

Ok

What is the question
Cancel
PICTURE FRAMES
 CUSTOM PICTURE FRAMES
Design Your Framing Package Online!
Add Mats, Glass & Acrylic, Mounting Board And More.





Search
☰

My Account
Log In
Favorites
Saved Designs
Shopping Cart
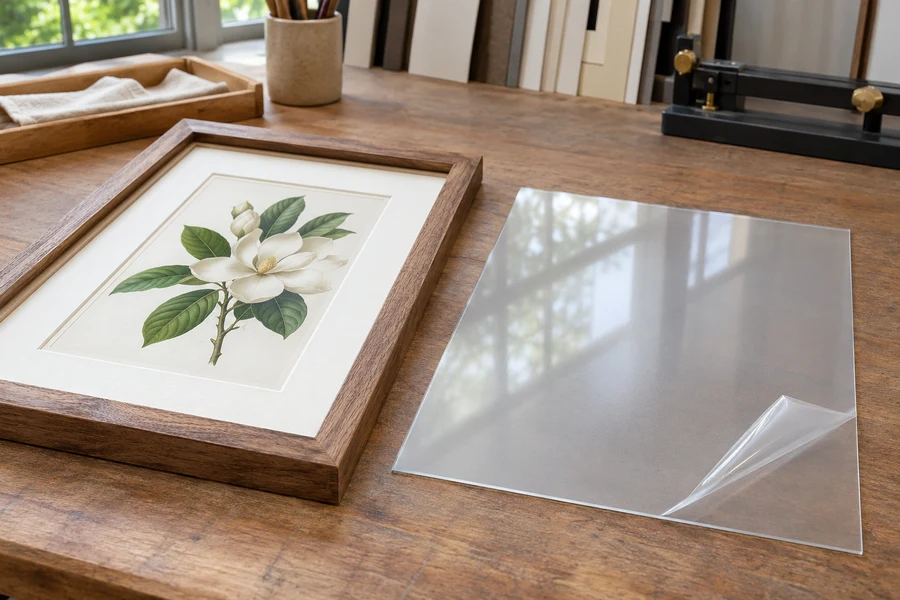
Non-glare acrylic softens recognizable reflections through a diffusing surface. Assess image clarity at the intended artwork-to-glazing gap before choosing this finish.
Watch: Non-Glare Acrylic for Picture Frames
Compare diffused and recognizable reflections
This option is reflection-control acrylic, also called P99. The example contrasts the recognizable reflected scene in regular acrylic with the softened reflection in non-glare acrylic. This is a diffusing surface, rather than the anti-reflective coated surface used on Optium Museum Acrylic.
Consider how the actual room will reflect in the frame. Consider bright rooms and lighting, but a sample viewed under your own conditions is more useful than assuming one finish will suit every wall.
Non-glare acrylic viewing checks
| Observation | Useful next comparison |
|---|---|
| Fine detail looks soft. | Check masking, cleanliness, orientation, and the actual artwork-to-glazing gap. |
| A bright area still obscures the image. | Compare the room lighting and whether a diffused reflection is preferable in that location. |
| The wrong surface seems to face the viewer. | Confirm the exact sheet instructions before reopening and reversing it. |
| UV filtering is uncertain. | Check the specified product rather than drawing a conclusion from the reflection. |
| A different pane is being considered. | Compare the complete feature set, thickness, size, and care requirements. |
Check image detail and spacing
- Compare the clear and non-glare appearances over artwork with detail similar to yours.
- Include the planned distance between artwork and glazing. Diffusing finishes can soften the image as that gap increases.
- View from the intended display distance and more than one angle.
- If you want reduced reflections with a clearer view through a deeper package, compare the coated anti-reflective option.
Do not remove necessary artwork separation merely to improve the appearance through the sheet. The mat, spacer, and glazing choices need to work together.
Choose UV filtering separately
Non-glare describes reflection control. It does not, by itself, identify the conservation version of the material. Compare conservation non-glare acrylic if UV filtering is part of the requirement.
Browse non-glare framing acrylic and confirm the product's orientation and cleaning instructions before fitting. For the wider comparison, see the acrylic guide.
Understand what the textured surface changes
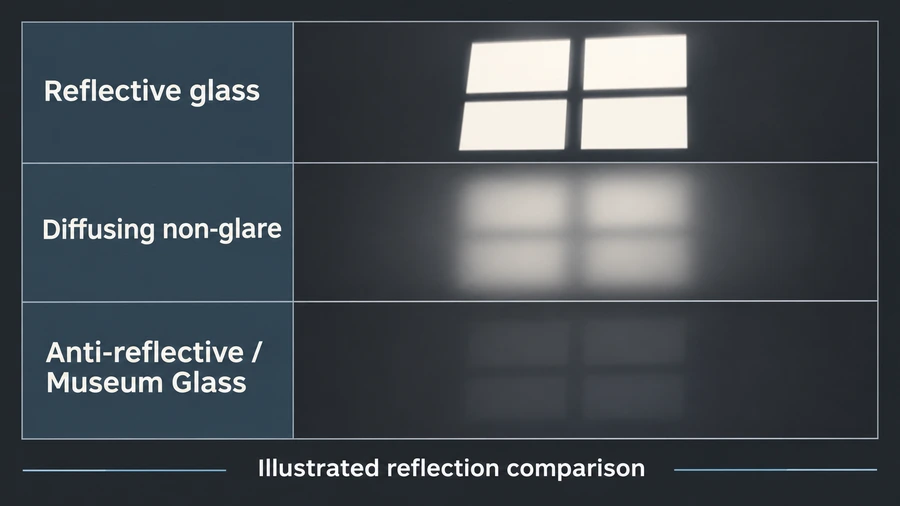
- Non-glare acrylic reduces the prominence of a recognizable reflection by diffusing it. Regular acrylic can return a more recognizable reflected scene. This is a surface-finish choice. It should not be confused with the coated anti-reflective approach or with a UV-filtering specification. A product can be non-glare without being the conservation version, and a conservation clear sheet can still have visible reflections.
- ACRYLITE describes its P99 non-glare surface as subtly textured and identifies the treated side's orientation. Use the instructions for the exact supplied sheet when fitting it. Finishes called non-glare are not necessarily identical; use the specified side orientation for the supplied sheet.
- The choice involves both reflection appearance and the view of the artwork behind the sheet. A diffuse reflection may be less distracting than a sharp reflected window, but the surface can also affect how fine details appear through the planned gap. Test both aspects together. Selecting a finish only by how it reflects an empty room leaves half of the practical comparison unanswered.
Keep a replacement consistent with the tested layout
If replacing an existing pane, retain the mat and spacer measurements that produced the preferred sample result. A new pane with a different thickness can change the available depth, while a revised mat stack can change the viewing gap. Recheck both instead of assuming that the same frame guarantees the same appearance. Keep the specified treated-face orientation with the order and identify it before discarding packaging. The final test should use the actual framed image and normal viewing position, because an acceptable loose-sheet sample does not by itself confirm a completed installation.
Build a useful sample test around your artwork
- Use image detail similar to the actual project: fine handwriting, small text, a detailed drawing, or a dark photographic area can reveal differences that a broad pale image conceals. Compare regular clear and non-glare samples without changing the image or room. Keep the samples clean and follow handling instructions so fingerprints or remaining masking do not become mistaken for a property of the finish.
- Reproduce the intended separation between artwork and glazing. If the final design uses a mat, a spacer, or several layers, include that distance in the test. A sample laid directly on a print can look different from the same sample above a deeper package. Do not eliminate necessary artwork clearance to obtain a sharper-looking sample. If the gap and finish do not work together, compare a different glazing approach.
- Look from the usual viewing position, then from a modest angle to either side. A picture above a desk, across a room, or in a hallway is not always seen straight on. The goal is an acceptable view in the actual display, not a single favorable angle under a work lamp. If the image's important detail becomes softer than you want, record that observation before changing unrelated frame or mat colors.
Evaluate the room before changing the glazing
- Identify the reflection that is causing concern. A window opposite the frame, a bright lamp behind the viewer, and a nearby illuminated screen produce different practical situations. Move a sample or temporary picture position to see whether the reflection changes. Sometimes a different wall location or lighting angle solves the problem without requiring a finish that changes the view through the package.
- Non-glare is not a promise that a bright light disappears under every condition. The reflected energy may be spread into a softer area rather than remain a sharp image. Compare whether that softer area is actually less intrusive over the artwork's dark and light regions. A broad haze across important detail may be less acceptable than a sharper reflection that can be avoided from the normal viewing position.
- Keep reflection control separate from exposure management. A less distracting pane does not make direct sunlight appropriate for sensitive work. The finish describes what the viewer sees at the surface; the project still needs its own UV and display decisions. If conservation filtering is required, select the stated conservation non-glare product rather than assuming the word non-glare supplies that property by itself.
Choose mats and spacers with the finish in mind
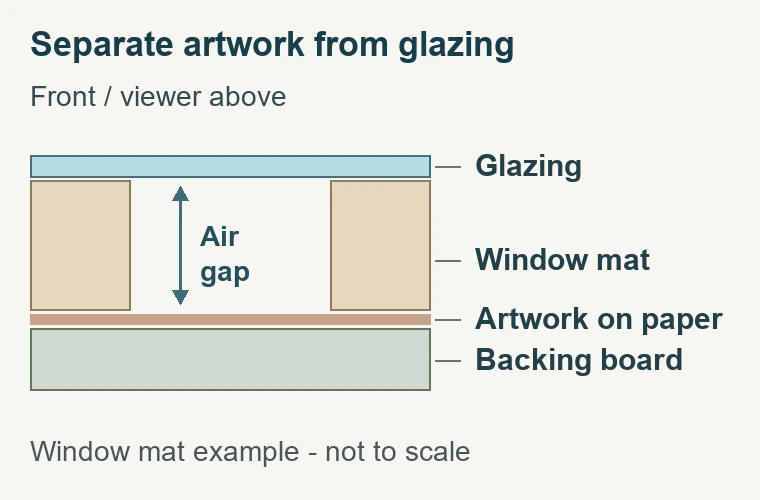
- The mat or spacer establishes a physical separation and may be necessary for the artwork. A deeper gap can change the appearance through a diffusing sheet, so it belongs in the glazing decision early. Do not order the frame and a complex mat stack first, then assume any non-glare pane will give the same clarity as a sample resting directly on the image.
- For a design with multiple mat layers, test the total stack rather than each sheet separately. The relevant distance is between the artwork surface and glazing in the finished arrangement. A narrow lower reveal and a broad upper mat can look attractive while still creating an optical result you do not like through the chosen pane. Consider that result before the components are cut and assembled.
- If reduced reflection is important and the required gap makes the diffusing appearance unsuitable, compare a coated anti-reflective option. Do not describe that choice as simply a clearer version of the same textured sheet. The approaches differ, and their other properties and care requirements must be checked separately. The broader glazing guides can help organize that comparison without changing the artwork's mounting requirements to accommodate a surface finish.
Prepare and orient the supplied sheet carefully
- Confirm the receiving size and actual thickness with the full package. The pane must fit the frame, and the frame must accommodate the pane, mats or spacers, artwork support, backing, and retainers. An outside moulding measurement does not establish the required glazing size. Follow the ordering system's conventions and confirm whether a separate allowance is requested before changing the entered dimensions.
- Keep protective masking in place during preparation as directed, then remove it from both sides for the final fit. Identify the treated face from the supplier's information instead of guessing from an uncertain reflection. Set the correct side outwards as instructed for the product. Inspect before closing the frame; discovering an orientation or masking problem after a dust cover is added creates avoidable handling.
- Use care instructions for the actual acrylic. Do not use a glass-cleaning method automatically or try to polish a textured face until it looks clear. The texture is part of its intended function. If a mark, scratch, or residue is present, identify it and consult the appropriate product guidance. A cleaning experiment can change the surface rather than restore the supplied finish.
Separate appearance problems before choosing a remedy
- Record the finish and orientation with the order details. If a future replacement is needed, a description such as acrylic is too broad to reproduce the viewing effect. Keep the selected product, dimensions, thickness, and any supplied handling information together. That record also prevents a later cleaner or fitter from treating a deliberately textured sheet as a scratched clear pane.
- Make the final decision with the artwork in its planned package and location. Non-glare acrylic is useful when its diffuse reflection and transmitted view meet the project's needs together. If one requirement remains unresolved, choose another specification or revise the display location. A thoughtful comparison is more reliable than selecting a pane solely because its name promises less glare.
Made in the USA
Handcrafted by American framing experts
Family Owned
Serving customers for over 40 years
Premium Shipping
Professionally packaged for safe delivery
Ready to Hang
Hardware included with all frames
Framing Specialists
Over 40 years of custom framing experience
