
Ok

Ok

What is the question
Cancel
PICTURE FRAMES
 CUSTOM PICTURE FRAMES
Design Your Framing Package Online!
Add Mats, Glass & Acrylic, Mounting Board And More.





Search
☰

My Account
Log In
Favorites
Saved Designs
Shopping Cart
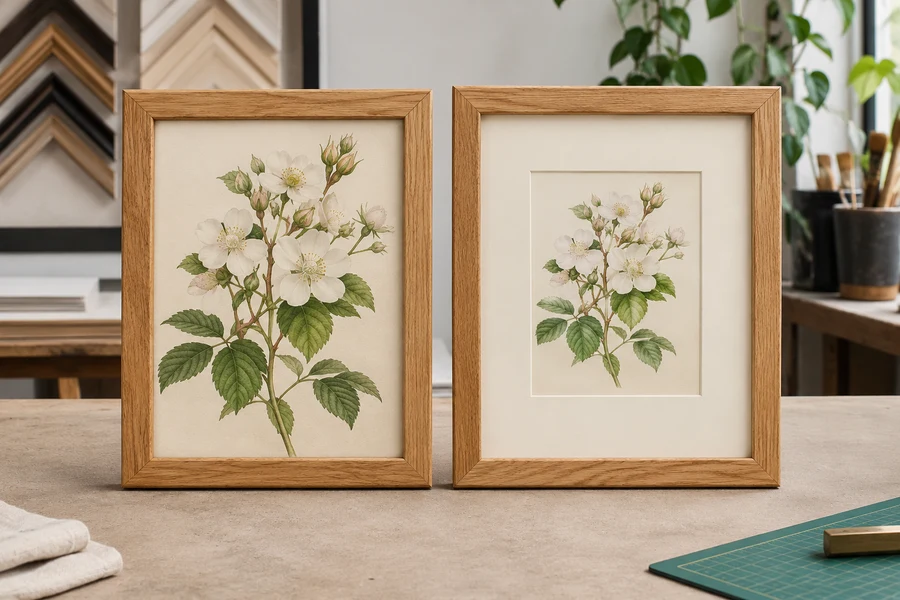
A mat changes both the presentation and the space between the image and glazing. Compare the framed examples before deciding whether your artwork needs one.
Watch: Should You Add a Mat to Your Artwork?
Compare the two framed presentations
Compare a print surrounded by a light mat with the same presentation without a broad mat border. The mat introduces a quiet area between picture and moulding. Without it, the frame sits visually closer to the image.
Neither appearance is required for every artwork. Start with the image, the frame, and the amount of surrounding space you want. An actual matted comparison is more useful than choosing from a color name alone.
Compare a matted and an unmatted layout
| Layout | Visible effect | Package requirement |
|---|---|---|
| Window mat | Adds surrounding space and defines the visible image crop. | Measure the window and outside size; choose suitable board and mounting. |
| No mat | Brings the frame visually closer to the image. | Plan artwork support and any required separation with compatible spacers. |
| Either layout | The frame still establishes the outer presentation. | Check glazing, backing, retaining hardware, and complete rabbet depth. |
Separate the design choice from glazing clearance
A window mat can both enhance the presentation and help keep the image surface away from the glazing. Choosing an unmatted look does not remove the need to consider that separation.
If the design has no mat, consider compatible glass spacers rather than assuming the artwork should touch the glass or acrylic. The appropriate package also needs backing and retaining hardware.
Make the choice with your own artwork
- Compare the image with a mat border and with the frame visually close to it.
- Judge the full composition at normal viewing distance. Check whether the mat gives the image space or makes the overall piece larger than you want.
- If using a mat, choose the window crop and border width separately.
- Confirm glazing separation and the depth of the complete package before ordering.
Continue with choosing a mat or designing a custom mat. Use the complete framing-order checklist for the other components.
Decide what the mat needs to accomplish
- A mat can give an image a deliberate visual boundary, provide room between the picture and the frame, and help establish separation from glazing. Those are related benefits, but they are not identical. You might want the visual space without wanting a contrasting color, or you might want a close-framed appearance while still needing an air gap. Start by identifying the purpose instead of treating a mat as an automatic item in every framing order.
- Compare the presentation using your own artwork. No single border, color, or mounting method suits every picture. A small photograph, a signed print, and an artwork with a deliberately irregular edge can need different presentations. Let the particular image and the information around it determine what should remain visible before deciding how much mat surrounds it.
- Ask what your eye notices first in the framed example. If the moulding competes with fine detail near the edge, a mat may provide useful breathing room. If the image has a strong graphic border of its own, another broad border may be unnecessary for the look you want. Both observations are design judgments. They do not remove the practical requirements for mounting, support, glazing clearance, and a package that fits inside the chosen frame.
Consider the image and the surrounding paper separately
- The visible image area is not always the same as the full sheet. A print may have blank margins, a title, a signature, or an edition number outside the picture. Decide whether those elements belong in the final presentation. A window mat can crop unwanted paper while showing a selected margin, but its opening must be planned for that purpose. Do not order solely from the image dimensions if the surrounding information matters.
- For a photograph printed to the edge of the sheet, the mat may need to overlap part of the printed area to cover and locate its edges. Establish a crop that preserves important details before making that choice. A face close to the edge, a fine line, or a border within the photograph can make a small overlap visually significant. Test the proposed window with loose paper strips or a sample rather than discovering the crop only after the mat is cut.
- If the paper edge itself is part of the artwork's presentation, a conventional overlapping window may not show what you intend. Do not enlarge the window randomly and assume the mat will still locate the work. That becomes a different mounting and display problem. Explain the desired visible edges to the framer and choose an appropriate support and attachment arrangement. The decision to use a mat should follow that plan, not force the artwork into an unsuitable crop.
Compare matted and unmatted layouts before ordering
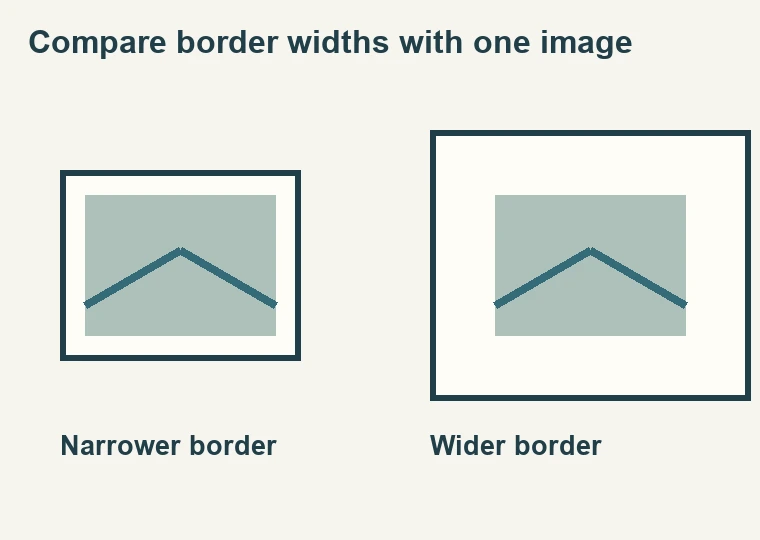
- Build a simple temporary comparison around the actual artwork. Place clean strips around the image to represent a possible mat, and set a frame corner beside them if one is available. Then remove the strips and compare a closer frame position. Keep the image upright in its intended orientation. A quick comparison on the worktable can reveal more about proportion than choosing a border from an isolated color chip.
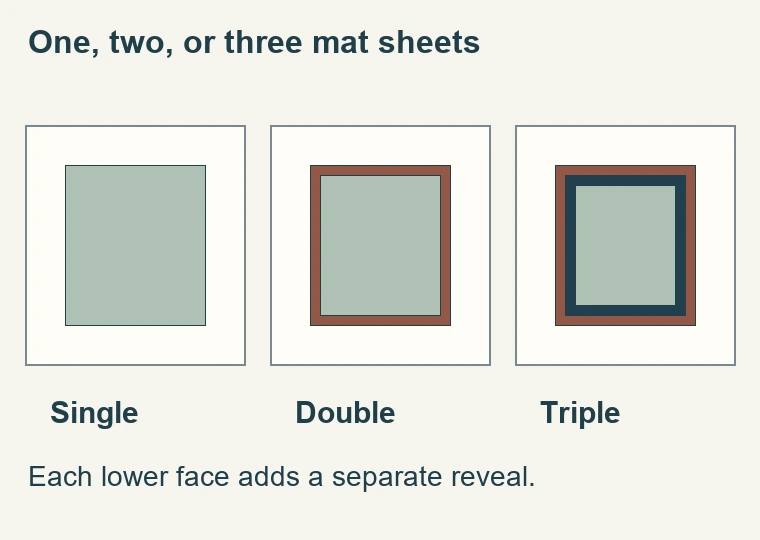
- Change one variable at a time. Compare the presence of a border before comparing several colors and layers. Once you decide that surrounding space helps, compare narrower and wider borders in the same color. Only then consider whether a lower color reveal or other detail adds something useful. This sequence makes the reason for each choice clearer and reduces the chance of selecting a complicated mat merely because several attractive samples are on the table.
- Step back to the expected viewing distance. A narrow accent that looks prominent from a few inches away may nearly disappear across a room. A broad pale mat may have more visual influence than expected when seen beside other framed pieces. Consider the wall color, nearby objects, and whether the picture will hang alone or in a group. The room supplies the context for the final choice.
Calculate the size change before choosing a frame
- Adding a mat increases the size of the package that the frame receives. For example, an illustrative 8-by-10-inch window with equal two-inch borders has an outside mat size of 12 by 14 inches. The complete outside size of the finished frame will be larger again because of the moulding. That final measurement depends on the profile and its construction; it should not be confused with either the artwork size or the mat's outside dimensions.
- This size change can affect more than wall space. It changes the required glazing and backing dimensions and may change which frame proportions look appropriate. Compare the complete design rather than ordering a frame from the original paper size and trying to insert a mat afterwards. If the frame already exists, work backwards from its actual package opening and check whether the intended image window leaves enough room for the proposed borders.
- Depth needs a separate check. One or more mat layers add thickness, while glazing, backing, and any spacers also occupy the usable rabbet. A design can have attractive front proportions and still be physically too deep for a particular moulding. Conversely, a physically adequate frame can look visually heavy around a delicate image. Check fit and appearance independently so one successful comparison does not hide a problem in the other.
Choose suitable materials and an attachment method
- A mat that touches the artwork should have the material properties required for that work. Verify an acid-free or archival specification for the selected board rather than assuming that every white, thick, or expensive-looking mat has the same composition. Color and bevel appearance describe what you see. They do not establish the board's artwork-contact properties. Keep the actual material choice on the order alongside the visual design.
- The mat also does not automatically attach the artwork. Decide how the work will be held and supported behind the window. Avoid treating pressure from a tight stack as a substitute for a suitable mounting arrangement. If the work needs hinges or another reversible method, plan that before closing the package. A mat can conceal the paper edges while the attachment remains a separate component behind it.
- For an unmatted design, check how the artwork will be kept clear of the glazing where separation is required. A compatible perimeter spacer may provide the intended gap, but it uses depth and must be concealed by the frame lip. The absence of a mat simplifies the visible border; it does not necessarily simplify every fitting decision. Confirm support, separation, and retaining hardware together rather than leaving them until the frame arrives.
A practical decision checklist
- Identify the image, margins, signature, and paper edges that must remain visible.
- Compare the picture with and without surrounding mat space.
- Evaluate the proposed frame beside the chosen layout at normal viewing distance.
- Calculate the outside mat size and the approximate wall area required for the complete frame.
- Verify board properties and the intended artwork attachment method.
- Check glazing separation, backing, and total package depth.
- Confirm what the order includes and which fitting steps remain to be completed.
If the mat adds useful space and supports the image, proceed to the more specific choices of border width, face color, layers, and bevel. If the closer-framed appearance serves the artwork better, keep that visual decision and resolve the unmatted fitting requirements. The goal is a clear reason for the chosen presentation, with the practical package planned at the same time.
Keep a record of the window and outside dimensions, the selected board, and any required visible paper margin. That record is useful when ordering a matching companion picture or replacing a component later. It also helps distinguish a design preference from a measuring error if the delivered mat does not look as expected. A precise layout is easier to repeat than a remembered description such as 'a fairly wide light-colored border.'
Made in the USA
Handcrafted by American framing experts
Family Owned
Serving customers for over 40 years
Premium Shipping
Professionally packaged for safe delivery
Ready to Hang
Hardware included with all frames
Framing Specialists
Over 40 years of custom framing experience
