
Ok

Ok

What is the question
Cancel
PICTURE FRAMES
 CUSTOM PICTURE FRAMES
Design Your Framing Package Online!
Add Mats, Glass & Acrylic, Mounting Board And More.





Search
☰

My Account
Log In
Favorites
Saved Designs
Shopping Cart
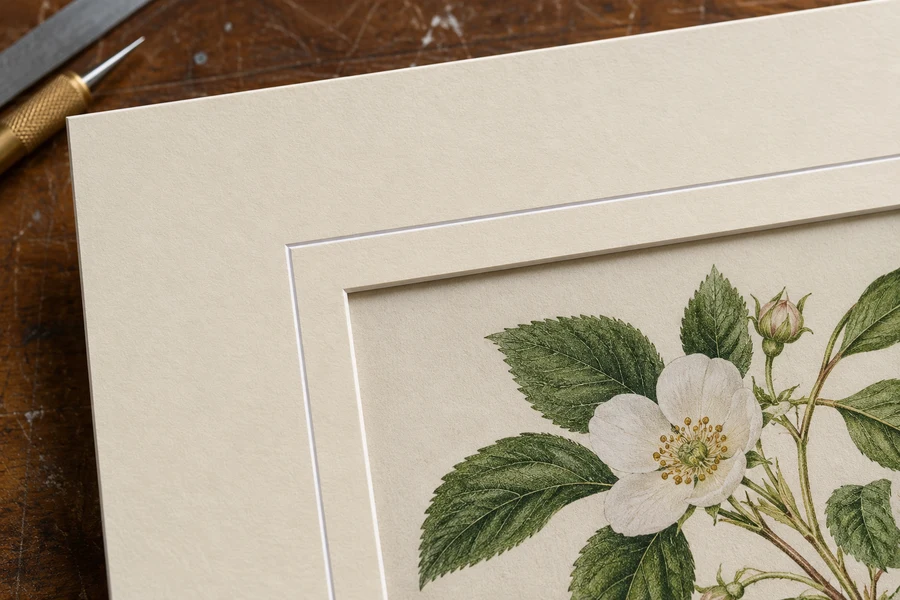
A V-groove is a shallow decorative cut in the mat face. The exposed core makes a line around the opening without adding another sheet of mat board.
Watch: Should You Add a V-Groove to a Picture Mat?
A decorative cut, not another mat layer
A V-groove is a shallow cut partway through the mat face. It follows a line around the picture opening and reveals the mat's core. The window still provides the opening for the image; the groove adds a separate decorative outline within the surrounding border.
Because the line comes from the core, its color depends on the mat construction. It is not a painted line or a strip of another mat laid on top.
V-groove, lower reveal, or fillet?
| Detail | Construction | Visible result |
|---|---|---|
| V-groove | A shallow cut in the face of a mat sheet. | A fine line of exposed core outside the artwork window. |
| Lower reveal | A separate mat sheet below a larger upper opening. | A band of another face color around the image. |
| Fillet | A separate narrow decorative moulding. | A moulded edge with its own depth and supporting arrangement. |
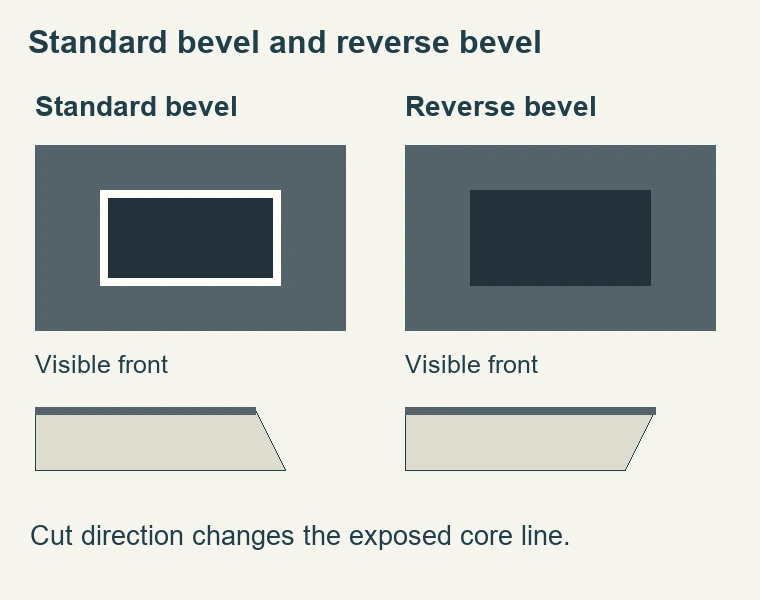
| Reverse bevel | The window edge is cut in the opposite direction. | The exposed core at the window is less prominent from the front. |
Compare black-core and white-core examples
A light mat with a black core produces a dark groove. Repeating dark details from an image in that line is one design option to compare beside the actual artwork.
The second example changes to an orange mat with a white core. Its groove appears white, so both the face color and the line change. Judge those effects separately: the same groove shape can look quite different with another core.
Decide whether the extra line helps
- Choose the image crop and mat border first.
- Compare the plain mat with a grooved version, looking for details or lines in the artwork that the groove might echo.
- Check the exposed core color; a white groove and a black groove make different accents.
- Review the full design so the decorative line supports the artwork rather than competing with it.
A V-groove does not create another sheet of mat board. Compare single, double, and triple mats if you want a layered color reveal. To hide the opening bevel instead, see reverse bevels. Check the available options in the mat designer.
Understand where the groove is cut
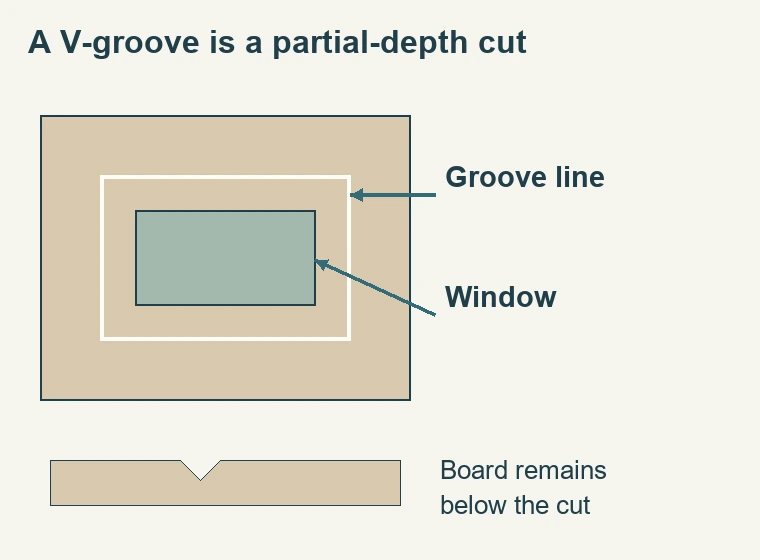
- A V-groove is made in the face of a mat, outside the artwork window. The shallow cut exposes a fine line of core material while leaving the sheet as a single mat layer. That location matters: the groove decorates the broad border, while the window determines which part of the artwork is visible. Changing the groove does not automatically change the image crop, the paper overlap, or the outside mat dimensions.
- Compare actual boards with different face and core appearances. The contrast of the exposed line is part of the effect. A dark face with a light core produces a different outline from a pale face with a dark core. Do not infer a core color from the face alone. Confirm the selected board and look at an actual sample when the contrast is important to the design.
- Design and ordering checks are separate from mat-cutter settings. A controlled shallow cut requires equipment and setup appropriate to the board and intended groove. Cutting depth, blade arrangement, and corner technique should come from the tool instructions. A finished decorative sample is not enough information to establish a safe or accurate machine setup.
Compare the groove with other decorative details
- A double mat creates a visible band from a second sheet below the upper one. A V-groove creates a fine line within the face of the sheet already present. The two can look related from a distance, but their construction and visual weight differ. A lower mat can introduce a broader area of another face color. The groove introduces the color of the exposed core along a narrow cut.
- A reverse bevel is different again. It changes the direction of the cut at the artwork window so the core line is less visible from the front. A V-groove is deliberately visible on the mat face away from that opening. You can discuss those choices independently: a quieter window edge and a decorative outer line address different boundaries. Do not use the terms interchangeably when asking for a quote or checking an order.
- A fillet is a separate small moulding incorporated into the framing design. Its material, profile, mitered corners, and supporting arrangement make it a different component from a shallow paperboard groove. If the intention is a raised decorative edge, a V-groove will not provide that same construction. Explain whether you want a fine cut line, an exposed lower mat, or an actual narrow moulding so the supplier can identify the intended treatment.
Choose the line's position around the image
- Set the window and border width before deciding where the groove sits. The border provides the area in which the line must work. A narrow mat may leave little room between the window, groove, and frame lip. A broad mat gives more room but does not require the groove to sit at any fixed fraction of that width. Compare the line's position with the complete frame rather than choosing its offset from a cropped close-up.
- Think of the spaces on both sides of the line. The area between the window and groove can visually extend the artwork boundary, while the area between the groove and frame provides another interval. If one becomes unintentionally tight, the groove may appear crowded. Use a light temporary outline on a separate mock-up or a sample to compare positions. Keep any marking tool away from the actual artwork and finished mat.
- For a rectangular design, check that the groove follows the intended geometry consistently. Equal offsets around an equal-border mat are straightforward to describe, but an unequal-border layout needs an explicit plan. Decide whether the line follows the window at a constant distance or relates to another boundary. Those can produce different bottom and side spaces. Record the actual arrangement rather than relying on an ambiguous instruction to 'center the groove.'
Test whether the extra outline helps the artwork
- A fine outline can echo the structure of a graphic image or give a large plain border another visual boundary. It can also compete with delicate drawing or an existing printed border. Compare a plain mat with the grooved version around the same image. First look at normal viewing distance, then inspect the detail. If the groove is the first thing you notice when you wanted a quiet presentation, reconsider its contrast or whether it is needed.
- Keep the frame in the comparison. A moulding with several strong edges or a pronounced decorative profile already adds lines around the picture. A groove may repeat that rhythm or add an unnecessary boundary. A simpler moulding may leave more room for a small mat detail. These are visual relationships to judge with samples, not evidence that one type of frame must always be paired with or kept away from V-grooves.
- In a group of pictures, consider consistency without forcing identical treatment. Repeating a groove can tie related pieces together, but images with different margins or border widths may require different placement. Keep the intended window and important paper details visible. Do not crop the artwork differently merely to make the decorative line land at an identical distance from every frame in the group.
Inspect the cut and the mat before installation
- View the mat face under useful light so the whole groove can be followed. Look for an even line, clean transitions at corners, and damage to the surrounding surface. A torn face or irregular corner can remain visible after the frame is closed. Inspect before mounting the artwork so a problem with the decorative cut can be addressed without reopening a completed assembly or handling the work again.
- Check the window and outside size separately. A well-cut groove does not prove that either dimension is correct. Place the mat over the artwork and confirm the visible image, signature, and margins, then check that the outside fits the frame's receiving size. If the design has multiple mat layers, verify the reveals and opening alignment as well. Evaluate each component by its own purpose rather than letting an attractive detail distract from a fit error.
- Handle the mat by clean edges and support it so the face is not scuffed against the bench. The groove is a visible feature in the same surface that will be on display. Avoid rubbing at a cut edge or adding an unrelated touch-up material to conceal a defect without checking compatibility. If a supplied mat is damaged, describe the location and provide clear photographs before attempting a repair that changes the board.
Information to include with a V-groove order
- The board selection, including the verified face and core appearance.
- The visible window dimensions and required artwork overlap.
- The outside mat size and all four border widths.
- The desired groove arrangement and its measured relationship to the window or outside edge.
- Any separate bevel, lower-reveal, or unequal-border preferences.
- The intended frame and complete package depth.
Keep the design and material specifications distinct. A V-groove does not make a board archival, and a visible dark or light core line does not establish its composition. Verify the chosen mat's suitability for contact with the artwork. The decorative cut can then be selected for appearance within a properly specified package, with backing, mounting, glazing, and retaining hardware planned for their separate roles.
If you later need a matching mat, a clear record is more reliable than estimating from the framed result. Photograph the whole design and keep the opening, outside size, board, and groove measurements together. The finished frame lip may conceal part of the outer border, so measurements taken only from the visible front can be misleading. Use the original order or carefully measured loose mat when reproducing the construction.
Made in the USA
Handcrafted by American framing experts
Family Owned
Serving customers for over 40 years
Premium Shipping
Professionally packaged for safe delivery
Ready to Hang
Hardware included with all frames
Framing Specialists
Over 40 years of custom framing experience
