
Ok

Ok

What is the question
Cancel
PICTURE FRAMES
 CUSTOM PICTURE FRAMES
Design Your Framing Package Online!
Add Mats, Glass & Acrylic, Mounting Board And More.





Search
☰

My Account
Log In
Favorites
Saved Designs
Shopping Cart

A reverse bevel hides the sloping core at the mat opening. Compare the visible edge, lower mat reveals, and artwork crop before specifying the cut.
Watch: What Is a Reverse Bevel Picture Mat?
Standard bevel and reverse bevel compared
A standard bevel exposes the sloping cut through the mat core around the window. With a white-core mat, it forms a fine white outline between the colored mat face and the image. A reverse bevel slopes the other way, towards the artwork, so the core is hidden from the normal front view.
Compare two otherwise similar mats: the standard bevel exposes the core around the window, while the reverse bevel hides that line from the normal front view.
Standard and reverse bevels at a glance
| Choice | What is visible | What it does not determine |
|---|---|---|
| Standard bevel | The angled core is exposed around the window. | Face color, archival properties, and image crop still need selection. |
| Reverse bevel | The core recedes beneath the face from the normal front view. | The opening and outside dimensions still need measurement. |
| Lower mat reveal | A separate sheet's face shows through the upper opening. | It remains a separate design choice from bevel direction. |
When to choose a reverse bevel
Start with the image rather than an assumption that one cut is always preferable. A bright white line can be useful separation, but it can also draw attention away from a dark image. Hiding that line lets the face color meet the image more quietly.
- View the artwork with a standard bevel. Notice whether the exposed core supports the image or becomes the first thing you see.
- Compare a reverse bevel using the same mat face color where possible. This helps isolate the edge treatment from the effect of changing colors.
- Check the result at normal viewing distance and with the intended frame, rather than judging the small edge alone.
Check the edge in a layered design
Compare the mats separately and as a stack. In a layered design, the visible inner mat reveal and the exposed bevel are separate visual details. Hiding the core does not remove the face-color reveal of another mat.
Decide which mat opening should show its bevel before ordering. Keep the opening dimensions and desired image crop separate from that finish choice: reversing the cut is an edge treatment, not a replacement for measuring the visible artwork area.
Use the mat-measuring guide to set the opening and the mat-selection guide for color, layers, and border width. Then choose the bevel option in the custom mat designer.
Separate the face color, core, and cut direction
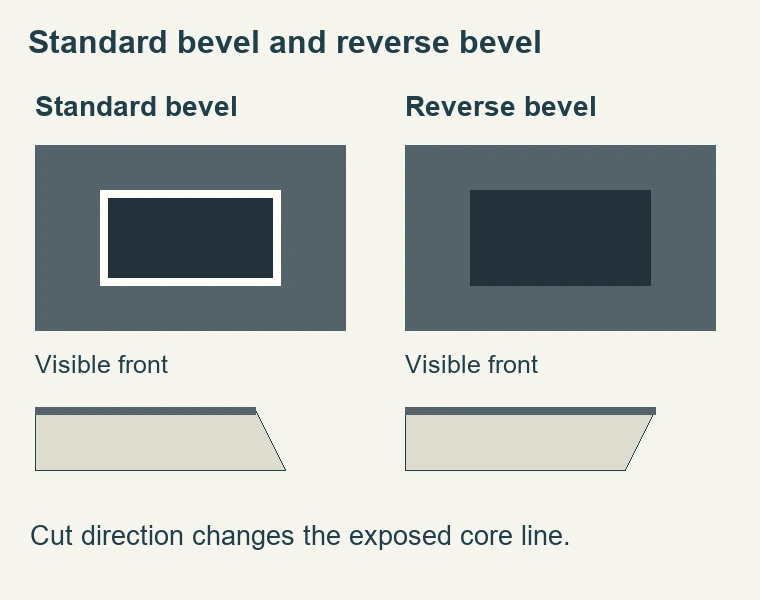
- A mat window has more than one visible characteristic. The face is the broad surface around the image. The core is the material exposed where the opening is cut. The bevel is the angled edge connecting those surfaces. A reverse bevel changes the direction of that angled cut. It does not automatically change the mat's face color, thickness, material specification, or number of layers. Keeping those decisions separate makes the order easier to specify.
- Look at a standard white-core bevel from the front. The slope catches light and creates a fine pale border even when the face is dark. In a reverse-bevel opening, that slope recedes underneath the face rather than presenting the core towards the viewer. The effect is usually a more abrupt transition from mat face to image. It should be judged in the complete composition, because a desirable quiet edge in one design can feel insufficiently defined in another.
- Evaluate the finished cut and the planned presentation separately from mat-cutter operation. Cutting angles, blade depth, and machine setup depend on the equipment and board. If you are ordering a custom mat, specify the intended edge treatment clearly. If you are cutting it yourself, use the cutter manufacturer's instructions rather than converting this visual description into guessed settings.
Make a controlled comparison beside the artwork
- Use samples with the same face color when possible. Comparing a dark standard-bevel mat with a pale reverse-bevel mat changes two things at once, so it becomes difficult to tell which difference you prefer. Put the samples over the same part of the image and keep the visible crop consistent. First compare the inner edge, then step back far enough to see whether that difference still matters in the overall presentation.
- Dark photographs provide a useful example of why the core line deserves attention. A white outline may separate a dark image from a dark mat, or it may become a bright distraction around a deliberately subdued picture. Neither outcome is automatic. Consider whether the photograph already has a white paper margin, a printed border, or bright detail near the edge. The bevel adds to those existing boundaries; it should not be assessed as though the artwork were a blank rectangle.
- For a light drawing on white paper, the question may be different. A standard white bevel can blend into the paper, while a reverse bevel makes the colored face meet the image more directly. Compare the intended paper margin as well as the drawing itself. If a signature or edition number must remain visible, establish that crop first. Choosing a quieter edge does not justify covering information that the owner wants included in the presentation.
- Lighting also changes the appearance of an edge. Look at the sample under the room's normal light and from the normal viewing position. An extremely close inspection under a work lamp can exaggerate a line that is barely noticeable on the wall. Conversely, a bright side light may make a standard bevel more prominent. Make the final choice with the intended frame corner beside the mat so the inner edge and outer moulding work together.
Keep the opening size independent of the bevel decision
- Write down the paper size, the visible image area, and the outside mat size as separate measurements. The opening must show the intended artwork while allowing the required overlap at its edges. A reverse bevel does not solve an opening that is too large or an image crop that is too tight. It changes the appearance of the cut edge. Confirm which dimension the ordering system asks for rather than assuming that every mat supplier describes an opening in exactly the same way.
- Consider an illustrative design with a 10-by-8-inch visible window and two-inch borders on all four sides. The outside dimensions are 14 by 12 inches. That arithmetic describes the face layout; it is not an instruction to reduce the opening by an additional amount because the bevel is reversed. The actual window and overlap still need to be specified for the artwork and the supplier's measurement convention. Keep any cutting allowance out of a measurement unless the ordering instructions call for it.
- Border width and bevel direction also solve different visual problems. A wider mat gives the image more surrounding space. A reverse bevel reduces the prominence of the exposed core. If a composition feels cramped, hiding the bevel may make its inner edge calmer but will not add the missing space. Compare the border proportions first, then refine the cut. This helps avoid making several small edge changes when the larger issue is the overall mat layout.
Specify every visible edge in a layered mat
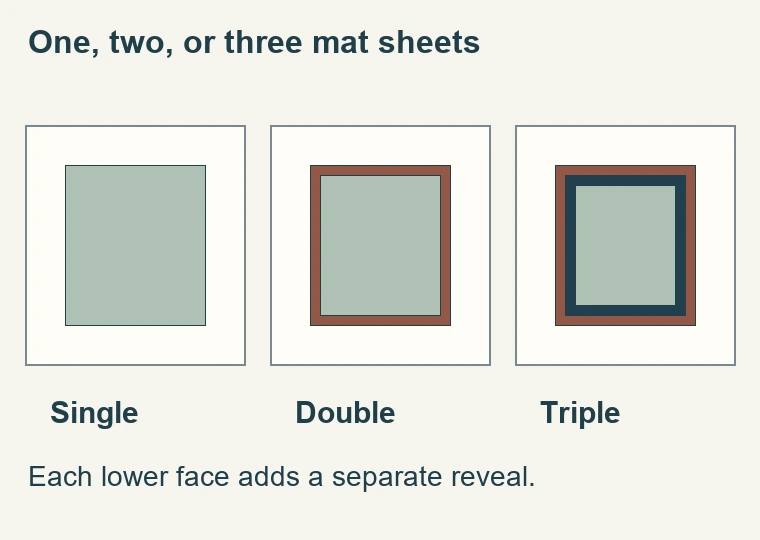
- In a double mat, the lower mat's visible face is called its reveal. That reveal remains visible even if one opening uses a reverse bevel. Picture an ivory upper mat with a narrow dark-blue lower reveal: changing the upper cut does not remove the blue band. It changes the exposed core line associated with that upper opening. The lower opening has its own face, core, and cut direction to consider separately.
- Sketch the layers in order before placing the order. Record the upper face color, lower face color, width of the visible reveal, and the bevel treatment required on each opening. Use plain descriptions rather than relying on a photograph taken at an uncertain angle. A note such as 'reverse bevel on the upper opening, standard bevel on the lower opening' communicates more precisely than asking for the entire double mat to look flat.
- A fillet adds another component to this decision. Its moulding and supporting arrangement can occupy the same visual boundary where a bevel would otherwise be prominent. Do not assume that a reverse-bevel choice alone establishes the correct construction for a fillet. Use the specific fillet fitting guidance and confirm the artwork-contact materials. Similarly, a V-groove is a separate shallow decorative cut in the mat face; reversing the window bevel does not create or remove a V-groove.
Check the finished opening before fitting
- Place the mat over the artwork without adhesive and confirm the intended visible image and margins.
- Inspect the opening from the normal front view to confirm that the requested core line is hidden or exposed as intended.
- Look along each edge for an even cut and inspect the corners for visible defects.
- For layered mats, confirm the reveal widths and the bevel treatment of each layer separately.
- Check the outside dimensions against the frame and confirm that the full package fits the usable rabbet.
- Only then proceed with the planned artwork attachment, backing, glazing, and retaining hardware.
If the result differs from your expectation, identify whether the problem is face color, core color, cut direction, reveal width, or opening size. Those are separate corrections. A precise explanation helps the supplier resolve the issue and avoids replacing a correctly sized mat merely because the edge treatment was misunderstood. Take a clear front photograph of the whole opening and a close view of the corner if you need to describe the difference.
What a reverse bevel does not establish
- The edge treatment does not establish whether the mat is archival. Verify that property from the selected board's specification, especially where it contacts the artwork. A clean-looking concealed core is a design feature, not evidence about the board's chemistry. Likewise, the absence of a white line does not tell you how the artwork is attached behind the mat. Choose the board and mounting method for the artwork's requirements, then choose the bevel for the desired appearance.
- A reverse bevel also does not replace the rest of the framing package. The artwork still needs appropriate support, the intended separation from glazing, and a frame that accommodates the complete depth. Check the final arrangement from both sides before retaining it. The useful result is a deliberately chosen inner edge within a complete, well-fitted presentation, rather than an isolated edge treatment selected simply because its name sounds more specialized.
Made in the USA
Handcrafted by American framing experts
Family Owned
Serving customers for over 40 years
Premium Shipping
Professionally packaged for safe delivery
Ready to Hang
Hardware included with all frames
Framing Specialists
Over 40 years of custom framing experience
