
Ok

Ok

What is the question
Cancel
PICTURE FRAMES
 CUSTOM PICTURE FRAMES
Design Your Framing Package Online!
Add Mats, Glass & Acrylic, Mounting Board And More.





Search
☰

My Account
Log In
Favorites
Saved Designs
Shopping Cart
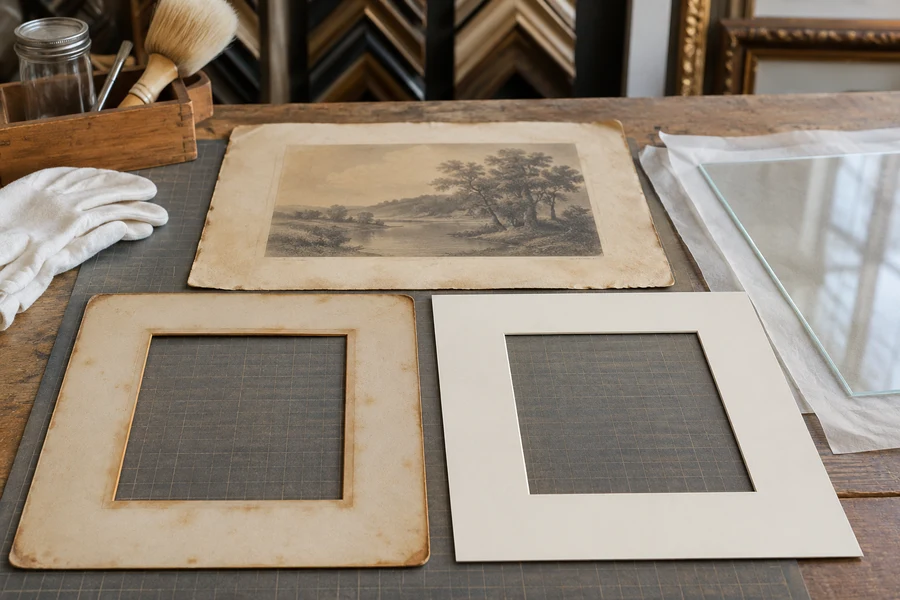
A darkened mat bevel or a difference between covered and exposed paper calls for a closer look at the framing package. Choose verified contact materials and manage light exposure together.
Watch: Why Conservation Mats and Glazing Protect Artwork
Inspect an aged mat and print
Look for a dark reddish-brown bevel on an old mat and a difference between the formerly covered paper border and the area exposed through its opening. Record visible changes without assuming a complete diagnosis from appearance.
These are useful shop observations: examine both the mat edge and the artwork beneath it when assessing an old framing package. Visible changes warrant investigation; their appearance does not predict the exact rate of change for every paper, pigment, or display environment.
Which part of the framing package addresses which need?
| Component or decision | Main role | Verify |
|---|---|---|
| Mat and backing | Provide selected materials around or against the work. | Actual artwork-contact specifications. |
| Artwork attachment | Locates and supports the image. | Compatibility and the intended ability to remove it. |
| UV-filtering glazing | Addresses part of light exposure. | Exact product properties; filtering does not stop all light damage. |
| Display location | Controls the conditions in which the work is seen. | Direct sun, light intensity, and duration of exposure. |
| Frame and retainers | Accommodate and hold the package. | Usable depth and a suitable retaining arrangement. |
Mat material and glazing have different jobs
Suitable conservation mat and backing materials address the materials surrounding or touching the artwork. UV-filtering glass or acrylic addresses part of the light exposure reaching it. Choosing one does not make the other decision unnecessary.
Compare the old bevel with an identified newer mat where helpful. Select mat materials by their verified specifications rather than assuming that face color or a fresh white bevel proves a particular protective quality.
UV protection does not stop all light damage
UV-filtering glazing is not a complete cure for fading. Visible light can still contribute to change over time. Do not interpret a high UV-filtering specification as permission to place sensitive artwork in direct sun.
- Review the verified properties of mats, backing, and mounting materials as a package.
- Select glazing for the protection and appearance the project requires.
- Consider the light and duration of display, as well as the framing materials.
- For an already damaged or valuable work, seek appropriate conservation advice before attempting to reverse damage.
Continue with protecting a print during framing, archival picture mats, or choosing glass or acrylic.
Use an old frame as evidence to investigate
- What happens behind a frame can become visible years later. A darkened bevel and a difference between covered and exposed paper deserve attention. They are observations, not a complete diagnosis. The appearance alone does not identify every material, the original light exposure, or all causes of change. Record what you can see before deciding what to replace or how to handle the work.
- Reviewing a framing package is separate from treating damaged art. Removing stains, bleaching paper, flattening brittle sheets, or separating old adhesive can create new damage if the work and materials are not understood. For valuable, fragile, or already deteriorated artwork, an assessment by a qualified conservator is a more useful next step than experimenting with household cleaning or repair methods.
- When an old frame is opened appropriately, compare the entire package: mat, artwork attachment, backing, glazing, and retaining hardware. A newly cut mat may improve the visible border while leaving an unsuitable backing or attachment untouched. Treat the example as a reason to examine the system rather than a reason to replace only the component with the most obvious discoloration. Keep a record of what was found and what was changed.
Review the materials touching the artwork
- Identify every paper, board, fabric, and adhesive that contacts the work. Verify the properties required for that particular artwork instead of assuming that a clean-looking surface is suitable. In this site's framing terminology, acid-free, archival, and conservation describe the relevant verified artwork-contact material property. None of those words should be added to an unidentified board simply because it is white, thick, recently purchased, or sold as a framing accessory.
- Check the back as well as the visible mat. The window mat is easy to notice, but the backing and mounting components can be in direct contact with a larger area of the artwork. A verified conservation mat does not automatically establish the properties of an unrelated backing sheet. Record the actual selected materials in the order so a future replacement or inspection does not depend on their appearance.
- Ask how the artwork will be attached and whether it can be removed as intended. A board's suitable material specification does not make every adhesive used on it appropriate for every work. Consider the artwork's condition, medium, and the owner's future needs. Do not assume that pressing a valuable sheet onto an adhesive-coated support is equivalent to a mounting arrangement chosen for later removal.
Treat light exposure as a separate decision
- UV-filtering glazing addresses one part of the light reaching the work. It does not remove every source of change. The Library of Congress paper-preservation guidance explains that visible light can also damage paper and recommends managing exposure rather than relying only on a UV-filtering pane. For that reason, a protective glazing specification is not permission to place sensitive paper in direct sunlight.
- Assess the actual wall location. Consider where sunlight falls during the day and whether a picture receives prolonged bright exposure. A spot that is shaded while you install the frame may be brightly lit at another time. Move a sensitive work to a more suitable position rather than treating the frame as a sealed solution to its environment. The mat and glazing choices remain useful, but they do not make placement irrelevant.
- For works whose condition or significance requires a display plan, discuss exposure and possible rotation with a conservator or collection specialist. Do not calculate a safe lifetime from the apparent age of an old framed example. Different papers, image materials, previous histories, and display conditions can respond differently. There is no universal timetable for when a framed image will fade.
Separate UV filtering from reflection control
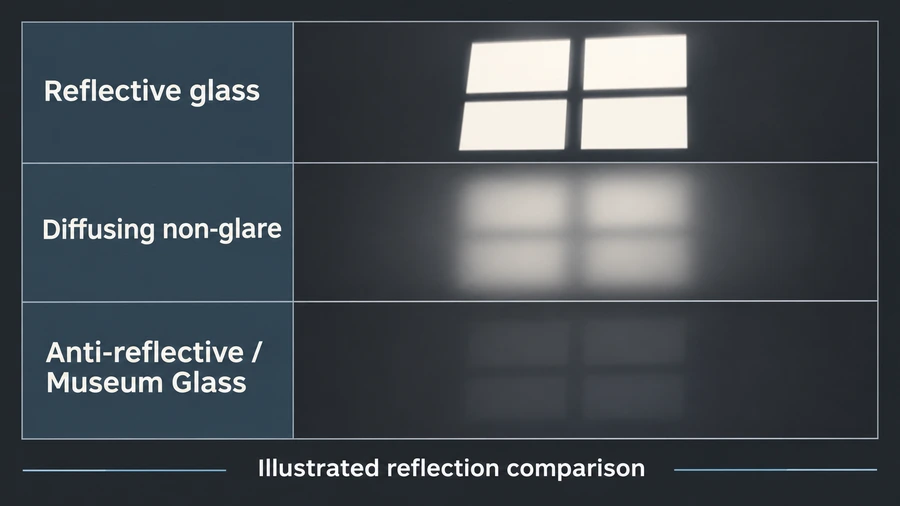
- Glazing specifications describe several different properties. UV filtering concerns a portion of the light spectrum. Non-glare or anti-reflective treatments concern the appearance of reflections. Weight, break resistance, scratch resistance, and static behavior raise other practical questions. A pane that looks unobtrusive is not automatically the one with the required UV specification, and a UV-filtering pane is not automatically free of reflections.
- Read the current specification for the exact product. Older product descriptions and generic terms can refer to an older offering or a different manufacturer. Record the selected glass or acrylic with the order, including any relevant handling requirements. Avoid transferring a percentage, coating description, or cleaning instruction from one type to another merely because both are sold for picture framing.
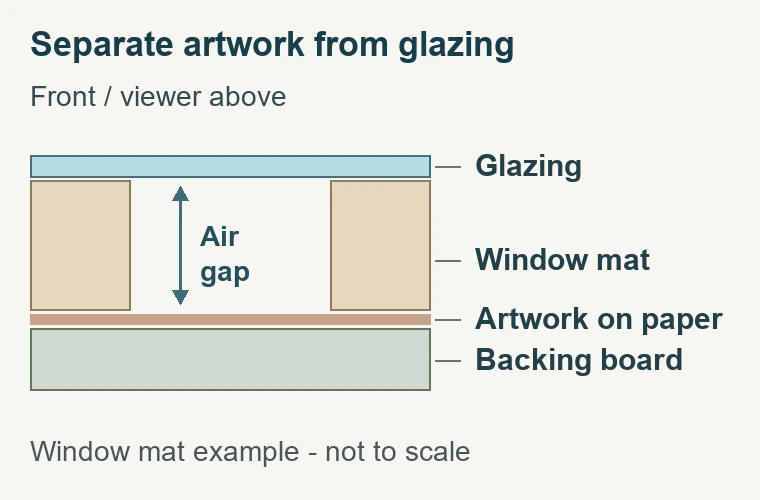
- Consider the artwork's separation from the glazing. A suitable window mat or compatible spacer can help establish a gap, but the mounting and flatness of the work also matter. The frame must accommodate that arrangement along with backing and retainers. A correctly specified pane can still be part of a poorly fitted package if the artwork is pressed directly against it or the depth has not been planned.
Write a package specification that can be checked
- Identify the artwork, medium where known, condition concerns, and important visible margins.
- Specify the verified mat and backing materials rather than only their colors.
- Describe the intended attachment and any requirement for future removal.
- Choose glazing by current product properties and handling requirements.
- Plan the required separation, complete depth, and retaining arrangement.
- Choose a display location with the artwork's light sensitivity in mind.
- Keep the final selections and any professional advice with the artwork record.
This record is useful even for an ordinary household framing project. It distinguishes what was actually supplied from what was assumed. If a component is later damaged or a different frame is chosen, you can preserve the relevant material and fitting requirements rather than replacing everything from memory. A receipt that identifies only a frame color and overall size may omit the details that matter most to the artwork package.
When comparing quotations, compare the complete scope. One may include suitable mat and backing materials while another describes only the visible frame and glazing. Ask for missing details before treating the two as equivalent. The purpose is not to add impressive terminology to the order; it is to know which materials touch the artwork, how it is supported, and what protection the selected glazing actually provides.
Inspect and maintain the finished framing arrangement
- Inspect the front after fitting for alignment, dust, visible contact, and changes at the paper edges. Inspect the back for loose fittings or damage before adding the final cover. A neat paper back is a finishing feature, not proof of conservation construction. If the frame is supplied already fitted, keep its material record and ask about any unexplained condition difference instead of dismantling a valuable work casually.
- Follow the care instructions for the actual glazing and finish. Avoid transferring cleaning liquid into the frame edges or introducing abrasive material around the artwork. If the work slips, the glazing breaks, or a moisture problem appears, address the condition rather than continuing to display it unchanged. The appropriate response depends on the artwork and package; an existing high-protection pane does not make every later problem harmless.
- Finally, keep claims proportionate to the evidence. Suitable conservation materials and UV-filtering glazing are practical parts of a thoughtful framing package, but they do not guarantee that an artwork remains unchanged forever. Make a clear materials and display plan, verify the selected components, and seek specialist advice where the work requires it.
Made in the USA
Handcrafted by American framing experts
Family Owned
Serving customers for over 40 years
Premium Shipping
Professionally packaged for safe delivery
Ready to Hang
Hardware included with all frames
Framing Specialists
Over 40 years of custom framing experience
