
Ok

Ok

What is the question
Cancel
PICTURE FRAMES
 CUSTOM PICTURE FRAMES
Design Your Framing Package Online!
Add Mats, Glass & Acrylic, Mounting Board And More.





Search
☰

My Account
Log In
Favorites
Saved Designs
Shopping Cart
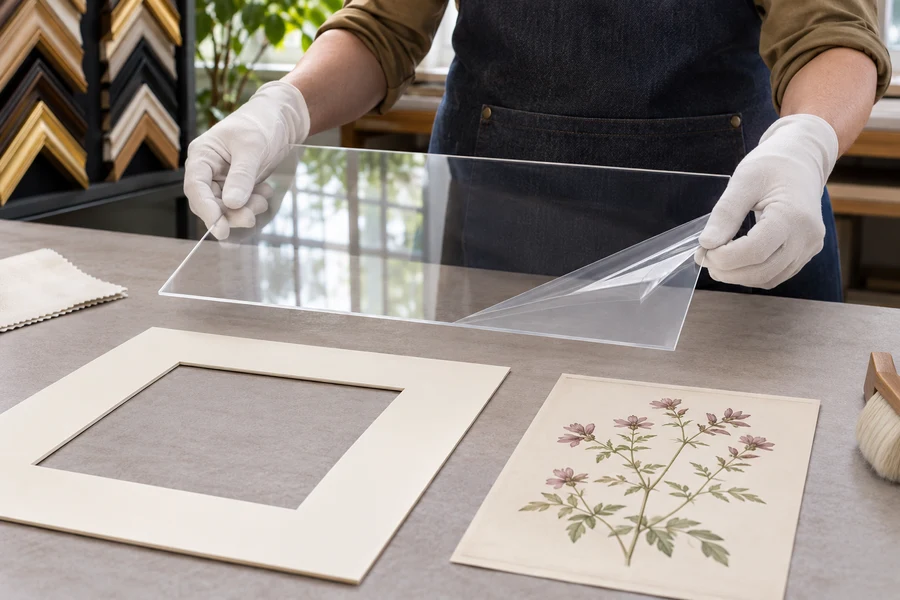
Conservation clear acrylic combines UV filtering with a clear surface that can still reflect the room. Specify protection, appearance, fit, and care separately.
Watch: Conservation Clear Acrylic for Picture Frames
UV filtering with a clear surface
Conservation acrylic is also called UV acrylic, conservation clear acrylic, and OP3. Compare that clear option with the conservation non-glare version. The important distinction is that UV filtering and reflection control are different properties.
Conservation clear acrylic is the option to assess when you want the UV-filtering product without a reflection-diffusing finish. It can still show the room's reflections, so check the display location as well as the protection requirement.
Compare conservation acrylic by the view you need
| Option | Viewing approach | Decision to verify |
|---|---|---|
| Conservation clear | Clear surface that can show recognizable room reflections. | Whether those reflections are acceptable in the actual location. |
| Conservation non-glare | Diffusing surface that softens reflected detail. | Image clarity through the required artwork-to-glazing gap. |
| Optium Museum Acrylic | Coated anti-reflective viewing with its stated feature combination. | Required anti-static, abrasion-resistant, and UV properties for the project. |
| Any option | One component in a complete framing package. | Current specifications, contact materials, mounting, and fit. |
Check the artwork and display conditions
- Identify whether the artwork needs the UV-filtering glazing option.
- Compare clear and non-glare samples over the image, including fine details and the intended glazing gap.
- Check whether reflected windows or lights obscure the image at its actual viewing position.
- Confirm the sheet size, thickness, and fit of the complete package.
Use the exact product's current specifications for its UV performance. ACRYLITE distinguishes OP3 and OP3 P99 from standard acrylic in its UV guidance. UV filtering reduces one source of damage; it does not stop all light-related change.
Fit and care for the selected sheet
Remove the protective film from both sides before closing the frame. Use a cleaner intended for the particular acrylic, avoid abrasive handling, and provide suitable separation between the artwork and glazing.
View UV-filtering clear acrylic, compare conservation non-glare acrylic, or review the conservation framing example.
Start with the protection requirement and the desired view
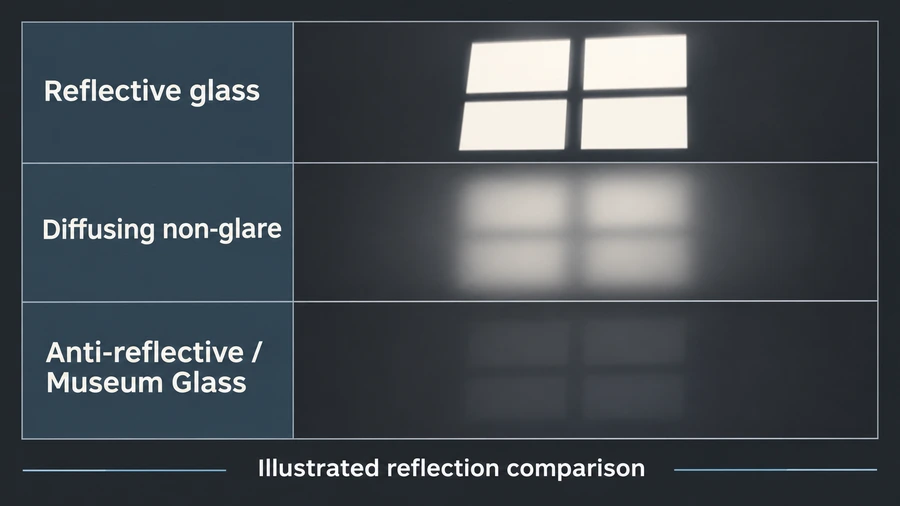
- Conservation clear acrylic combines a clear viewing surface with the specified UV-filtering property. It is a distinct choice from regular clear acrylic because the protection specification matters, and a distinct choice from conservation non-glare acrylic because the reflected appearance differs. Check those relationships in the actual order without assigning a generic performance claim to an unidentified sheet.
- Write down why UV filtering is being selected. The work may have preservation requirements, sentimental importance, or a display plan that calls for it. Then decide whether a clear reflective face is acceptable in the intended room. These are two separate questions. A pane can meet the chosen UV specification while still reflecting a window, and a pane with a quieter reflection may be a different product with different viewing and care properties.
- Use the exact current product specification for the supplied sheet. Names such as UV acrylic and conservation clear are useful categories, but a complete record identifies what was actually ordered. If a numerical specification is important to the project, retain its stated wavelength range and the manufacturer's supporting information. A percentage without that context is not a reliable way to compare different products or older product descriptions.
Preserve identification when several panes look alike
Regular clear and conservation clear acrylic can be difficult to distinguish by casual visual inspection. Keep packaging and order references associated with the right sheet while preparing several frames. Mark the work record rather than writing on a viewing surface or attaching a label where it could contact artwork. If an unmarked spare pane cannot be identified, obtain reliable supplier information before assigning a protection claim. This simple organization step is especially useful when one project includes different glazing specifications that all look clear on the bench.
Plan display conditions alongside the glazing
- UV filtering does not establish that the artwork is immune to every effect of light. Protection and exposure must be assessed together. Choose a suitable display position and consider the duration and intensity of exposure. Do not use the clear appearance or a high filtering specification as a reason to place sensitive paper in direct sunlight.
- Check the wall at more than one time of day. A location that appears shaded during installation may receive a band of sunlight later. Artificial lights and nearby bright surfaces can also change the way the work is seen. The practical response may involve relocating the picture or adjusting the room, not simply buying a different pane. Glazing selection is one part of the display plan rather than a substitute for it.
- If the artwork is valuable, fragile, or already changed by previous display, describe that condition before selecting a new package. Do not infer a safe display period from the age of another framed example. The original paper, image material, condition, and exposure history matter. Seek appropriate conservation advice when those factors require it, and keep that advice with the framing record so later replacements preserve the intended approach.
Test clear viewing in the actual room
- Use a sample over the actual image or comparable detail and view it from the expected position. A clear sheet preserves an undiffused view, but the room can appear in its reflected surface. Look particularly at dark image areas and important fine detail where a reflection may be intrusive. The relevant question is not whether a reflection can be found under any light, but whether it obstructs the picture during normal use.
- Compare possible wall positions and lighting angles before changing the surface specification. A bright lamp behind the viewer may be easier to move than the framed artwork. If the room cannot be changed and reflections remain distracting, compare conservation non-glare and coated anti-reflective alternatives. Keep the protection requirement constant while comparing their appearance, so a visual improvement does not accidentally remove a specified feature.
- Include the intended mat or spacer distance in every sample test. The package may need that separation for reasons unrelated to reflections. A clear sheet and a diffusing sheet can look different through the same gap. Do not test one directly against the picture and the other above a deep stack, then treat the results as equivalent. A fair comparison uses the same image, separation, room, and viewing position.
Make the rest of the package support the same purpose
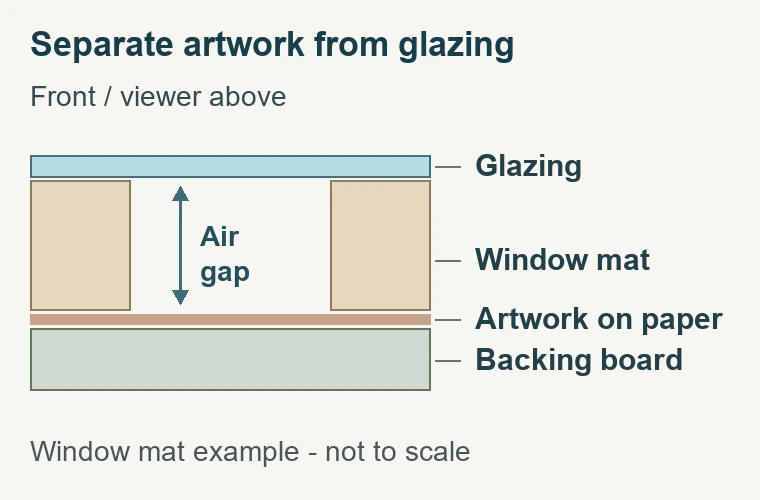
- A UV-filtering pane does not establish the properties of the mat, backing, or adhesive behind it. Verify those components separately where they touch the artwork. A conservation framing requirement should be reflected in the actual selected contact materials and mounting arrangement, not only in the name of the glazing. Record the board specifications and the intended attachment so the package can be reviewed as a complete system.
- Choose a suitable mounting method rather than relying on compression between glazing and backing. Paper should be supported and located as required by the work, with the intended separation from the pane. A window mat may help establish that gap; a compatible spacer may be needed for an unmatted presentation. Each adds depth, so include it before selecting the moulding and retaining hardware.
- Compare the assembled thickness against the usable rabbet. The outside height of a decorative profile does not tell you how much room is available inside. Glazing, mat layers, artwork support, backing, and spacers all belong in the assessment. If the package does not fit, revise the frame or package coherently rather than omitting a component that was part of the preservation or support plan.
Prepare and install the supplied acrylic
- Confirm the sheet's exact product, receiving dimensions, and thickness against the order.
- Prepare a clean protected work area and keep abrasive debris away from the viewing surface.
- Follow the supplied masking and handling instructions, removing protective film from both faces before final assembly.
- Clean only with the method appropriate to the actual acrylic.
- Fit the planned separation, artwork support, and backing without dragging them across the pane.
- Inspect the front before and after retaining the package.
If the sheet looks cloudy or marked, identify the cause while the package is open. Remaining film, dirt, scratches, and reflections require different responses. Do not apply a polishing compound or solvent simply because it is used on some other clear plastic. The current product instructions are the appropriate source for care, especially when a future replacement might have a different surface treatment from the original pane.
Inspect the image position and any visible mat or spacer edges after the retainers are fitted. A protective glazing choice does not prevent a component from shifting during assembly. The front should show the intended crop without debris or unexpected contact. Complete a paper back or other finishing step only after that inspection, so a visible problem can be corrected with minimal additional handling.
Keep a useful specification for future servicing
- Record the glazing name, dimensions, thickness, protection specification, and care instructions. Keep those details with the mat and backing selections and any mounting notes. A future fitter should be able to distinguish the pane from ordinary clear acrylic even if both look similar on the bench. Appearance alone is not a dependable way to recover the original UV specification.
- When comparing prices, compare the same required size and feature set. A quote for regular acrylic, a different thickness, or a pane without the stated protection is not directly equivalent. Also check what remains to be ordered: the glazing does not automatically include a mat, backing, attachment materials, retainers, or hanging hardware. Review the current package summary rather than inferring those components from the glazing category.
- If the display or artwork changes, reassess the specification. A replacement image, a deeper mat arrangement, or a different wall can change the relevant viewing and fitting conditions. Conservation clear acrylic remains a specific combination of properties, not an all-purpose promise. Select it when its verified protection and clear viewing behavior meet the project, and preserve the rest of the framing plan that makes those properties useful.
Made in the USA
Handcrafted by American framing experts
Family Owned
Serving customers for over 40 years
Premium Shipping
Professionally packaged for safe delivery
Ready to Hang
Hardware included with all frames
Framing Specialists
Over 40 years of custom framing experience
