
Ok

Ok

What is the question
Cancel
PICTURE FRAMES
 CUSTOM PICTURE FRAMES
Design Your Framing Package Online!
Add Mats, Glass & Acrylic, Mounting Board And More.





Search
☰

My Account
Log In
Favorites
Saved Designs
Shopping Cart
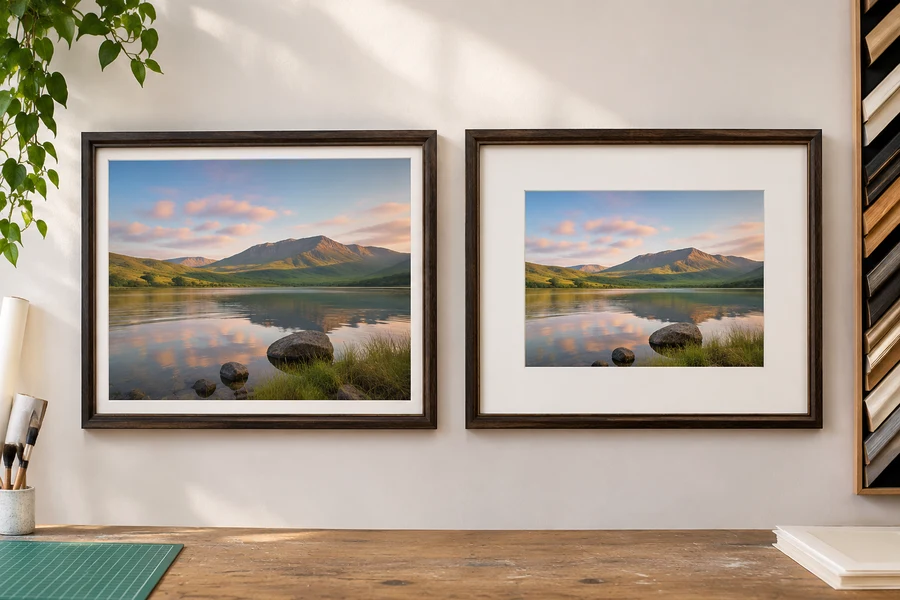
Mat border width sets the amount of visual space around the image. This guide compares narrow and much wider borders around the same print, showing why the choice changes its emphasis.
Watch: How Wide Should Picture Mat Borders Be?
What changes when the border gets wider?
Compare a narrow mat around the print with a much larger white mat. The image remains the focus of the comparison: changing the surrounding area changes the apparent scale and emphasis of the finished piece.
A narrow border can leave little visual breathing room. A wide border can make the same image feel more isolated and prominent, while increasing the overall framed size. These are design effects, not a rule that wider is always better.
Mat border sizes: worked examples
| Visible window | Equal border | Outside mat size |
|---|---|---|
| 8 x 10 inches | 1 inch | 10 x 12 inches |
| 8 x 10 inches | 2 inches | 12 x 14 inches |
| 8 x 10 inches | 3 inches | 14 x 16 inches |
| 12 x 16 inches | 2 inches | 16 x 20 inches |
Choose a width you can assess in context
- Set the visible image area first. A border decision should not accidentally hide important picture details.
- Compare at least two border widths with the same image.
- Include the proposed frame in the comparison and view it from the distance at which it will be displayed.
- Check the finished outside dimensions against the available wall space.
Check the current designer for the permitted border range for your particular mat. A permitted minimum is an ordering constraint, not a design recommendation for every image.
Calculate the outside mat size
For equal borders, add twice the border width to each window dimension. For example, an 8 x 10-inch window with 2-inch borders produces a 12 x 14-inch outside mat. Increasing those borders to 3 inches produces a 14 x 16-inch outside mat.
This is a sizing example, not a recommended border. With unequal borders, add the actual left and right widths to the window width, and the top and bottom widths to the window height. Outside mat size is also different from the finished outside size of the moulding.
Use the mat-measuring guide to set the opening and coverage. Preview the design in the custom mat designer before ordering.
Start with the visible window and the display location
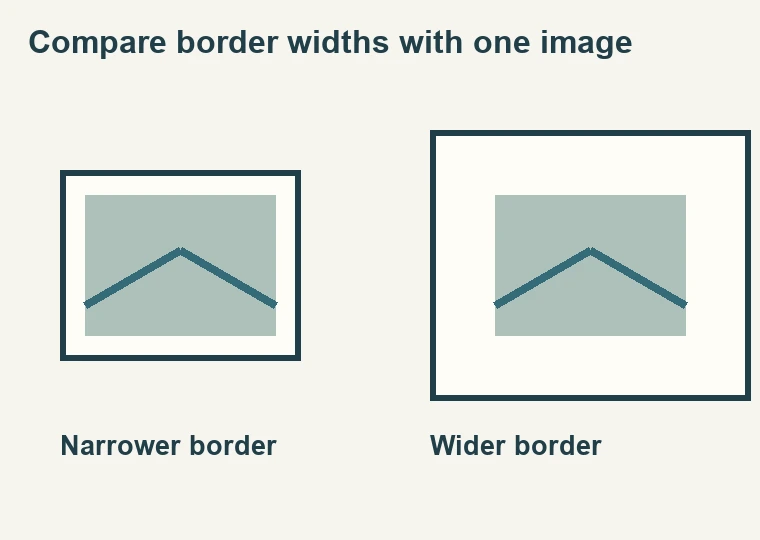
- Border width is the distance from the window to the outside edge of the mat on each side. It is not the visible reveal of a lower mat and not the width of the frame moulding. Those dimensions can all affect the same composition, so name them separately when discussing a design. Compare the space around the image without treating any one border width as suitable for every artwork.
- Establish the window first. Decide what picture detail and paper margin should remain visible, then measure that rectangle. An apparently generous border will not correct a window that hides a signature or cuts into an important part of the image. Likewise, increasing the window to show more paper changes the surrounding border if the outside size stays fixed. Work from a deliberate visible crop rather than adjusting several dimensions without recording which one changed.
- Next consider where the framed piece will go. A wide mat may give a small image a stronger presence on a large wall, but it also increases the complete dimensions. In a tight group, that increase may force the frames farther apart or change the arrangement. Measure the available space and consider neighboring pictures before settling on a border. A proportion that looks balanced in a preview still has to fit the intended display.
Use equal-border arithmetic to compare options
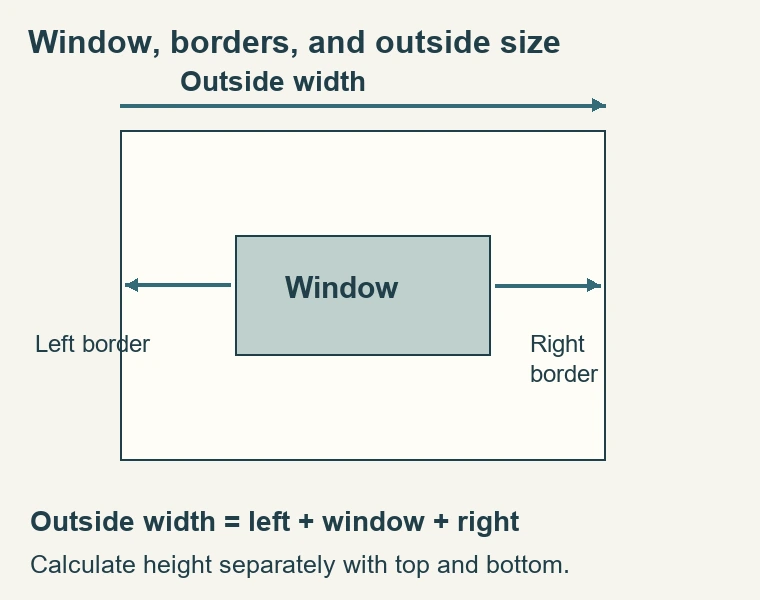
- For a window width W, window height H, and equal border B, the outside mat width is W plus two times B, and the outside height is H plus two times B. All dimensions must use the same unit. This simple relationship lets you compare several borders without confusing the window with the complete mat. It does not account for the extra external width of the frame moulding.
- These are arithmetic examples, not recommendations or standard allowances. They assume that the listed dimensions are the intended visible window. If you start from the full paper size instead, you still need to determine the overlap and crop before treating the result as an order. Do not apply a second reduction to the opening unless the designer's measurement instructions specifically call for it.
- The same arithmetic can work backwards. If a frame receives a 16-by-20-inch package and the intended centered window is 12 by 16 inches, the difference is four inches in each direction. Dividing each difference by two gives two-inch borders. This works only when the opening is centered and the opposing borders are equal. Measure the frame's actual receiving size rather than using an estimated outside moulding dimension.
Calculate unequal borders without guessing
- Unequal borders are a separate layout decision. The outside width equals the window width plus the left border plus the right border. The outside height equals the window height plus the top border plus the bottom border. Record all four values. A description such as 'a two-inch mat with extra at the bottom' leaves the actual outside height uncertain until that additional amount is specified.
- For example, an 8-by-10-inch window with two-inch left, right, and top borders and a three-inch bottom border produces an outside mat measuring 12 by 15 inches. Its extra lower area changes the visual placement of the image within the rectangle. That may suit a particular composition or display, but it should be assessed with the artwork upright. Rotating the finished piece would move the unequal border to a different side.
- Do not confuse a deliberately unequal design with an accidentally off-center cut. A planned layout can be described and measured before production. If the borders differ on a mat that was ordered with equal sides, compare the actual opening and outside dimensions against the order. Precise measurements make it easier to identify whether the error is in the crop, the window position, or the outside trimming.
Judge proportion with a simple physical mock-up
- Use clean strips of paper or mat samples to represent two or three candidate widths. Keep the face color consistent while comparing width. A darker sample often feels more visually prominent than a pale sample, which can disguise the effect you are trying to assess. Place a frame corner at the outside edge and step back. Look at the complete relationship among image, surrounding space, and moulding.
- Notice whether the mat gives the image breathing room or dominates the composition. A very narrow border next to a substantial frame may look compressed, while a broad border can make a small image feel isolated. Those are observations to test, not universal rules. The image's contrast, the frame profile, the wall, and the viewing distance all affect the result. Keep the same picture in both comparisons so the changed border is the feature you are judging.
- If you are framing a series, decide what should remain consistent. Equal outside frame sizes may require different border widths around differently sized images. Equal border widths may produce different outside sizes. Neither arrangement is inherently required. Sketch the group and choose the relationship that serves the display, then calculate each mat independently. Avoid forcing different images into the same crop merely to make a set of borders look identical.
Account for layers, reveals, and package depth
- With a double or triple mat, describe the broad upper border separately from the narrow exposed lower colors. A lower reveal is the band visible between successive windows. Increasing that band changes the relationship near the image and may change the dimensions of the upper opening. It does not automatically mean that the outside size should grow. Confirm how the designer measures borders and reveals for the layered construction being ordered.
- Additional layers also add thickness. Once the front layout is chosen, check whether the frame can receive the mats together with glazing, artwork, backing, and any other required components. A border that is visually suitable can belong to a package that is too deep for the selected frame. Do not remove necessary backing or separation simply to keep a moulding chosen before the full design was considered.
- Mat width does not establish artwork-contact suitability. Verify the selected board's material properties independently of its color and size. A wide decorative mat is not automatically archival, and a thin exposed reveal is not exempt from material requirements when it contacts the work. Keep the construction and preservation decisions beside the visual layout so the finished order describes the whole package.
Record the layout before placing the order
- Write the intended visible window width and height.
- Record left, right, top, and bottom border widths, even when all four are equal.
- Calculate the outside mat dimensions and confirm them in the designer.
- List any lower reveals, bevel preferences, or deliberately unequal borders separately.
- Check the frame's receiving dimensions and the complete package depth.
- Review a preview with the artwork in its final orientation.
If the available wall space changes, return to those measurements instead of trimming a finished mat casually. Reducing one outside edge changes that side's border and the window's position within the frame. A revised layout may require a different outside size or a newly cut mat. Treat the border as a planned part of the composition so the final fitting preserves the balance you chose.
Made in the USA
Handcrafted by American framing experts
Family Owned
Serving customers for over 40 years
Premium Shipping
Professionally packaged for safe delivery
Ready to Hang
Hardware included with all frames
Framing Specialists
Over 40 years of custom framing experience
