
Ok

Ok

What is the question
Cancel
PICTURE FRAMES
 CUSTOM PICTURE FRAMES
Design Your Framing Package Online!
Add Mats, Glass & Acrylic, Mounting Board And More.





Search
☰

My Account
Log In
Favorites
Saved Designs
Shopping Cart
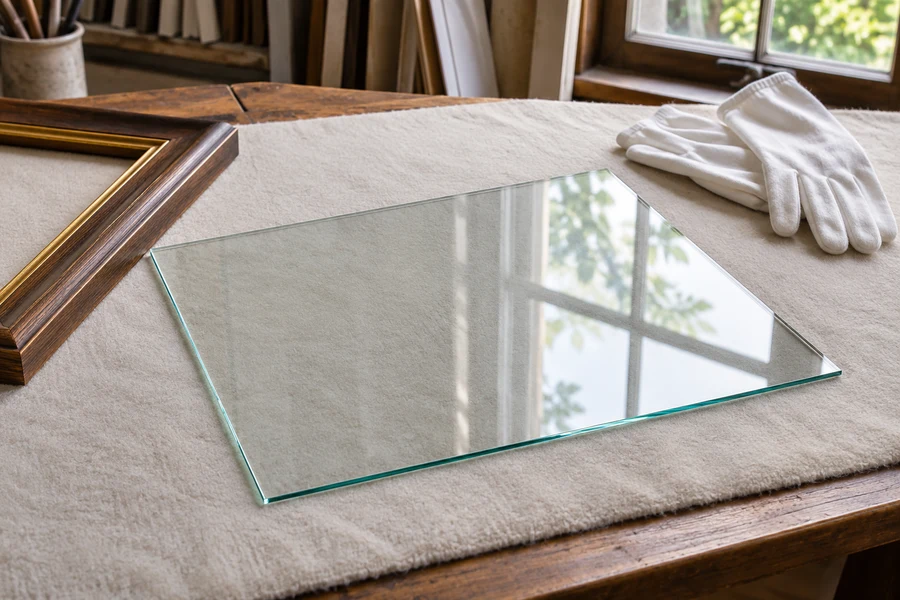
Regular glass provides clear viewing with recognizable room reflections. Compare current glazing specifications when protection, reflection control, or handling needs call for another option.
Watch: Regular Picture Frame Glass Explained
What regular glass looks like in the comparison
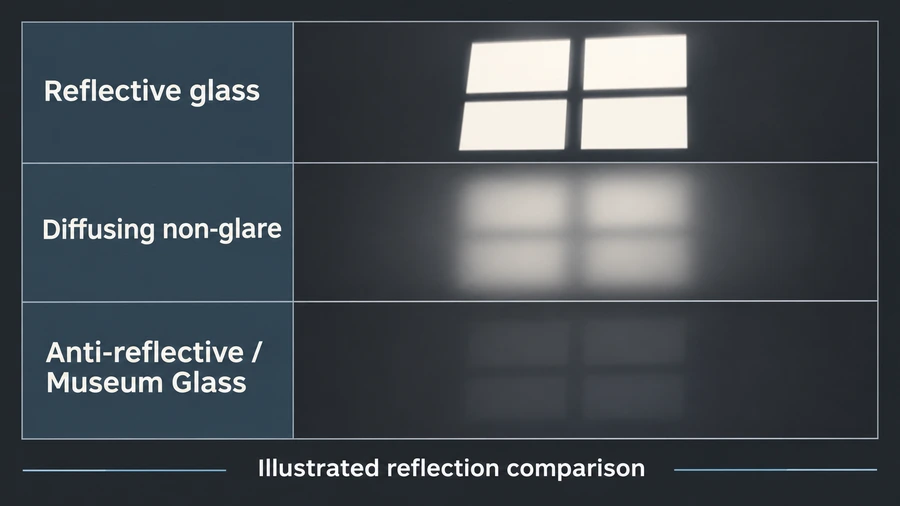
Regular clear glass and clear conservation glass can both return a recognizable room reflection. Non-glare glass diffuses that reflection, while anti-reflective coatings reduce it through a different surface treatment.
Regular glass gives a clear view through its surface, but windows and lights can obscure the image from particular angles. Assess the intended wall and viewing position rather than judging the loose sheet alone.
When to compare another glazing specification
| Project requirement | What to compare |
|---|---|
| Documented conservation UV filtering | The exact UV-filtering glass or acrylic, using current product information. |
| A less recognizable reflected room | Non-glare and anti-reflective treatments over the intended package. |
| Lower glazing weight or different breakage behavior | Acrylic options with the required protection and viewing properties. |
| A deep mat or spacer arrangement | Clarity through the actual gap, plus complete rabbet fit. |
| Repeated transport | The complete material, frame, packing, and handling plan. |
Separate surface protection from fading protection
Glazing physically covers the picture, but a regular-glass description does not establish conservation UV filtering. Use the exact current product specification for a new project.
Also consider the weight and breakability of the completed package. Glass and acrylic are different handling choices even when their clear appearance is similar. For transport or a larger frame, compare glass and acrylic before choosing.
Choose the feature the picture needs
- Check how much of the room reflects over the image.
- Decide whether UV filtering is required for the artwork.
- Check the size, sheet thickness, frame depth, and finished weight.
- Provide suitable mat or spacer separation rather than trapping sensitive artwork against the glass.
Compare Conservation Clear for UV filtering and Museum Glass for anti-reflective viewing with UV protection. Use the glass-selection guide to review currently offered options.
For a new order, compare the currently offered glass and acrylic options. The current glass products include Anti-Reflective Glass and Museum Glass. This article explains regular clear glass as a material category; it does not identify a currently listed regular-glass product. For a clear acrylic option, review ACRYLITE FF3 clear acrylic and check its handling and protection specification for the project.
Use regular glass for a defined set of requirements
- Regular picture-framing glass provides a transparent physical cover for the artwork. Its clear appearance can coexist with recognizable room reflections. It should be selected because that combination meets the project, not because every transparent pane is assumed to offer the same protection. UV filtering, reflection control, weight, breakage behavior, and care are separate factors to check when comparing glazing materials.
- Identify protection, reflection, and handling requirements before fitting a clear pane. Do not assign a UV specification to a product category without documentation. Identify the actual supplied item and current specification. If the project requires a particular protective feature, confirm it explicitly rather than estimating it from the pane's color or reflection.
- Decide what is being framed and where it will go. An ordinary replaceable print in a controlled location raises different priorities from a valuable or sensitive work with a specific preservation plan. Do not use price or the word regular as the complete decision. State the required features, then compare the materials that provide them. A straightforward pane can be a deliberate choice when its limitations and handling requirements are understood.
Review an existing frame before replacing its pane
A replacement project is a useful time to inspect the frame rather than only order another sheet. Check the joints, receiving opening, back support, and retaining hardware. Identify why the previous pane is being replaced: breakage, a reflection concern, or a change in the artwork can lead to different decisions. If the old pane broke in transit, repeating its size alone does not address the packing or handling problem. If reflections are the issue, compare the display position before changing the material. Record the receiving dimensions and actual package thickness so the replacement fits the existing construction. Resolve damaged or loose frame components before placing a new pane over the artwork; a clean sheet cannot correct an unstable frame.
Evaluate reflections over the image
- Put a sample over artwork with similar contrast and detail. A dark photograph can show a reflected room more prominently than a pale drawing, even though the glass is unchanged. Inspect the areas that matter to the image rather than looking only at a bright corner. View from the intended standing or seated position and include the frame's likely height on the wall.
- Identify windows, lamps, screens, and bright surfaces behind the viewer. Their positions determine which reflected objects cross the picture. Try another wall position or lighting angle where practical. This separates a glazing preference from a room-layout problem. A pane may look acceptable in one location and obstruct the same image in another, so a favorable bench sample is not the entire test.
- If the reflection remains intrusive, compare non-glare and coated anti-reflective glass using the same image and intended gap. The former diffuses reflections; the latter uses a different approach to reducing their appearance. Do not assume both will preserve the same fine detail in a deep package. Keep the artwork's required separation in the comparison rather than pressing a sample against the image for an artificially favorable view.
Confirm the receiving dimensions and available depth
- Measure the package the frame receives, following the supplier's order convention. The outside moulding size is not the glazing size. A mat can make the package substantially larger than the visible image. If replacing a pane in an existing frame, check the actual opening and the intended clearance instead of relying on a nominal label. Do not add or subtract an allowance unless the ordering instructions require it.
- Record thickness as well as width and height. The glazing occupies part of the usable rabbet together with mats or spacers, artwork support, and backing. Retaining hardware must suit where the completed back sits. A frame that looks deep externally can have a different internal recess than expected. Assess the actual package rather than using overall moulding height as a substitute for usable depth.
- For large, awkward, or frequently transported work, assess whether glass remains the appropriate material. Consider the different weight and breakage considerations of glass and acrylic. Do not infer a maximum glass size or a safe frame capacity from the small display sample. Confirm the complete construction and handling plan for the actual project, including how it will be carried, packed, and hung.
Prepare a protected fitting area
- Clear a work surface large enough to support the pane and frame. Remove loose fasteners, chips, grit, and tools from the area where glass will rest. A clean protective pad helps prevent contact with the finished moulding and glazing surfaces. Support the pane for its actual size rather than allowing it to overhang an unstable edge while other components are being arranged.
- Inspect the cut pane for damage before fitting. If an edge is chipped, the sheet is cracked, or the supplied size is wrong, resolve that before placing it over the artwork. Do not force an unsuitable pane into the frame or use retainers to bend the package into alignment. A fit problem should be identified while the components can still be separated without disturbing an attached work.
- Use the care method specified for the supplied glass. Keep cleaning materials clean and prevent liquid from entering the frame package. A product sold as regular glass may still arrive with particular preparation instructions, so do not assume every household cleaning treatment is appropriate. Inspect both surfaces under useful light before closing the frame; a missed mark inside cannot be cleaned from the front later.
Support the artwork without pressing it against the pane
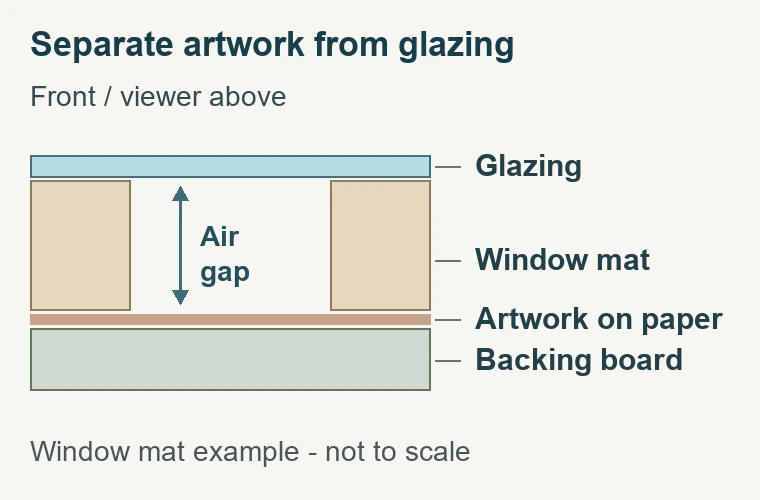
- Plan the required artwork-to-glazing separation with a suitable mat or spacer arrangement. That gap is not the same thing as mounting the work. The artwork needs its own support and attachment, and the backing needs appropriate retention. A sheet trapped tightly between glass and board may look located initially while leaving the intended mounting decision unresolved.
- Choose contact materials for the artwork's needs. The use of regular glass does not establish whether the mat or backing is archival, and it does not justify using unidentified boards against sensitive work. Verify those specifications independently. If conservation UV filtering is required as well, select the glazing that states it rather than expecting contact materials alone to address light exposure.
- Retain the complete package without using excessive force to flatten warped or misplaced parts. Before adding points or clips, check that the pane, mats, and backing seat properly. Inspect the front, then fit the appropriate retainers and inspect again. A shifted mat, visible spacer, or new speck of debris is easier to correct before a finishing paper cover is added.
Recognize when another specification is needed
- Keep the selected pane's identity and dimensions with the frame record. If it is replaced later, the person doing the work should know whether the original was regular, conservation, non-glare, or coated anti-reflective glass. A casual look at a clear sheet is not a reliable specification. Record any separate mat, backing, and mounting requirements at the same time.
- Review the final order for missing components. Glazing does not automatically include the artwork attachment, backing, retainers, dust cover, hanging fittings, or a complete installation service. Confirm what is supplied and what remains to be done. The useful result is a fully planned frame using regular glass where its verified properties are appropriate, rather than a pane chosen without considering the rest of the package.
Made in the USA
Handcrafted by American framing experts
Family Owned
Serving customers for over 40 years
Premium Shipping
Professionally packaged for safe delivery
Ready to Hang
Hardware included with all frames
Framing Specialists
Over 40 years of custom framing experience
