
Ok

Ok

What is the question
Cancel
PICTURE FRAMES
 CUSTOM PICTURE FRAMES
Design Your Framing Package Online!
Add Mats, Glass & Acrylic, Mounting Board And More.





Search
☰

My Account
Log In
Favorites
Saved Designs
Shopping Cart
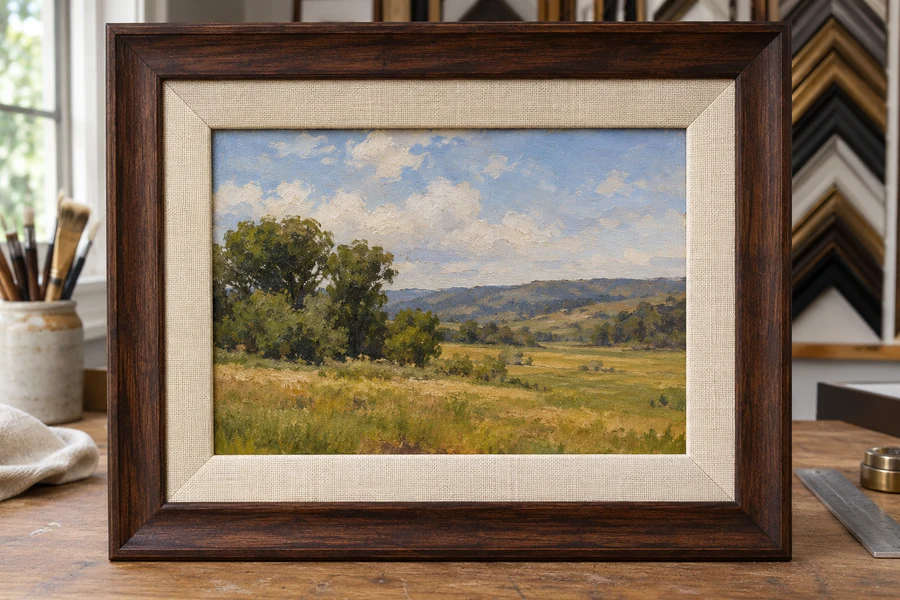
A linen liner places a fabric-covered wood border between the artwork and outer frame. This guide nests a liner corner inside a frame corner to show how the two parts work together.
Watch: What Is a Linen Liner Picture Frame?
A fabric-covered border inside the outer frame
A liner fits inside the outer decorative frame. The liner is a wood frame wrapped with attached fabric. Seen from the front, it introduces a textured area between the artwork and the outer moulding.
Oil paintings are one common application to consider with the selected liner. A liner is physically different from a paper window mat and different from the open reveal around artwork in a canvas floater frame.
Liner, window mat, and floater reveal compared
| Presentation | Construction | Ordering distinction |
|---|---|---|
| Linen liner | A fabric-covered frame component nested inside an outer frame. | The liner receives the artwork; the outer frame receives the liner. |
| Window mat | A board sheet with an artwork window. | Specify the window, outside size, material, and borders. |
| Floater reveal | Visible space around supported canvas or a panel. | Use the floater frame's depth and reveal requirements. |
| Frame and liner together | Liner installation is a frame-to-liner assembly step. | Confirm remaining artwork fitting and other components in the current order. |
How the frame-and-liner order is sized
The example uses the artwork size as the starting point: for a 16 x 20-inch artwork, the liner is made to fit that artwork, and the outer frame is made to fit the liner. The outer frame's artwork opening is therefore not treated as though the liner takes no space.
- Measure the actual artwork width, height, and thickness.
- Choose the liner and compatible outer frame as a combined design.
- Use the artwork measurements for the combined order, following the designer's prompts, rather than adding the liner's visible face width yourself.
- Check the complete depth and the selected method for securing the artwork.
What is assembled for you?
Confirm the current frame-and-liner order scope: liner installation concerns the liner inside the outer frame. That statement concerns the frame-to-liner assembly; it does not mean your artwork has already been fitted or that every other component is included.
Review the current order summary for the actual package. Browse linen liners and use the framing-order checklist to confirm the remaining fitting and hanging components. For an already-stretched canvas, see canvas fitting in a standard wood frame.
Understand the liner as a separate frame component
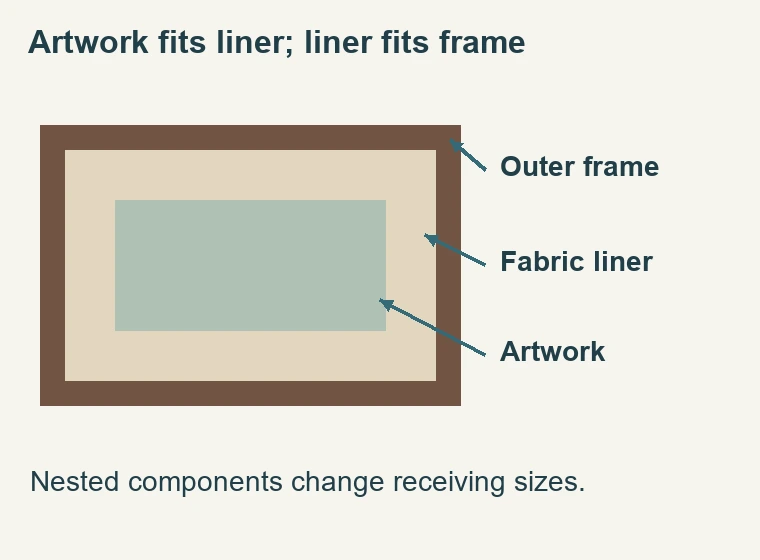
- A linen liner is a fabric-covered wood frame placed within an outer moulding. Its fabric face introduces a textured border around the artwork. It should not be confused with a sheet of matboard that has a paper face, nor with a bare gap around a canvas in a floater frame. Those constructions can occupy a similar visual area, but their thickness, support, sizing, and attachment arrangements differ.
- Liner composition and fitting requirements need verification for the selected product and artwork. Verify the selected liner's actual description and dimensions. The word linen in a product name should not be used to invent an unverified fiber percentage, weave specification, wood species, or country of manufacture.
- Think of the order as nested components. The artwork fits the liner's receiving opening, and the liner fits within the outer frame. The outer frame therefore receives a larger component than the artwork alone. Keep that nested sizing relationship explicit in the order. Treating the liner as though it takes no space creates a different and generally incorrect order.
Compare texture and proportion around the artwork
- A fabric-covered face adds texture even when its color is quiet. Compare that texture with the artwork's surface and the outer moulding. The border can separate a busy painting from a detailed frame or provide a broad pause between the image and the frame edge. It can also become more prominent than intended. Assess the complete corner combination beside the artwork rather than selecting the fabric and outer frame independently.
- Look at the visible liner width in relation to the image size. A sample held close to a large painting may appear modest, while the same width around a small work can dominate the presentation. There is no universal width required by the construction name. Use actual corner samples or an accurately scaled preview, then check the final outside dimensions against the display location.
- Color should be judged with the actual frame finish and lighting. A warm fabric can read differently beside a cool metallic moulding than beside a warm wood finish. Natural and artificial light may change the apparent relationship. Choose a combination that supports the artwork at normal viewing distance. Matching every color exactly is not a requirement, and a photograph of a sample does not establish the surface appearance under every light.
Measure the artwork before using the combined designer
- Measure the actual width, height, and thickness of the work. An already-stretched canvas should be assessed as the physical object being fitted, not simply by a label or the original canvas-roll dimensions. Check whether its edges are square and whether the support changes shape or depth at any location. An irregular or unusually deep work may need a discussion with the framing team before a standard combined order is placed.
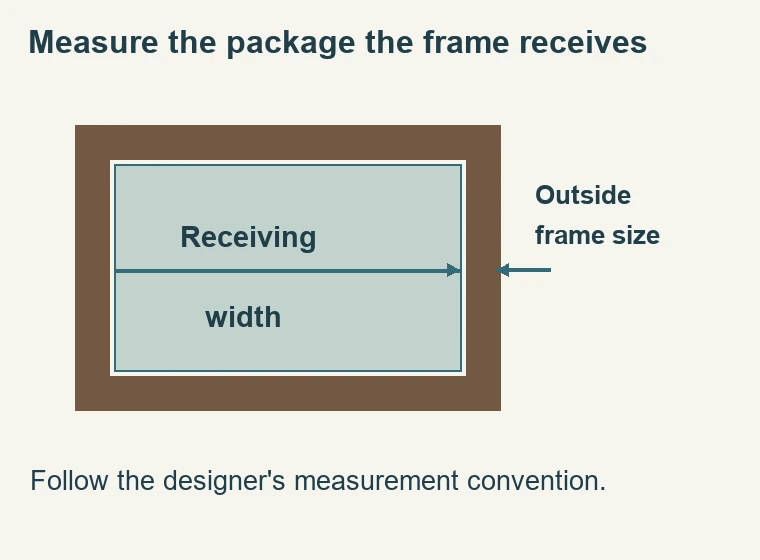
- Follow the designer's prompts for the combined frame-and-liner order. Start from the requested artwork measurements and follow the system's sizing convention for the liner and outer frame. Do not add the visible liner width to the artwork dimensions unless the current ordering instructions explicitly request that calculation. Otherwise the same added space can be accounted for twice.
- If you already own an outer frame, provide its actual receiving dimensions and usable depth rather than only its outside measurements. A separate liner must fit that existing opening while receiving the artwork. The fit cannot be established from the visible front width alone. Ask whether the intended liner profile and the existing frame can be combined before ordering a component that may be attractive but physically incompatible.
Check depth and retention as well as width
- The liner and outer moulding each have a profile. Their relationship determines where the artwork and the back of the assembly sit. A front-facing sample does not show every usable depth or screw location. Confirm the complete arrangement for the selected artwork thickness. A tall outer frame is not by itself evidence that the nested liner-and-artwork package will be retained in the intended way.
- For a stretched canvas, the retaining method must act on the appropriate structural parts of the canvas and frame assembly. Do not drive a screw through the painted fabric or assume that any supplied screw is safe at any location. Check the actual path and available material. If offset clips or another method are required, select their size for the final back position rather than from the artwork's nominal depth alone.
- A fabric liner is not a substitute for every other package component. If the artwork requires glazing, backing, separation, or a particular attachment method, those requirements remain part of the design. Confirm how the selected liner is intended to be used with those components. Use with paintings does not establish that every kind of paper artwork can be placed directly against any fabric-covered liner.
Confirm what arrives assembled
- Confirm liner installation in the current combined frame-and-liner order. That is the scope of the frame-to-liner assembly. Your artwork is a separate object unless the order specifically includes a fitting service. Review the current order summary to establish the supplied hardware, other components, and work remaining after delivery. Do not infer a complete installed artwork from the word assembled.
- If ordering the parts separately, confirm who is responsible for the liner-to-frame fitting and what the compatible attachment requires. A loose liner and a combined assembly are different deliverables. Keep the dimensions and product selections together so the supplier can assess the nested fit. This is especially useful when replacing one component in an existing frame rather than ordering a coordinated combination from the current designer.
- Hanging hardware is another separate question. The final framed artwork can have different weight and outside dimensions from the empty outer moulding. Choose the hanging arrangement for the completed assembly and intended display. Artwork retainers, liner attachments, and wall-hanging fittings perform different jobs; the presence of one type on the back does not prove that the others are included or suitable.
Inspect the assembly before installing the artwork
- Confirm the selected fabric appearance and outer frame finish.
- Inspect the liner corners and the fabric face for visible damage or marks.
- Check that the liner is seated consistently within the outer frame.
- Measure the artwork receiving opening and compare it with the order.
- Dry-fit the work without forcing it and check the planned back position.
- Confirm the remaining retainers, backing, and hanging components before completing the installation.
Handle the liner face with clean hands or suitable clean gloves and keep it away from dirty work surfaces. Do not use a cleaning chemical merely because it is suitable for the outer moulding or glazing. Fabric and finishes need their own care instructions. If the delivered face is marked, document the problem and ask about the correct remedy rather than rubbing or wetting the fabric in an attempt to hide it.
Keep the completed design record for future work: artwork dimensions, liner selection, outer frame selection, and any depth or fitting notes. A front photograph is helpful for appearance, but it may conceal the nested openings and attachments. Those documented details make a replacement or matching companion piece easier to assess. They also preserve the important distinction between the artwork size and the larger component received by the outer frame.
Made in the USA
Handcrafted by American framing experts
Family Owned
Serving customers for over 40 years
Premium Shipping
Professionally packaged for safe delivery
Ready to Hang
Hardware included with all frames
Framing Specialists
Over 40 years of custom framing experience
