
Ok

Ok

What is the question
Cancel
PICTURE FRAMES
 CUSTOM PICTURE FRAMES
Design Your Framing Package Online!
Add Mats, Glass & Acrylic, Mounting Board And More.





Search
☰

My Account
Log In
Favorites
Saved Designs
Shopping Cart
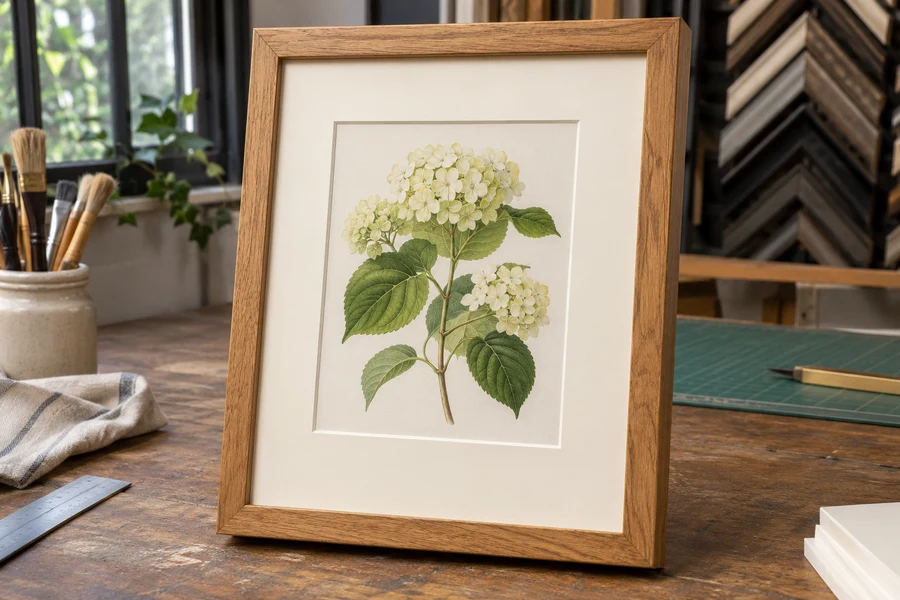
A single mat uses one sheet of mat board with a window cut for the artwork. Compare face color, visible core, opening dimensions, and the complete framing package.
Watch: What Is a Single Picture Mat?
One sheet, with a window for the artwork
Each single mat is one sheet with an opening, whether its face is orange, dark, white, or another selected color. A single mat can have a colored face and a differently colored exposed core at the bevel. That core line does not make it a double mat.
Single refers to the number of layers, not the number of openings. Decide the layer construction separately from whether your project needs one image window or several.
What belongs to a single mat?
| Part | Its job | Specify separately |
|---|---|---|
| Face | Provides the broad visible border. | Board selection and border widths. |
| Window | Defines the visible artwork area. | Crop, paper overlap, and any signature or margin to show. |
| Bevel | Forms the cut edge around the window. | Core appearance and standard or reverse treatment. |
| Backing and mounting | Support and locate the artwork behind the mat. | These are additional package decisions, not another name for the mat. |
Plan the opening, border, and bevel
- Choose the visible image area and the overlap needed to cover the paper edges.
- Set the border width and outside size to suit the intended frame and presentation.
- Compare face colors around the actual image, using separate samples.
- Check whether the visible bevel line adds useful separation or whether you prefer a reverse bevel.
A strong face color occupies the whole border in a single-layer design. If you want just a small amount of that color, compare a double mat with an inner reveal.
Measure before ordering
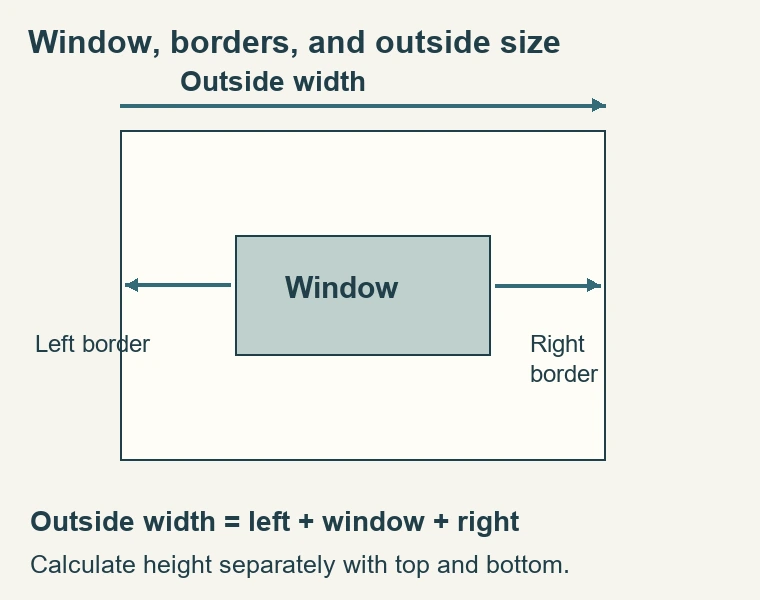
The mat opening, the paper size, and the outside mat size are different measurements. Use the mat-measuring guide to establish them. A single mat still needs a suitable complete framing package; one sheet of mat board does not replace backing or retaining hardware.
For the visual effect of adding layers, use the single, double, and triple comparison. Then preview your design with custom picture mats.
Use one layer deliberately
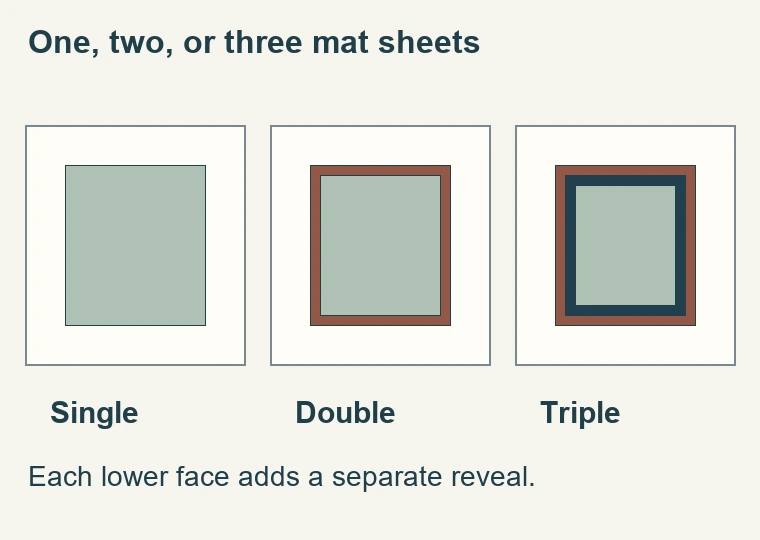
- A single mat is a complete design choice, not an unfinished double mat. Its broad face gives the image surrounding space while its window defines the visible crop. Because there is no lower face-color reveal, the relationship among the artwork, face color, bevel, and outer frame is especially direct. Choose those elements together. A plain border can be useful when the image already contains detailed edges, strong contrast, or a printed border of its own.
- Plan the single mat as part of the complete framing package. It does not mean that every artwork needs a mat or that a single mat suits every package. First determine whether the work should have an overlapping window at all, then decide how that window should appear. An artwork whose entire paper edge must remain visible may require a different presentation and mounting plan.
- Compare a single mat with no mat before adding decorative layers. A useful surrounding area can make fine image detail easier to read without introducing another accent color. On the other hand, a close-framed graphic image may not benefit from a broad border. The decision should come from the artwork and the intended display. The construction name tells you the number of layers; it does not establish the correct appearance for the picture.
Establish the window before choosing the border
- Identify what must remain visible: the picture, any surrounding paper margin, a signature, an edition number, or a printed title. These can extend beyond the main image rectangle. Measure that intended visible area and inspect the sheet edges. Do not assume the full paper dimensions should become the window dimensions, because a conventional mat usually overlaps the work rather than simply exposing an unsupported sheet through an oversized hole.
- Use a temporary paper window if the crop is uncertain. Keep the test material clean and avoid adhesive on the artwork. Check every side and the corners, where important detail can be easy to overlook. A measurement that seems adequate along the centers may still cover a signature placed close to a corner. Make the crop decision with the actual image upright, rather than relying entirely on a list of dimensions.
- Once the window is chosen, set the outside dimensions and borders. For equal borders, add the chosen border twice to each window dimension. An illustrative 8-by-10-inch window with two-inch borders produces a 12-by-14-inch outside mat. That calculation describes a layout only. Any overlap or supplier allowance must be established through the designer's instructions rather than added or subtracted a second time from the same numbers.
Compare the face and core around the actual picture
- A face color occupies the entire visible border in a single mat, so a strong color has a larger role than a thin lower reveal in a double mat. Place a sample beside the image and frame corner. Notice whether it supports the picture or becomes the most prominent part of the arrangement. A color taken from a small detail in the image can look very different when expanded into a broad surrounding field.
- Light mats, dark mats, and colored mats should be judged in the intended lighting and at viewing distance. There is no requirement that a mat match the wall or repeat a particular image color. Consider the whole presentation, including the frame finish and profile. If the effect feels too forceful, first try a quieter face or different border width before assuming a more complex layered design is necessary.
- The exposed core at a standard bevel adds a fine outline even though only one sheet is present. A white-core mat with a dark face can show a strong light line. A reverse bevel changes how that edge is seen. Choose the edge treatment consciously and confirm the actual board's core appearance. Face color, core color, and cut direction are three related decisions, not three physical mat layers.
Specify the board and the rest of the package
- Verify the selected mat's material properties where it contacts the artwork. A clean white face is not evidence that the board is archival, and a colored face is not evidence that it is unsuitable. Use the board's actual specification. If the work needs acid-free contact materials, carry that requirement through the mat, backing, and other paper or fabric in contact with it rather than treating the visible border as the only relevant component.
- Plan the artwork attachment behind the mat. The window can conceal edges and help locate the presentation visually, but it does not automatically provide a suitable mounting method. Choose an attachment appropriate to the work and any need for future removal. Avoid relying on a tightly compressed sandwich to hold loose artwork in position. The support and the visible window should work together without asking one to replace the other.
- Include glazing, backing, and any additional separation in the depth check. One mat layer is thinner than a stack of the same board in two or three layers, but that does not prove the whole package fits every frame. Measure the usable rabbet and consider the retaining hardware. A shallow moulding can still be inadequate for a single-mat arrangement if the other required components occupy the available depth.
Inspect the single mat during fitting
- Place the mat over the artwork without permanent attachment and confirm the crop.
- Inspect the face, bevel, and corners for marks, torn edges, or cutting defects.
- Confirm that the outside mat dimensions fit the frame's receiving opening.
- Complete the planned artwork attachment and backing arrangement.
- Clean and fit the glazing using the care instructions for the selected material.
- Check the front before retaining the package, then check again after the retainers are installed.
If the image appears off-center, distinguish an uneven printed margin from an incorrectly positioned mat window. The picture may not be centered on its sheet even when the paper is square in the frame. Judge the intended visible composition and compare it with the measurements recorded before ordering. Moving the whole package around is not always the correct response to a layout that was measured from the wrong reference edges.
If the mat will not sit flat, inspect what is underneath it before pressing down. A folded hinge, debris, an uneven backing edge, or a component catching the frame can affect the stack. Retaining hardware should not be used to flatten a problem that can be corrected while the package is open. Keep the work supported and resolve the cause rather than accepting a distorted border because only one layer is involved.
Common single-mat questions
Can a single mat have more than one opening?
Yes. The word single describes the layer count. Several windows in one sheet are a separate layout choice. Record each window's size and position, along with the spacing between them and the outside dimensions. Make sure the mounting and backing arrangement supports each artwork. Do not confuse a multiple-opening design with several mat layers simply because the face contains several visible rectangles.
Does a groove make it a double mat?
No. A V-groove is a shallow cut in the face of the existing board. A double mat uses another sheet. The groove can introduce a fine contrasting core line, but its decorative appearance does not change the physical layer count. Specify the groove separately if you want that treatment, and keep its position independent of the window crop and outside size.
When should a second layer be considered?
Consider it when a controlled lower color band would serve a specific visual purpose that the single face and bevel do not provide. Compare the result with the same artwork and upper border so the additional layer can be judged fairly. If the single mat already gives the image appropriate space and definition, there is no need to add another layer merely to make the construction more elaborate.
Keep the final board, window, outside dimensions, and bevel preference with the order. Those details are more useful for a future matching piece than the phrase 'single white mat' alone. The same broad description can refer to different core appearances, thicknesses, borders, and material properties. A clear specification makes a simple design repeatable and helps the framer deliver the presentation you actually selected.
Made in the USA
Handcrafted by American framing experts
Family Owned
Serving customers for over 40 years
Premium Shipping
Professionally packaged for safe delivery
Ready to Hang
Hardware included with all frames
Framing Specialists
Over 40 years of custom framing experience
