
Ok

Ok

What is the question
Cancel
PICTURE FRAMES
 CUSTOM PICTURE FRAMES
Design Your Framing Package Online!
Add Mats, Glass & Acrylic, Mounting Board And More.





Search
☰

My Account
Log In
Favorites
Saved Designs
Shopping Cart
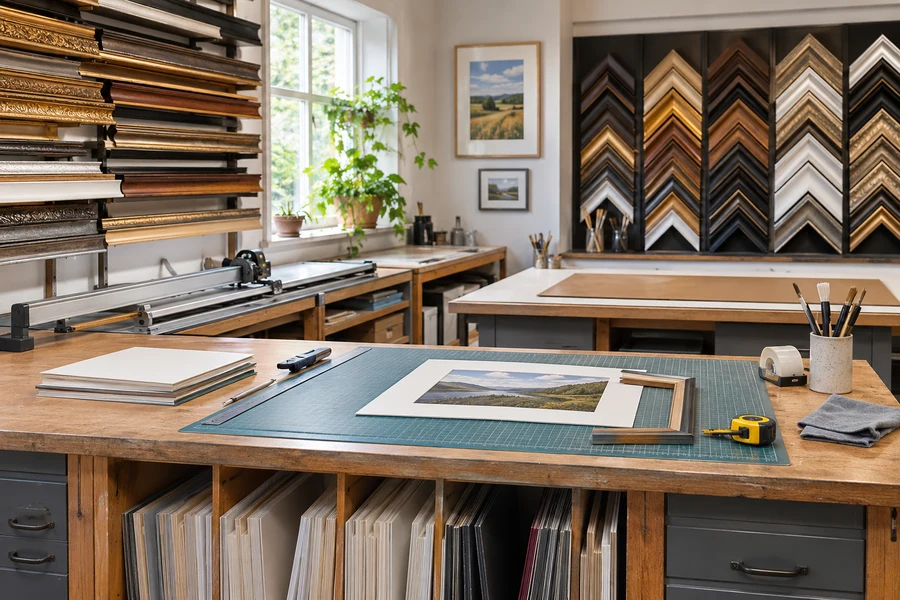
Custom framing connects material selection, cutting, mat preparation, glazing, fitting, and packing. Prepare the information each stage needs so the finished order fits the artwork.
Watch: Tour the WebPictureFrames Custom Frame Shop
Materials storage and frame cutting
Custom framing starts with stored moulding lengths and sheet materials, then moves through cutting, joining, and package preparation. Components for custom wood frames, matboard, glazing, backing, and packaging serve different jobs and need different measurements.
Seeing the moulding before it becomes a frame explains why custom dimensions and profile choice are separate parts of an order. The profile must suit the artwork visually and provide the physical depth needed for the complete package.
For the manufacturing sequence, read how a wood frame is cut and joined.
Connect each shop stage with your order
| Work area | What it illustrates | Information to prepare |
|---|---|---|
| Moulding storage | Lengths of frame material before cutting. | Selected profile and verified material, finish, and depth. |
| Cutting workstations | Components are made to a specified receiving size. | Actual artwork or package measurements using the designer's convention. |
| Mat, glazing, and fitting areas | The inner package has separate preparation stages. | Window layout, glazing properties, support, and mounting. |
| Packing area | A frame still needs protection for transport. | What is supplied assembled and what fitting remains. |
| Showroom and customer areas | Physical samples support design comparisons. | Questions about finish, scale, and current services; confirm visiting arrangements separately. |
Mat, glazing, and fitting work areas
Mat preparation, glazing, and artwork fitting require their own clean work surfaces and checks. These stages are separate from cutting the outer moulding: the window, receiving size, material properties, and package depth must agree before final assembly.
Choose components for their actual jobs: compare glass and acrylic, backing boards, and custom picture mats. Use the mat decision guide when the presentation is still uncertain.
Customer work areas and frame samples
Physical frame-corner samples help compare a profile with the artwork. Look at face width, finish, sheen, contour, and depth separately. A sample can clarify appearance under room lighting while the current product specification supplies the verified material and dimensions.
Confirm current visiting arrangements and any requested service with our framing team. Workshop layouts and available services can change; an order should rely on current product and service information.
Prepare a clearer framing order
Start with artwork dimensions and condition; decide whether a mat is wanted; choose glazing and backing; and check the complete depth against the frame rabbet. Compare a frame sample beside the artwork when finish or scale is uncertain.
Before ordering, read what to order with a picture frame so the frame, components, and fitting responsibilities are clear.
Understand the stages behind an order
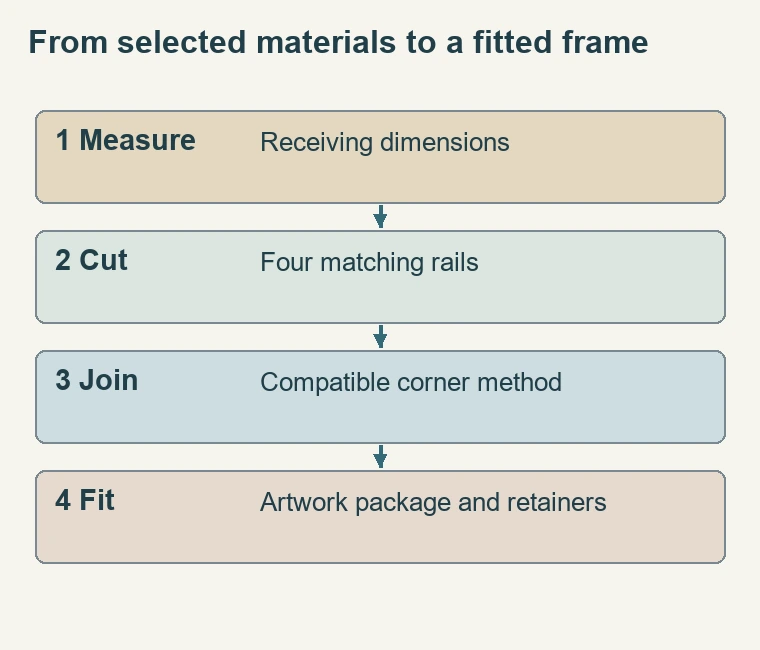
- A finished frame connects several different decisions and operations. Selecting a moulding establishes the visible outer border and the recess available to receive the work. Cutting and joining turn its lengths into a rectangle. Mat preparation, glazing, mounting, backing, and retention complete the inner package where required. Keeping those stages explicit makes it easier to specify an order and identify what remains to be fitted after delivery.
- Prepare the order around the actual artwork and current product information. Confirm current services and visiting arrangements directly when those details affect the project. The practical value of understanding the workflow is knowing which measurements and choices each stage needs, rather than assuming the shop can infer every hidden requirement from a picture of the finished design.
- A broad choice of materials does not make all frames physically interchangeable. Compare the product specifications for each selected moulding rather than inferring material, species, origin, or depth from its general appearance. A frame that looks appropriate around the image must also accommodate the complete artwork package and an appropriate retaining arrangement. Treat visual balance and physical capacity as separate checks.
Materials storage comes before a finished frame
- Custom framing uses different storage and preparation arrangements for different materials. Long moulding lengths, flat sheet materials, and packaging occupy different spaces because they enter different stages of the work. That distinction helps explain why the order must identify more than a frame color. The selected moulding, glazing, mats, backing, and packing plan are separate parts that must come together.
- Moulding stored as lengths has not yet become a frame at your artwork dimensions. The chosen profile must first be measured and cut, then joined. A sample corner can show its face width, shape, finish, and the way a miter looks, while the product specification supplies the relevant material and depth details. Use both sources when deciding whether a moulding is visually suitable and physically adequate.
- Confirm current availability of the chosen profile or sheet before finalizing the rest of the package. If a sample is needed to judge finish or scale, make that decision early enough that dimensions and components are not built around an unconfirmed appearance. Keep the selected product reference with the design so a similar-looking alternative is not substituted without reviewing its dimensions and material.
Cutting stations translate measurements into components
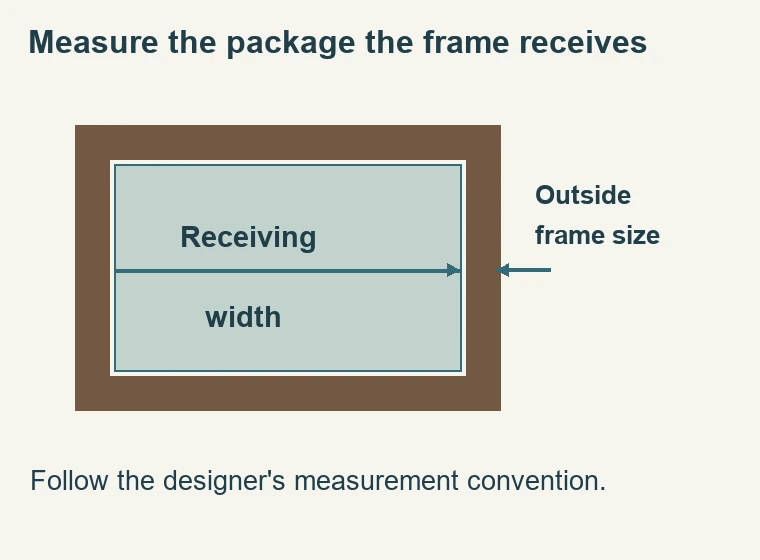
- Accurate receiving dimensions connect the design to the cutting stage. A number can describe the visible image, paper sheet, mat outside size, or outside moulding measurement, and those are different rectangles. Establish the package the frame must receive before entering dimensions into the designer. Use the requested reference edges and ask for clarification before manufacture if the ordering convention is uncertain.
- For a matted print, the receiving package can be larger than the artwork's image area. For a stretched canvas, the physical object and its thickness matter. A linen liner or another nested component changes the relationship again. Use the relevant measuring and ordering guide for the actual construction. Do not add an assumed cutting allowance to the requested receiving dimensions.
- Industrial cutting and joining equipment requires its own operating instructions and trained use. This overview does not supply blade settings, guarding arrangements, pressure, or fastener schedules. Use the cutting-and-joining overview to understand the manufacturing stages. For home dovetail assembly, follow that frame's dedicated method rather than adapting a different joining system.
Mat, glazing, and fitting areas prepare the package
- The cleaner work areas contain broad tables, sheet-material storage, cutting equipment, and frame stock. These stages are distinct from cutting the outer moulding. Mats require a deliberate window and outside size. Glazing needs the required receiving dimensions, protection properties, and viewing finish. Backing and mounting support must suit the artwork and the available depth. Each decision has a separate purpose even when all components arrive in one order.
- This is where the difference between visual fit and physical fit becomes particularly important. A broad mat and a deep stack may look balanced in a preview while exceeding the chosen frame's usable rabbet. Conversely, a deep frame can accommodate the package while looking out of proportion with the image. Check actual component thicknesses and visual samples independently so success in one area does not hide a problem in the other.
- Plan the artwork attachment as part of that package. A mat window is not automatically a mounting system, and a backing board does not identify an adhesive method. Decide how the work will be supported, located, and removed if required. Verify the contact materials and glazing properties from their current specifications. Those choices must be made for the particular artwork.
Packing is another stage after manufacture and fitting
- A completed frame still needs protection for movement. Outside frame dimensions, glazing material, finish, protruding fittings, and whether artwork is installed all affect the object that must be packed. Measure the actual finished object, including its depth. Original image size alone does not describe the shipping footprint or the cushioning space needed around it.
- Distinguish the contents of the order from the transport package. A joined frame may be shipped without artwork, while a completed framed work has different internal fitting considerations. Confirm which components are supplied and which steps the recipient will complete. Do not infer that a joined frame includes artwork installation unless the order explicitly includes that work.
- If you later ship a completed artwork yourself, use the dedicated packing guide and assess the actual item against current carrier requirements. Glass, oversized work, and valuable art can require different packaging and specialist assessment. The useful connection is the separate planning stage: manufacture, fitting, and packing each have their own checks.
Samples and customer areas support design decisions
- Frame-corner samples connect catalog specifications with appearance beside the actual artwork. A finish can look different under room lighting than on a screen, and a profile's face width is easier to judge at the image's real scale. Use a sample when color, texture, sheen, or proportion remains uncertain. Check the technical dimensions as well; an attractive front view does not establish the usable recess behind it.
- Prepare questions before contacting the framing team. Identify the artwork medium where known, its condition, the intended display, and which components you already have. If the question concerns a replacement, include the existing receiving dimensions and package thickness rather than only the visible image size. That information makes it easier to discuss an appropriate product or service without guessing at hidden construction.
- WebPictureFrames is a family-owned framing business with more than 40 years of practical framing experience. Use that experience for concrete decisions: selecting a moulding that suits the complete package, understanding custom dimensions, comparing samples, and clarifying fitting responsibilities. Keep the final choices tied to verified product information and the actual artwork rather than relying on a general quality adjective to answer a technical question.
Prepare an order that connects all the stages
- Identify the artwork, its actual dimensions, thickness, and relevant condition concerns.
- Decide which image area, margins, and signature must remain visible.
- Choose whether a mat, liner, or another presentation component is wanted.
- Select glazing by the required protection, viewing, and handling properties.
- Specify backing and artwork attachment separately.
- Check usable frame depth against the complete package.
- Use samples where finish or scale remains uncertain.
- Confirm what arrives assembled and which fitting or hanging work remains.
Keep those selections together rather than making isolated choices at unrelated times. A later change in mat layers can alter depth; a different glazing can alter thickness and handling; an added liner changes sizing. Review the whole package whenever one of those decisions changes. Keep the relationship explicit: materials are prepared for a specific construction, not combined randomly at the final table.
For a future matching piece, retain the measurements and selected product references with photographs of the finished presentation. A picture alone may not show hidden depth, contact materials, or assembly scope. Clear records make the next discussion with the framing team more precise. Connect the manufacturing and fitting stages with a complete, accurately specified order.
Made in the USA
Handcrafted by American framing experts
Family Owned
Serving customers for over 40 years
Premium Shipping
Professionally packaged for safe delivery
Ready to Hang
Hardware included with all frames
Framing Specialists
Over 40 years of custom framing experience
